The latest blog entries are shown below. All entries are found under all journal entries.
I wanted to migrate my Home Assistant Operating System (HAOS) instance from a Raspberry Pi to an old PC that was apparently older than UEFI. HAOS only supports UEFI boot however. I had read about some community efforts to install Grub for BIOS on top of HAOS. This is not too difficult to do. What seems difficult is making this configuration stable across HAOS updates so that they, first of all work at all with the A/B update mechanism, and secondly, remain working even as HAOS changes across major releases. I took a different path, which is to make the PC quack like UEFI by inserting another bootloader stage before HAOS: Clover EFI Bootloader.
Clover is primarily used to make a PC look sufficiently like a Mac so that macOS can be installed and run. macOS has many dependencies on EFI which need to be emulated by Clover. Linux in contrast is much easier to boot, so most parts of Clover are not necessary for this hack and its configuration will be comparatively simple.
I eventually succeeded in booting a mostly unmodified HAOS Generic x86-64 in UEFI mode. However, I quickly realised that my intended use-case wouldn't work, which was to use the GPU in this old box for hardware accelerated video decoding and analytics in Frigate NVR. This is because HAOS doesn't include drivers for NVIDIA GPUs. (The GPU is much newer than the motherboard.)
So I scrapped that idea for now and thus cannot say whether this method works as intended long-term across updates. The installation succeeded though so I'm putting this out there as a "how I did it", not a "how to-guide".
All the steps are done from a Linux live CD (or USB etc.). I used Debian Live but any distro containing common system utilities should work.
Boot sequence with Clover
From the Clover Manual (PDF):
BIOS→Master Boot Record→Partition/Volume Boot Record→boot→CLOVERX64.efi→OSLoader
where the executable code in Master Boot Record and Partition/Volume Boot Record are parts of Clover, boot is an executable file in the EFI System Partition, also from Clover, and OSLoader is Grub for UEFI as shipped by HAOS.
Specifically, OSLoader will be /efi/boot/bootx64.efi from the ESP on the HAOS image.
The manual is detailed but somewhat difficult to read. The ArchWiki entry on Clover gives an overview that is easier to read.
Clover requires that the EFI System Partition is FAT32 and won't accept FAT12 or FAT16.
This is allegedly UEFI specification compliant (although I find that the UEFI specification is not very firm on this point), but many UEFI implementations are apparently fine with a FAT16 ESP.
The ESP in HAOS is formatted as FAT16.
I tried it and it didn't work.
I had to reformat it as FAT32.
Unfortunately, the ESP volume is too small to be valid FAT32 according to some sources (like mkfs.fat).
The HAOS ESP is exactly 32 MiB but the smallest valid FAT32 volume is a tad larger than 32 MiB.
How much larger depends on who you ask, and maybe which parameters are used during formatting (sectors per cluster etc.).
I guess it depends on which historic FAT32 implementations you want to be compliant with.
I haven't bothered to figure out the (most) correct answer.
What this means is that the ESP needs to be enlarged and subsequent partitions shifted over a bit. I made it 100 MiB. I didn't try formatting the ESP in-place as a 32 MiB FAT32 volume and see if Clover would accept it. If it does, then many of these steps are unnecessary. Again, this is how I did it, but if I did this again I would start by just reformatting the existing ESP.
Partitioning
I made a new GUID Partition Table with a 100 MiB ESP first and then eight more partitions corresponding to the layout on the HAOS image.
The partition layout is described in the Home Assistant Developer Docs, section Partitioning.
This was a mistake as HAOS requires at a minimum the partition unique GUID of the system partition to match the expected value from the image, as well as the filesystem label on the ESP to match.
Otherwise the HAOS boot sequence would fail at various stages due to not finding all its volumes.
I later had to fix this up using gdisk to copy the unique GUID from each partition on the image to the corresponding partition on my target disk, as well as the partition name for good measure.
Use gdisk command i to "show detailed information on a partition" such as the unique GUID and partition name on the image.
Use command c to "change a partition's name" on the target partition.
Use command x ("extra functionality (experts only)"), then command c to "change partition GUID" on the target partition.
Use mkfs.fat -F 32 to specifically make a FAT32 filesystem on the ESP, overriding the automatic choice between FAT12/16/32 that mkfs.fat would otherwise make.
fatlabel can be used to change the filesystem label on the ESP FAT32 filesystem.
Clover installation
Loop mount the Clover ISO at /clover_iso:
# mkdir /clover_iso
# mount -o loop /media/user/disk/Clover-5162-X64.iso /clover_iso
The commands from ArchWiki should generally apply, but these are the ones that I used.
Replace sdb with the target disk, the first volume of which will be the EFI System Partition.
Install boot0 and boot1 like this:
# cd /tmp
# cp /clover_iso/usr/standalone/i386/boot0af .
# cp /clover_iso/usr/standalone/i386/boot1f32alt .

# dd if=/dev/sdb count=1 bs=512 of=origMBR
# cp origMBR newMBR
# dd if=boot0af of=newMBR bs=1 count=440 conv=notrunc
# dd if=newMBR of=/dev/sdb count=1 bs=512
# dd if=/dev/sdb1 count=1 bs=512 of=origbs
# cp boot1f32alt newbs
# dd if=origbs of=newbs skip=3 seek=3 bs=1 count=87 conv=notrunc
# dd if=newbs of=/dev/sdb1 count=1 bs=512
Then copy the required files into the ESP filesystem:
# mkdir /esp
# mount /dev/sdb1 /esp
# cp -a /clover_iso/efi/clover/ /esp/EFI/
# cp /clover_iso/usr/standalone/i386/x64/boot6 /esp/boot
Don't worry about warnings from cp about not being able to copy metadata such as file ownership.
This is caused by using -a on a filesystem not supporting such attributes (FAT32).
Don't copy bootx64.efi from Clover.
This executable is only used when booting Clover from UEFI.
Which boot0 to use?
I don't think it matters too much actually.
ArchWiki suggests boot0ss which according to the Clover manual looks for a HFS+ partition signature.
If not found it falls back to the first FAT32 partition.
I used boot0af which checks the active partition first (I think this means the partition with the boot flag set).
If none, then it falls back to the EFI System Partition
These two variants should thus in practice both work in this case.
I think my ESP unintentionally does have the boot flag set, so the first check in boot0af would select it.
However, even if it didn't, then it should still be selected due to being the ESP.
Which boot1 to use?
Either boot1f32 or boot1f32alt is fine.
Both are for FAT32 volumes.
The difference is that the alt-version has a 2 second pause while it waits for user input to override which next stage to use.
HAOS installation
Loop mount partition 1 from the HAOS image and copy the entire /efi/boot from it onto the target ESP:
# losetup --show --find /media/user/disk/haos_generic-x86-64-15.2.img
/dev/loop1
# partprobe /dev/loop1
# mkdir /haos_esp
# mount /dev/loop1p1 /haos_esp
# cp -a /haos_esp/efi/boot /esp
/efi/boot contains the Grub UEFI executable and its configuration.
Copy HAOS partitions 2-9 onto the target disk using dd or whatever.
Configuring Clover
Clover will be configured to boot Grub without showing a menu. You may wish to pause here, reboot and verify that Clover with its default configuration starts and shows a GUI. See the section Unmounting and rebooting below for example commands. If it does, HAOS Grub can be manually started by entering a UEFI shell and typing:
fs0:
cd efi\boot
bootx64.efi
If instead there is a blinking cursor and no more progress, that is a sign that the pre-loader "boot" cannot be found.
This happened to me when the ESP was formatted as FAT16.
The boot file was there, but the stage 1 bootloader (in the Partition Boot Record) probably couldn't read the filesystem at all.
If successful then reboot into the live CD, mount the target ESP at /haos_esp and continue.
Or skip the previous part and continue without testing if feeling lucky.
Replace the contents of /haos_esp/efi/clover/config.plist with the following:
<?xml version="1.0" encoding="UTF-8"?>
<!DOCTYPE plist PUBLIC "-//Apple//DTD PLIST 1.0//EN" "https://www.apple.com/DTDs/PropertyList-1.0.dtd">
<plist version="1.0">
<dict>
    <key>Boot</key>
    <dict>
        <key>DefaultVolume</key>
        <string>hassos-boot</string>
        <key>DefaultLoader</key>
        <string>\efi\BOOT\bootx64.efi</string>
        <key>Fast</key>
        <true/>
    </dict>
    <key>GUI</key>
    <dict>
        <key>Custom</key>
        <dict>
            <key>Entries</key>
            <array>
                <dict>
                    <key>Hidden</key>
                    <false/>
                    <key>Disabled</key>
                    <false/>
                    <key>Volume</key>
                    <string>hassos-boot</string>
                    <key>Path</key>
                    <string>\efi\BOOT\bootx64.efi</string>
                    <key>Title</key>
                    <string>HAOS</string>
                    <key>Type</key>
                    <string>Linux</string>
                </dict>
            </array>
        </dict>
    </dict>
</dict>
</plist>
This is from the ArchWiki entry on Clover, section chainload systemd-boot, lightly edited.
Explanations:
- DefaultVolume and Volume identify the ESP volume, either based on its GUID or name. Not sure if name refers to the partition name or filesystem label. In the HAOS image they are the same, so best keep it that way.
- DefaultLoader and Path are the path to the EFI executable from the root of DefaultVolume or Volume, respectively.
- Fast is the option that disables the Clover GUI.
- I don't know what Type (Linux) is used for, or if the false options actually need to be set as such.
Unmounting and rebooting
I always carefully unmount anything I mount on a live CD before rebooting. Generally, do the opposite steps in the opposite order compared to when setting up:
# umount /haos_esp
# umount /esp
# umount /clover_iso
# losetup -d /dev/loop1
After a reboot with the configuration from the previous section Clover should automatically boot HAOS Grub without showing a GUI.
Hardware details
Probably not of interest to anyone, but in case it is the old PC has these specs:
- Asus P7P55 LX
- Intel Core i5-760
- GeForce 960
I'm watching modern era Doctor Who (2005-present) for the second time. Doctor Who is a TV series that is dear to me but at the same time somewhat uneven so for the benefit of future me and hopefully others I'm writing a short episode guide this rewatch.
I try to avoid spoilers as far as possible except when needed to justify my verdict or when spoiler warnings are well past their due date, such as which episodes have the Doctor reincarnate. Double episodes are combined into one review.
These are the entries published so far:
2025 update: This never worked reliably. Time Machine backups would only work a few times, then it would no longer recognize the destination. Deleting the backup and starting over helped, but only temporarily. In the end I gave up.
I recently upgraded Debian on my home server by means of reinstallation. Before this I had Netatalk set up to serve a directory over AFP to be used as the Time Machine backup target for the girlfriend's MacBook. In the beginning Time Machine only supported AFP for remote backups but since quite a few years now it can also use the SMB protocol version 3.
I figured that by now the relevant parts to support that server side ought to have been implemented in Samba, trickled down the distribution chain and with some luck ended up packaged in the latest Debian. That turned out to be correct and what follows is a summary of my configuration and findings during researching the correct settings.
Base configuration
You can find any number of online guides on how to set up a decent base configuration of Samba. The stock smb.conf shipped with Debian is pretty cluttered but contains mostly reasonable default values. These are the deviations from it that I made, in the [global] section:
interfaces = 127.0.0.0/8 br0
bind interfaces only = yes
I have multiple network interfaces for virtualization purposes and only
want Samba shares on one of them (br0). The man page for
smb.conf(5)
tells you that the loopback address must be listed in interfaces:
If bind interfaces only is set and the network address 127.0.0.1 is not added to the interfaces parameter list smbpasswd(8) may not work as expected due to the reasons covered below.
Microsoft has discouraged the use of the original SMB protocol for approximately 100 years now. I don't plan to use any devices that do not support SMB 3.0 so let's set that as the minimum version required:
server min protocol = SMB3_00
I then removed all the default shares (home directories and printers)
and added a few of my own. For each share I set a comment, path and
read only. I'm not sure whether the comment is necessary. The rest of
the parameters should be fine at their default values. I have given up
trying to get guest access to work and now have user accounts everywhere
instead.
User accounts
Simply run smbpasswd -a <username> for each user. The username should
already exist as a Unix user account (create it with useradd
otherwise). This allows the use of Unix filesystem permissions also for
SMB shares to make things simple.
Additional configuration requirements
We are not done yet. For Time Machine to accept an SMB share as a valid target a few Apple specific protocol extensions need to be enabled. These are needed to support alternate data streams (e.g. Apple resource forks) and are implemented in the Samba VFS module fruit. I recommend that you read through the entirety of the man page vfs_fruit(8).
Mind especially the following paragraph of the description:
Be careful when mixing shares with and without vfs_fruit. OS X clients negotiate SMB2 AAPL protocol extensions on the first tcon, so mixing shares with and without fruit will globally disable AAPL if the first tcon is without fruit.
For this reason I recommend placing some of the fruit configuration in the [global] section so that it affects all shares.
[global] section
To begin with the relevant VFS modules need to be enabled using the vfs
objects parameter. fruit is the module that implements the protocol
features. It depends on streams_xattr for storing the alternate data
streams in extended attributes, so that also needs to be loaded.
As an inheritance from Windows some characters (such as the colon :)
are illegal in SMB, while they are allowed on both macOS and Linux. This
means that in order to transfer them over SMB they need to be encoded
somehow, and Time Machine uses a private Unicode range for this. This is
totally fine, but can (allegedly) look a bit weird if listing the files
on the server. So, optionally the catia module can be used to reverse
this encoding server side.
The Samba wiki page Configure Samba to Work Better with Mac OS X tells me that the module order is important and that the correct order for these three modules is this:
vfs objects = catia fruit streams_xattr
Next, the fruit module needs to be told where to store the alternate data streams. The default storage is a file, which is slow but works with every filesystem. It can also use xattrs, but only with filesystems that support very large xattrs such as ZFS, the greatest filesystem that ever was or will be. As it happens, ZFS is what I use and thus I add:
fruit:resource = xattr
To tell fruit to reverse the encoding of the aforementioned illegal characters using the catia module, the following parameter must be set:
fruit:encoding = native
I also enabled fruit:copyfile which enables a feature that lets the
client request a server side file copy for increased performance. It is
not enabled by default and I cannot find a quotation why.
Per share configuration
The last part necessary is to mark a specific share as an allowed Time Machine target. This is done using the parameter
fruit:time machine = yes
Since Time Machine will fill the target with as many backups as there is space for before removing old ones it is a good idea to set a reasonable advertised limit. Note according to vfs_fruit(8) that this only works as intended when the share is used solely as a Time Machine target.
fruit:time machine max size = 1536G
While it is possible to place also these parameters in the [global] section, you probably don't want to allow all shares to be used as Time Machine destinations.
ZFS specific configuration
Extended attributes are enabled by default in ZFS (xattr=on). The default storage is directory based, which is compatible with very old (pre-OpenZFS) implementations. The last open source version of OpenSolaris (Nevada b137) as well as all OpenZFS versions as far as I am aware supports storing extended attributes as system attributes, which greatly increase their performance due to fewer disk accesses. To switch to system attributes:
zfs set xattr=sa <pool>/<filesystem>
Conclusion
That should be it! Restart smbd and nmbd (I never learned which service does what) to apply the configuration:
systemctl restart smbd nmbd
With a default Avahi configuration the configured volume should now appear as an available target in Time Machine.
It's been a while. I've recently migrated this site (back) to Ikiwiki. For the last few years this site was based on Grav. While the result was pretty enough, I found Grav to be a quite high maintenance CMS. I blame this mostly on the fact that Grav has decided to be a "stupid" PHP application. A stupid PHP applicaiton is installed and updated by visiting a website somewhere, manually downloading a ZIP archive and extracting it (on top of the old one).
Anyone who has used a Linux distribution knows that there is a better way to install and keep software up to date, and it is known as package management. PHP applications don't have to be stupid. It is perfectly possible to integrate them into the normal package management of any distribution which would make them as easy to update and maintain as any other package that is just "there" and just works.
Since I write here very rarely and irregularly, I've come to value low maintenance over most other benefits a CMS may have.
There are some other things I like about Ikiwiki:
Version control integration
Any CMS using flat files as storage can of course be version controlled. However, usually some degree of integration is desirable for smooth deployment. Ikiwiki has all this built in. For Grav I had to write a plugin, which I published here: grav-plugin-deploygit. I don't know if it still works or is still needed.
Static site generator
If I don't want to run it anymore, I can just disable and remove the Ikiwiki CGI. The web server would continue to serve the baked site, only the search function would stop working.
This also makes it very fast. Yes, a dynamic site server can also be fast, but a static one is fast by default.
Well-packaged in Debian
There is a list of all Ikiwiki instances on a system (/etc/ikiwiki/wikilist) which is used on package upgrades to refresh or rebuild everything as needed, making unattended upgrades possible and carefree. I don't think it is a coincidence that Ikiwiki's maintainers are or were Debian developers.
Domain-specific language with powerful primitives
Ikiwiki's directives like inline and map enable elaborate website
constructs and reduce the need for third-party plugins. I don't like
(third-party) plugins in general. Too often they don't work, and even if
they work today they may no longer work tomorrow as a result of being
developed separately from the base program.
On the other hand, making website features based on these primitives takes a lot of time and is bound to run into corner cases where they don't work like they should or the way you want. I have found that Ikiwiki is not an exception to this rule.
Issues with Ikiwiki
I alluded that this is not my first encounter with Ikiwiki. There was also a short period in early 2016 before Grav, and I had set up and used Ikiwiki on a job in 2014-2015. What made me go away was partly Ikiwiki's aforementioned corner cases where I couldn't make its directives work the way I wanted.
Another part was workflow issues. I mostly worked directly on the live site, pushing a commit for each update. This quickly made a mess of the revision history. The more sensible way of working with Ikiwiki is to have a local copy of the site that you can deploy to without committing to Git (alternatively, amending and force-pushing commits followed by a manual rebuild). That is essentially my current workflow. I might document it in more detail later, but it is similar to this.
Before 2016 I briefly used my home-cooked Python based CMS, which I wrote in 2013 and humbly named Writer's Choice. Its code is still available on Github.
Suppose, not entirely hypothetically, that you have a custom file type which is actually an existing type with a new file extension. Just for the sake of argument, let's say that the file type is Mozilla Archive Format (MAFF). This is actually a standard ZIP file which by its custom extension (.maff) is given a new purpose.
However, at least in Ubuntu 16.04 and earlier, there is no MIME type installed for MAFF. This causes programs like Nautilus that try to be smart about unknown file extensions to treat MAFF files like ZIP files, and suggest that they be opened in File-Roller. There doesn't seem to be a MIME type registered with IANA either. It is fairly easy to add a custom one though.
I'm writing this down mostly for my own reference. Since there is no standard MIME type for MAFF, I'll use application/x-maff which several sites on the internet (none authoritative though) suggests. First, put the following (adapting it to your needs) into a new file in ~/.local/share/mime/packages/something.xml. I don't think the file name is important, as long as it ends in .xml.
<?xml version="1.0" encoding="UTF-8"?>
<mime-info xmlns="http://www.freedesktop.org/standards/shared-mime-info">
  <mime-type type="application/x-maff">
    <glob pattern="*.maff"/>
    <comment>Mozilla Archive Format File</comment>
  </mime-type>
</mime-info>
Then run the following command to update the user specific MIME database.
$ update-mime-database .local/share/mime/
This will install the information above into
.local/share/mime/mimetype command:
$ mimetype 'Understanding the Xbox boot process_Flash structures - Hacking the Xbox.maff'
Understanding the Xbox boot process_Flash structures - Hacking the Xbox.maff: application/x-maff
Changes take effect in new Nautilus windows (in my testing), so close the existing windows and open a new one. Note that this is different from restarting Nautilus, as the process is usually still running in the background.
You could probably also do this change system-wide by placing the XML file in /usr/local/share/mime/packages/ (creating the directory if it doesn't exist) and updating the system-wide MIME database using:
$ sudo update-mime-database /usr/local/share/mime/
I prefer to keep such changes in my home directory though. My system is single-user anyway, and I reinstall the base operating system more often than I recreate my home directory.
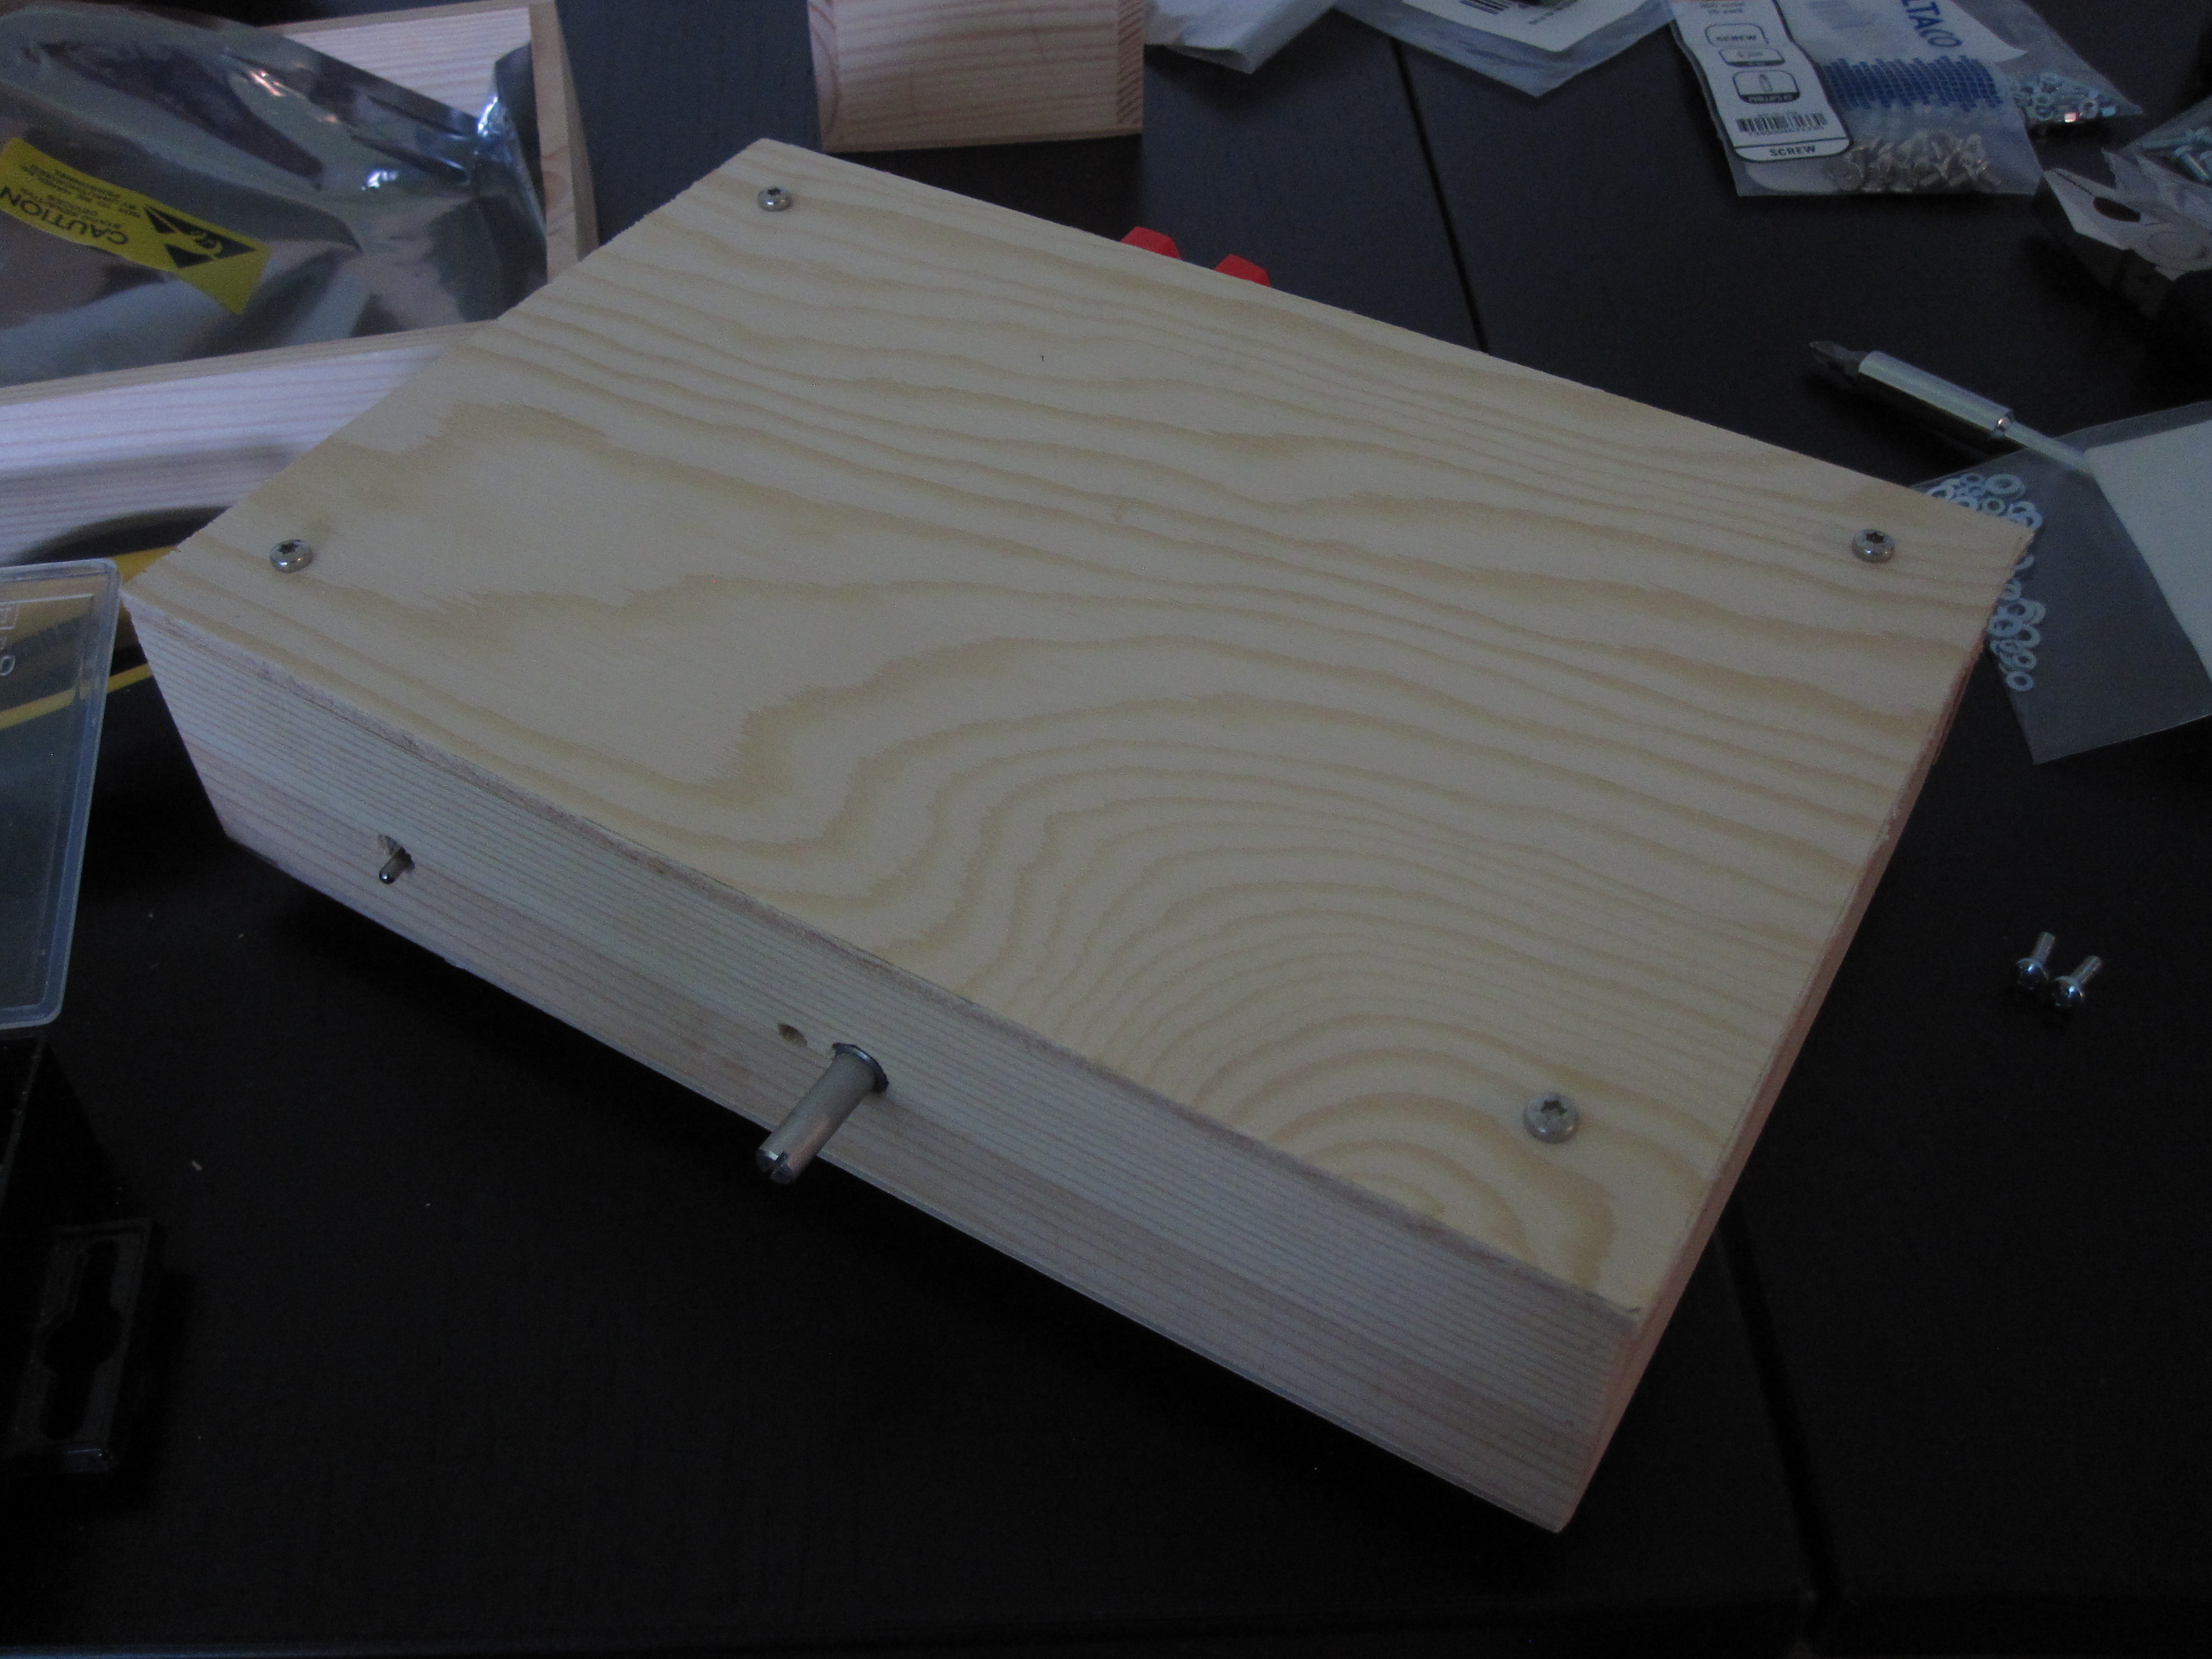
During the summer I built a wooden enclosure for the amplifier board I bought from HiFimeDIY. I will show the result rightaway and then go through the steps building it.
Design
I like the look of unpainted wooden cases and furniture in general. I also like electric appliances with visible screws to show that they are intended to be opened, serviced and hacked on. To keep the case together I opted to use metal standoffs between the top and bottom, as it would allow me to take the case apart repeatedly without damaging the wood like wood screws would. To lift it off the ground I used rubber feet that were screwed in place, reusing the screws for the standoffs.
Finally I would like to take this opportunity to make a political statement on screw heads. To clearly show that the screws on this case are intended to be turned more than once without breaking I used hexobular/Torx heads for all visible screws. As they can be hard to find in all sizes and lengths in tool stores I did cheat a bit and use more common Philips screws internally. All screws are M3 size for simplicity.
Tools
This is basically my first woodworking project so I didn't have a lot of tools suitable for processing wood before I started. Since I wasn't sure whether I would like it I didn't want to spend too much on tools. But on the other hand I didn't want to waste money on too crappy tools that would fall apart while I was using them or just after the completion of this project, in case I did want to do more woodworking projects. For this reason I chose to use hand tools only, since research and experience from other non-woodworking projects tell me that good power tools will typically cost a lot unless they can be found second-hand.
I settled for the Clas Ohlson COCRAFT series for most of my tools. I have found that they provide good value in general. The exception is the sharp tools (knife, drill bits) were I spent a little more to get quality hardware. These were the ones I ended up using:
- Jigsaw
- Hand cranked drill. I bought slightly nicer Bosch wood drill bits.
- Two small clamps
- Morakniv crafting knife
- Set of small metal files
Materials
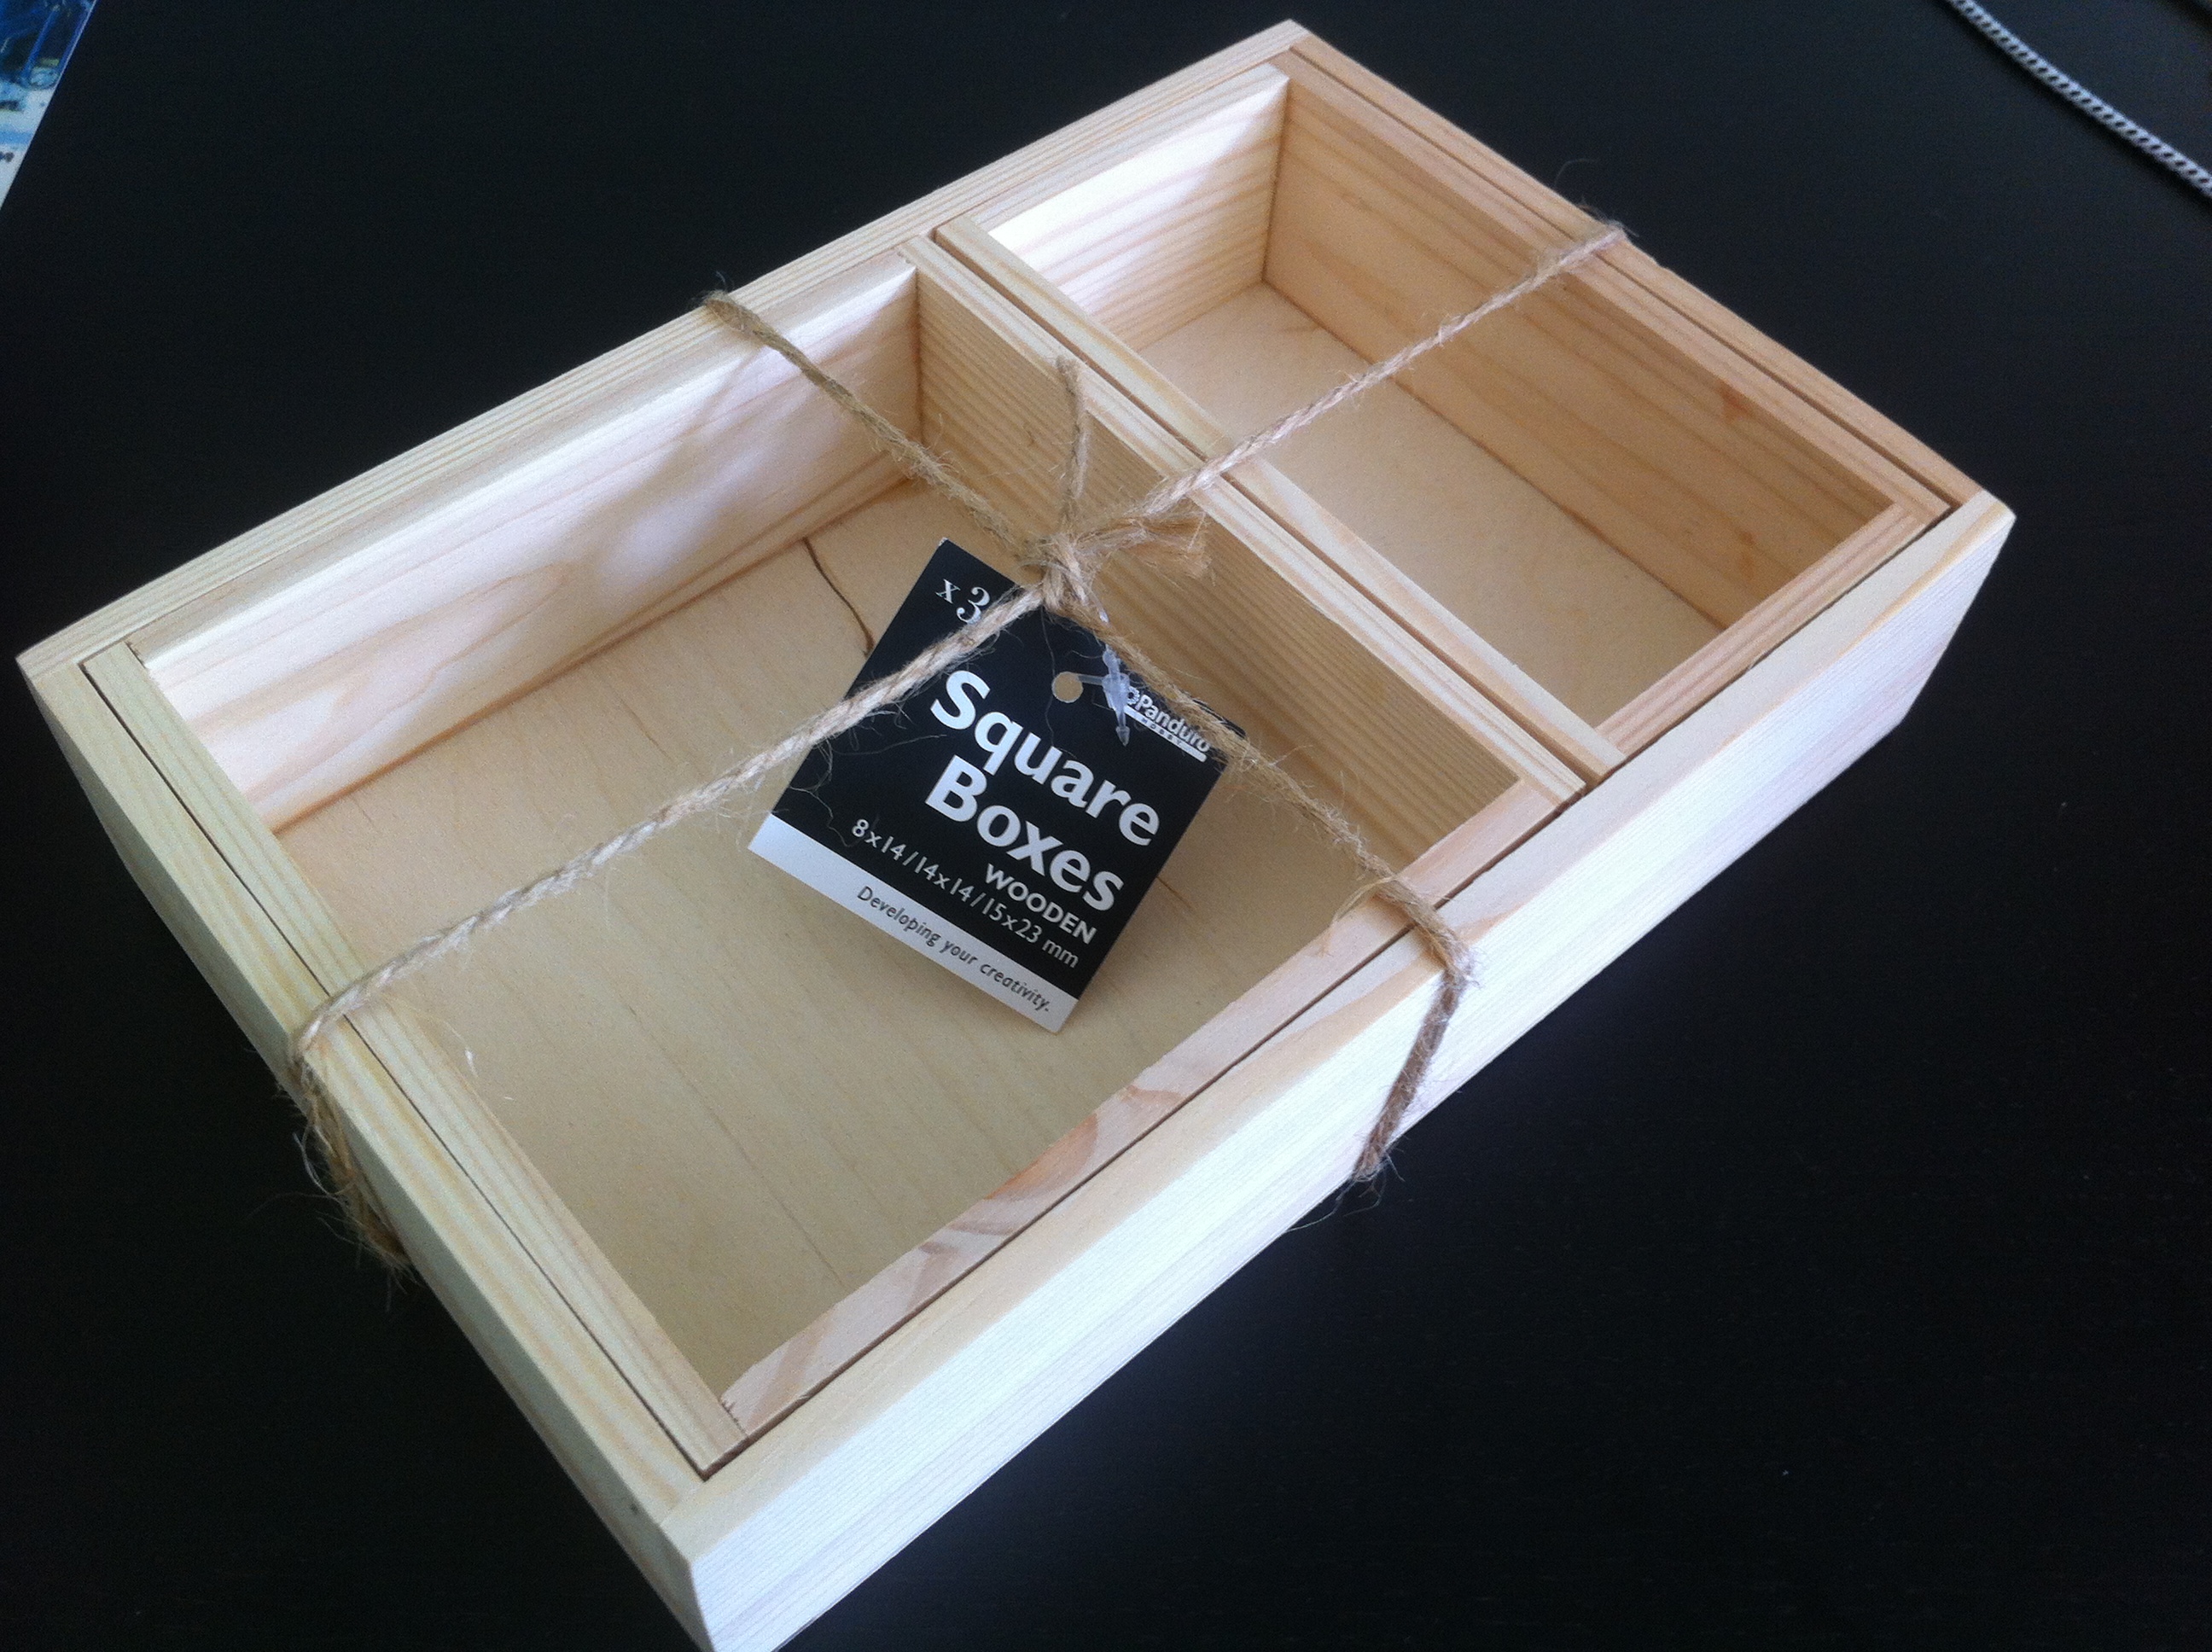
I found these nice small wooden boxes for not too much money, of which I used the largest 15x23 cm box in this project.
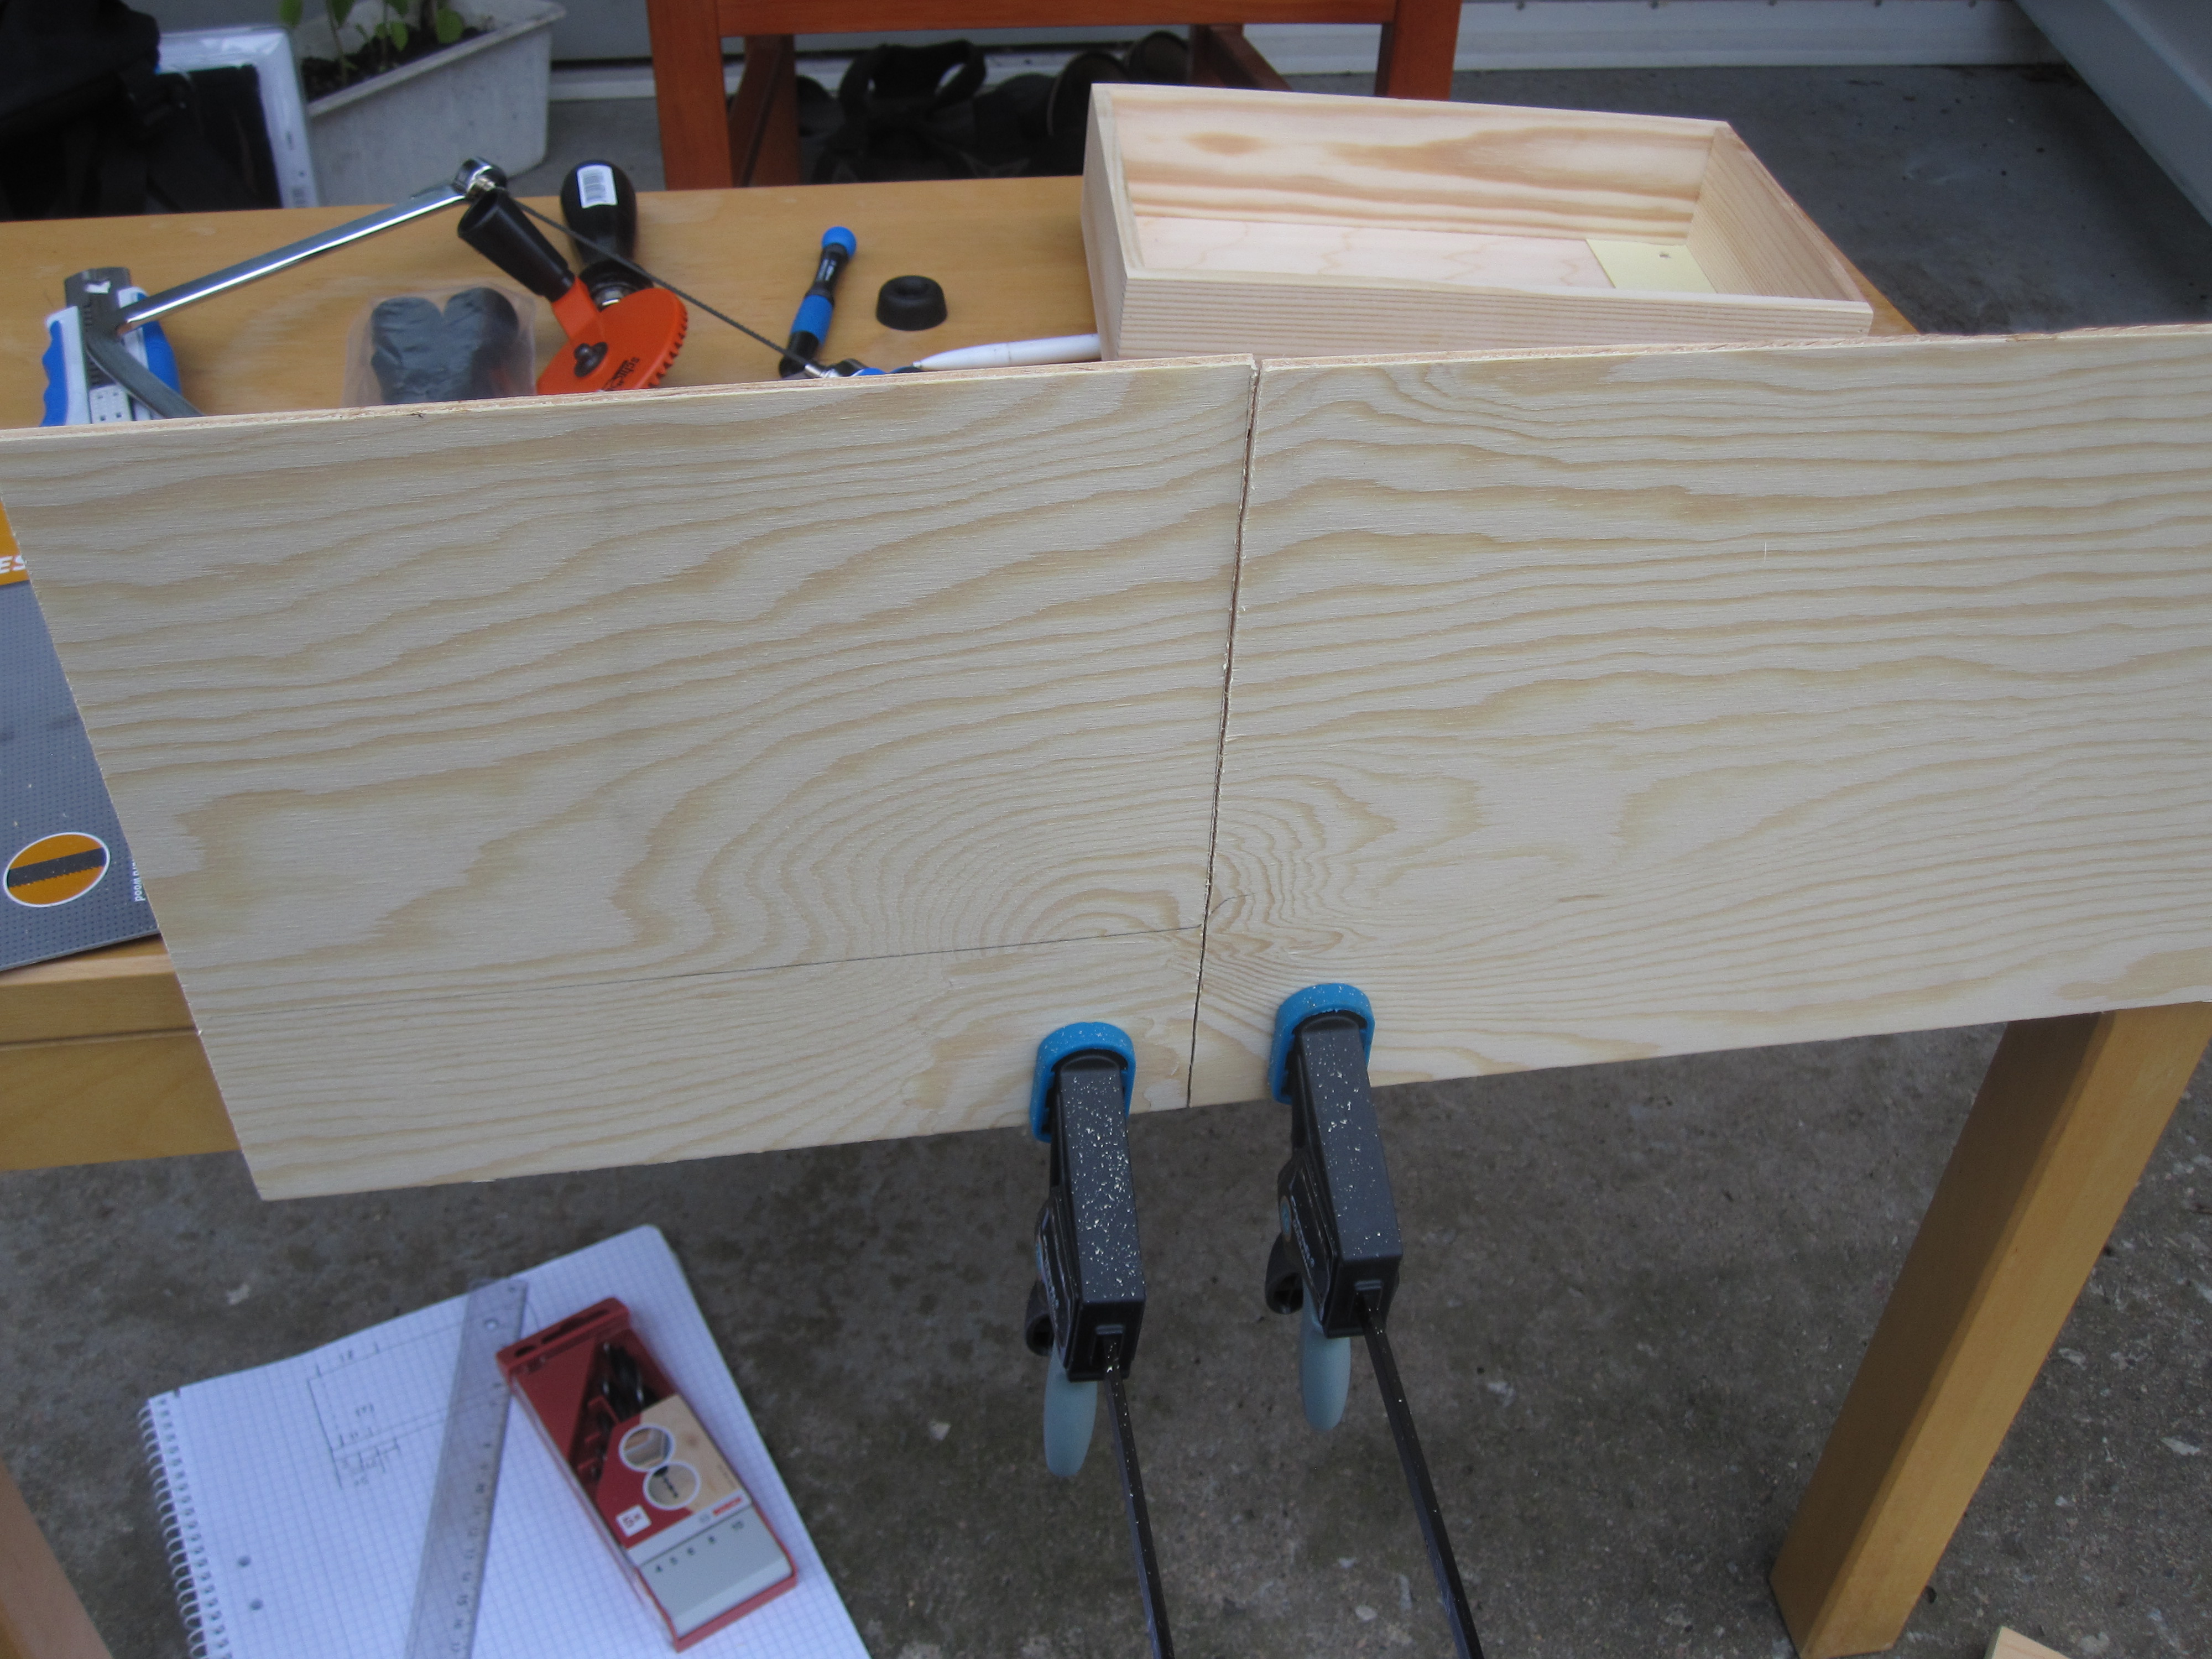
As the lid I got a small plywood board for free from a carpentry store waste pile.
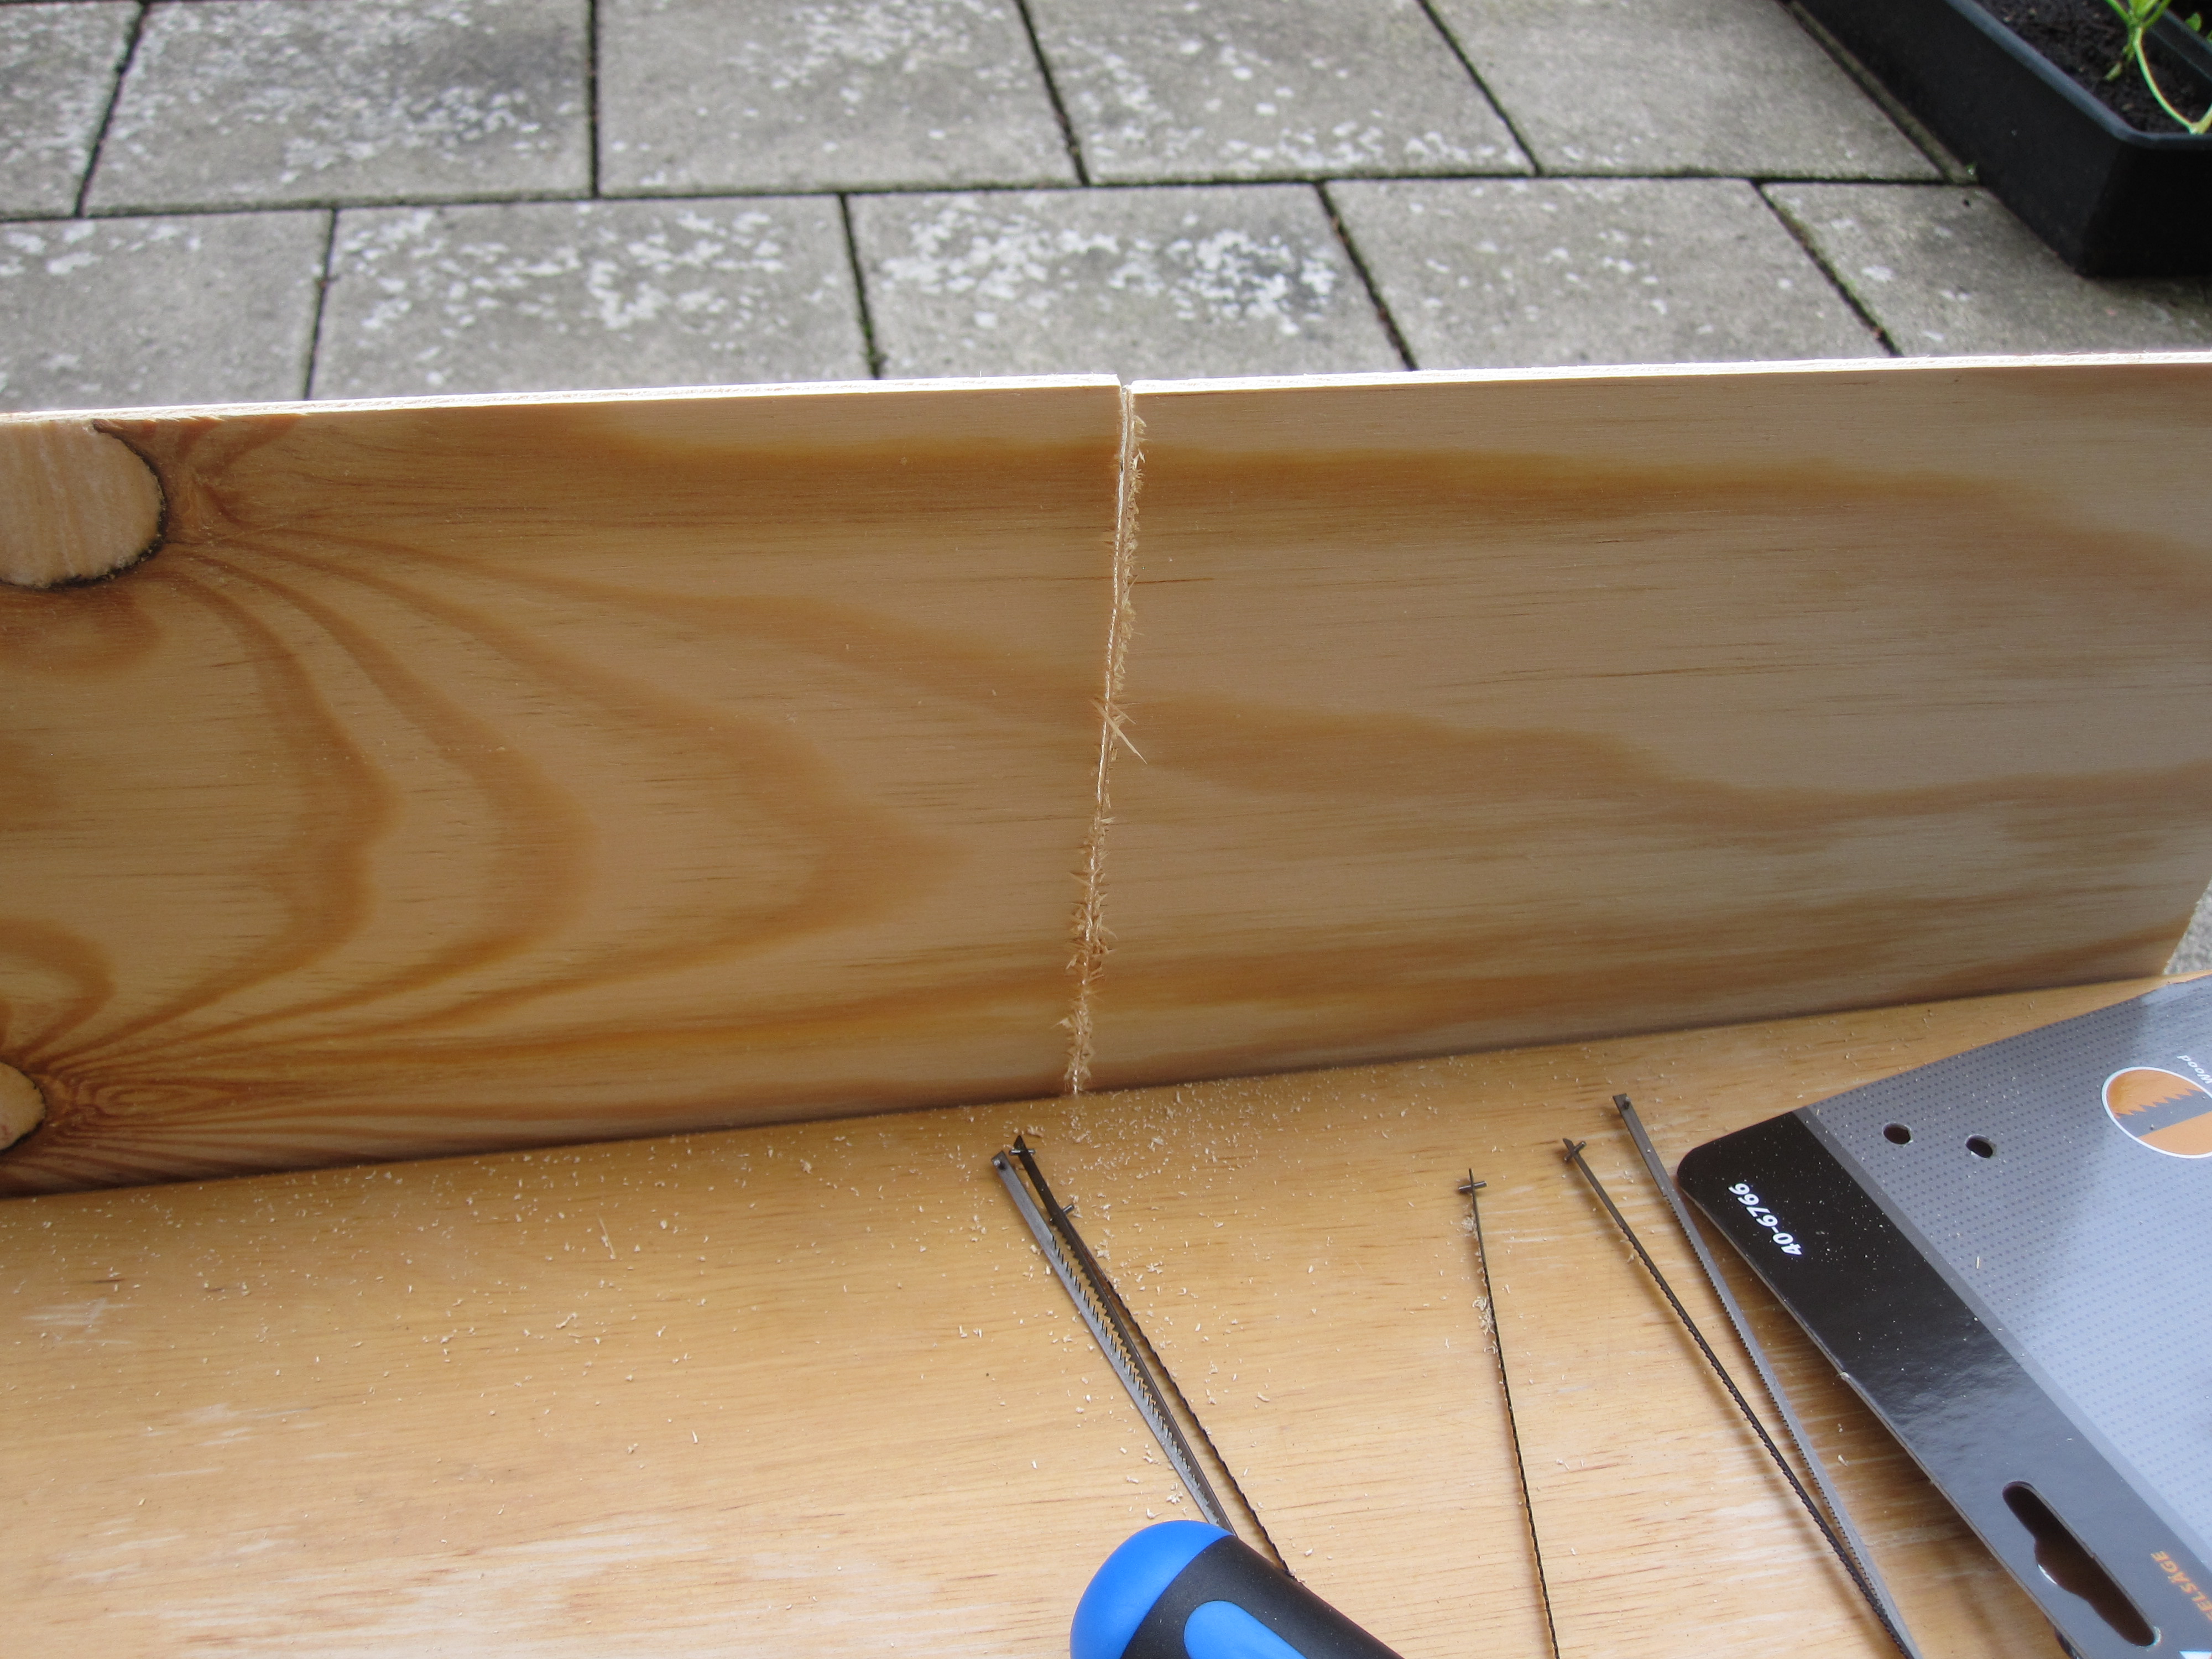
I started by marking and sawing out a suitable sized board using a hand jigsaw.
I used too course a sawblade initially, which caused some chip-out on the back. Fortunately blades with several different teeth densities came with the saw.
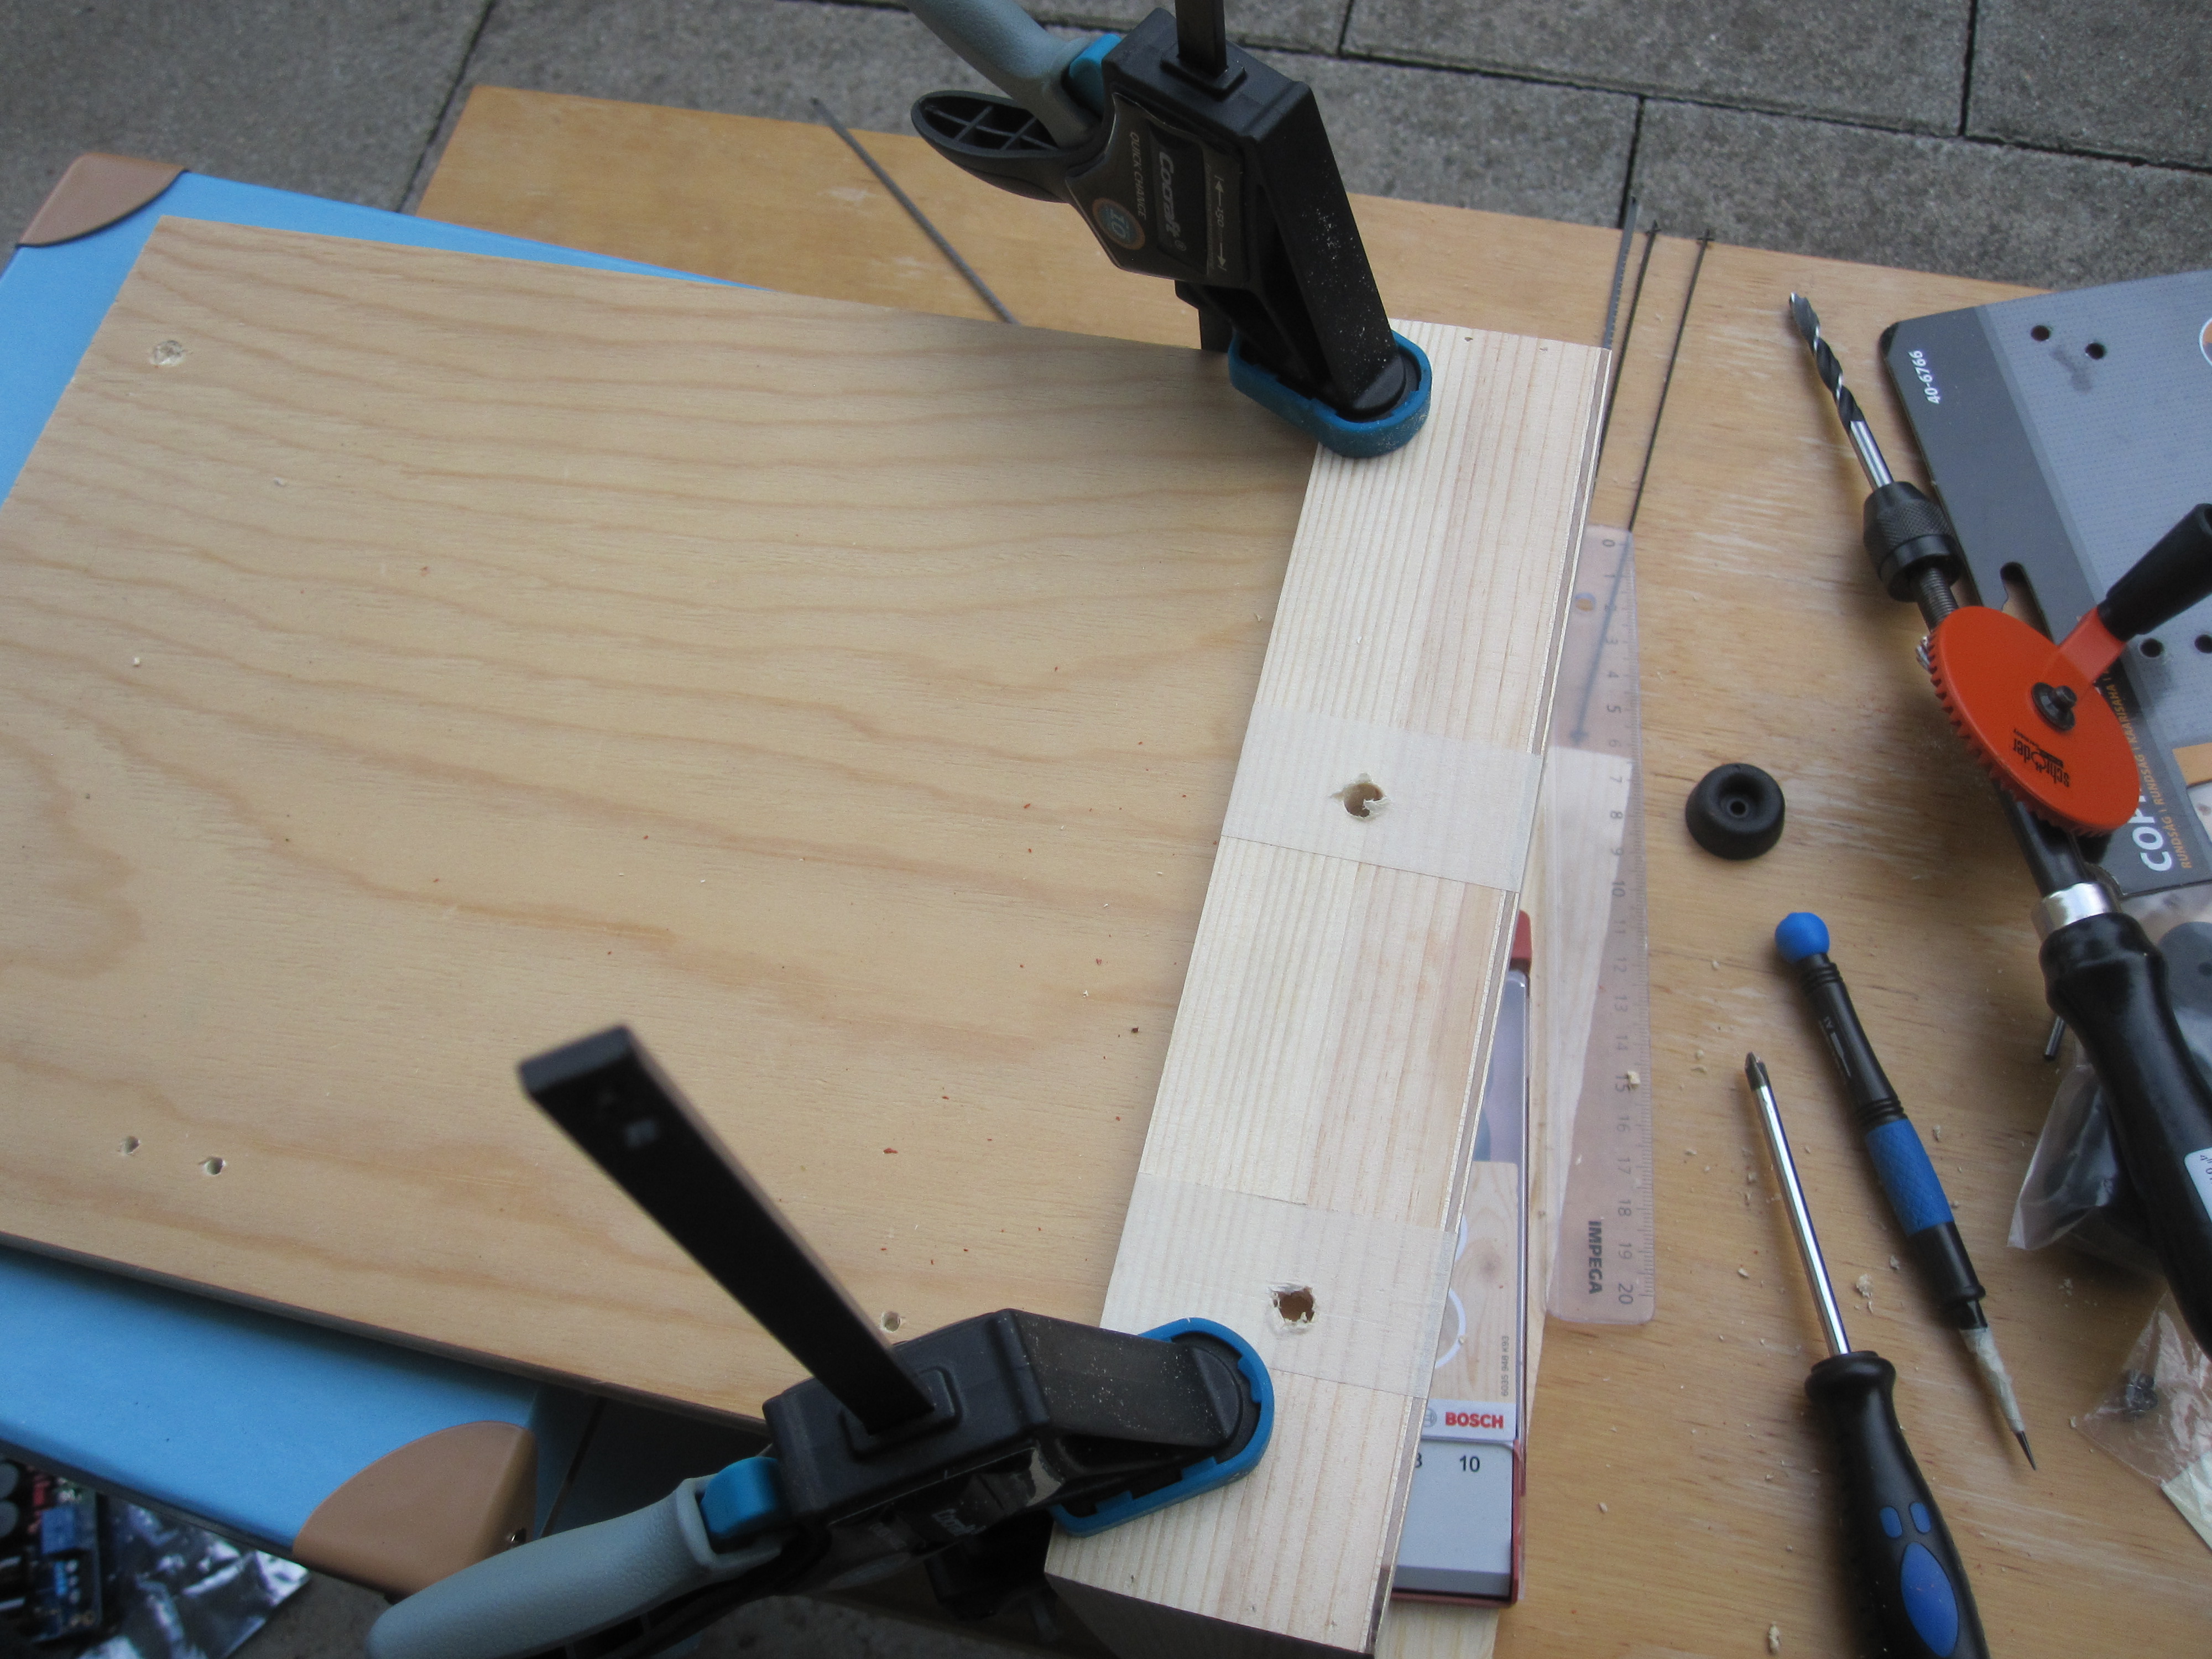
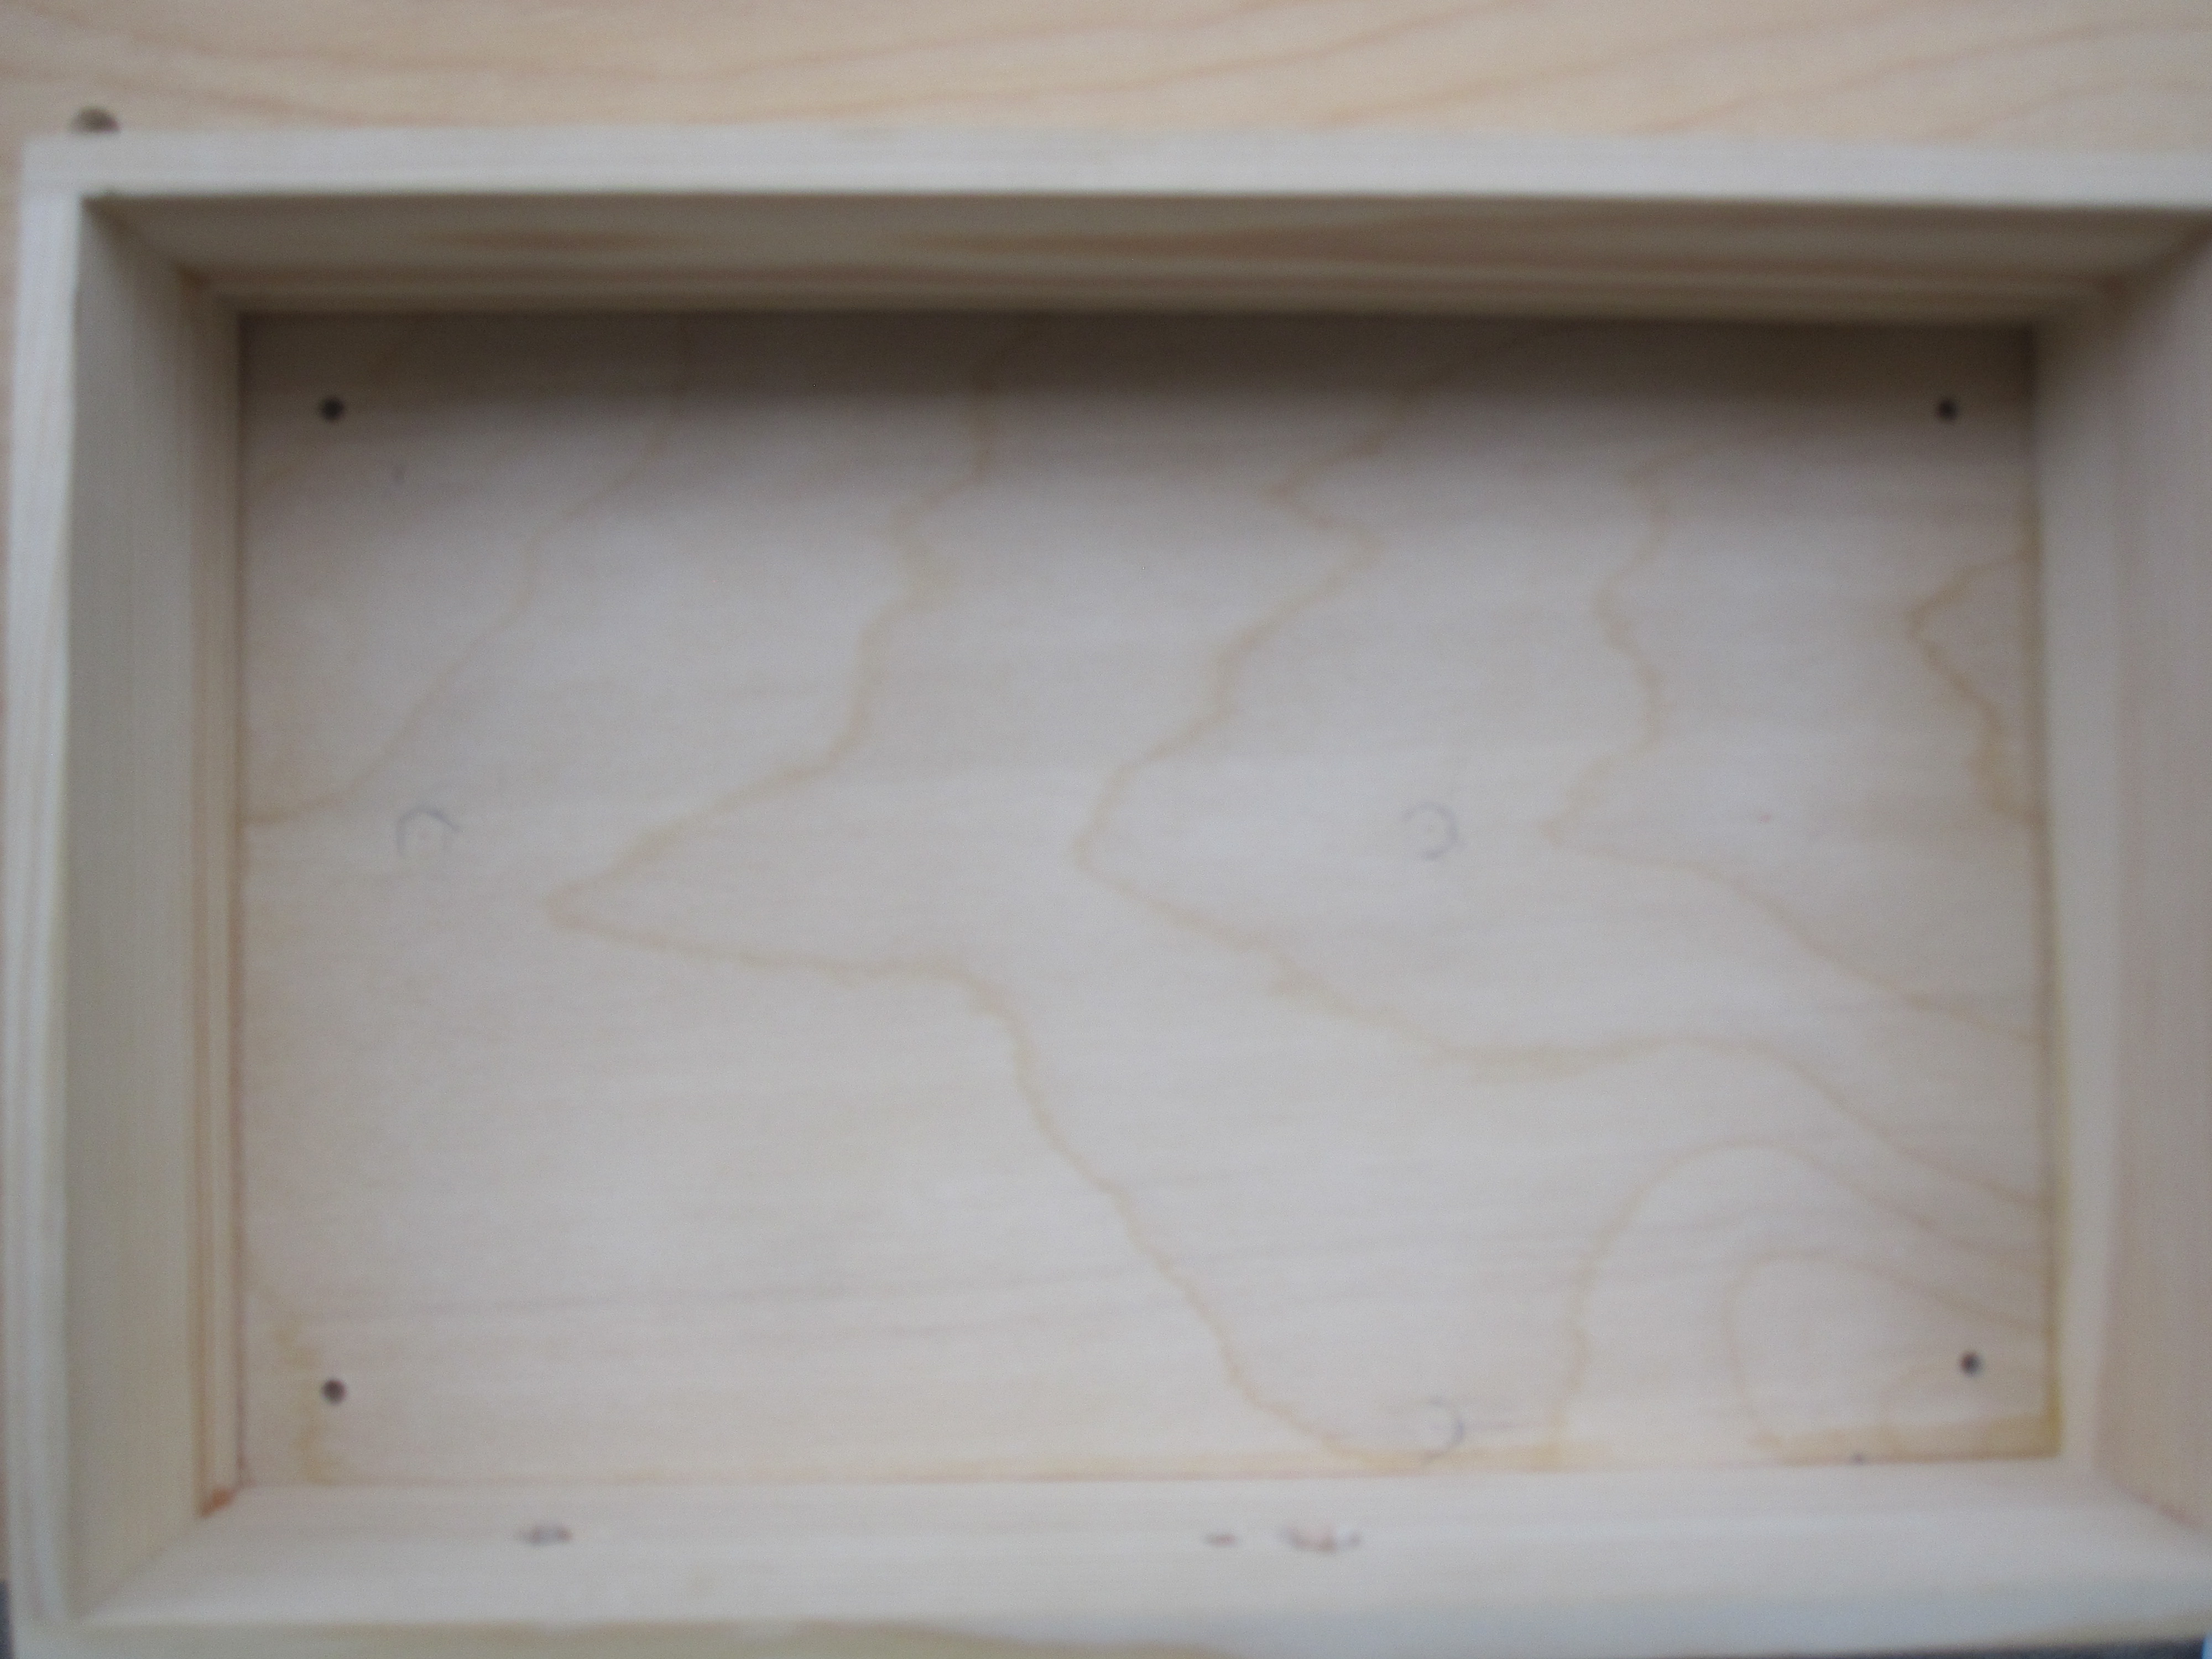
I then lined up the box and lid and drilled holes for the four standoffs. To precisely mark the holes near the corners I marked the hole on a post-it note that I could more easily line up in the corner. Obviously, if I made the case from scratch I would instead drill all the holes before assembly.
 |
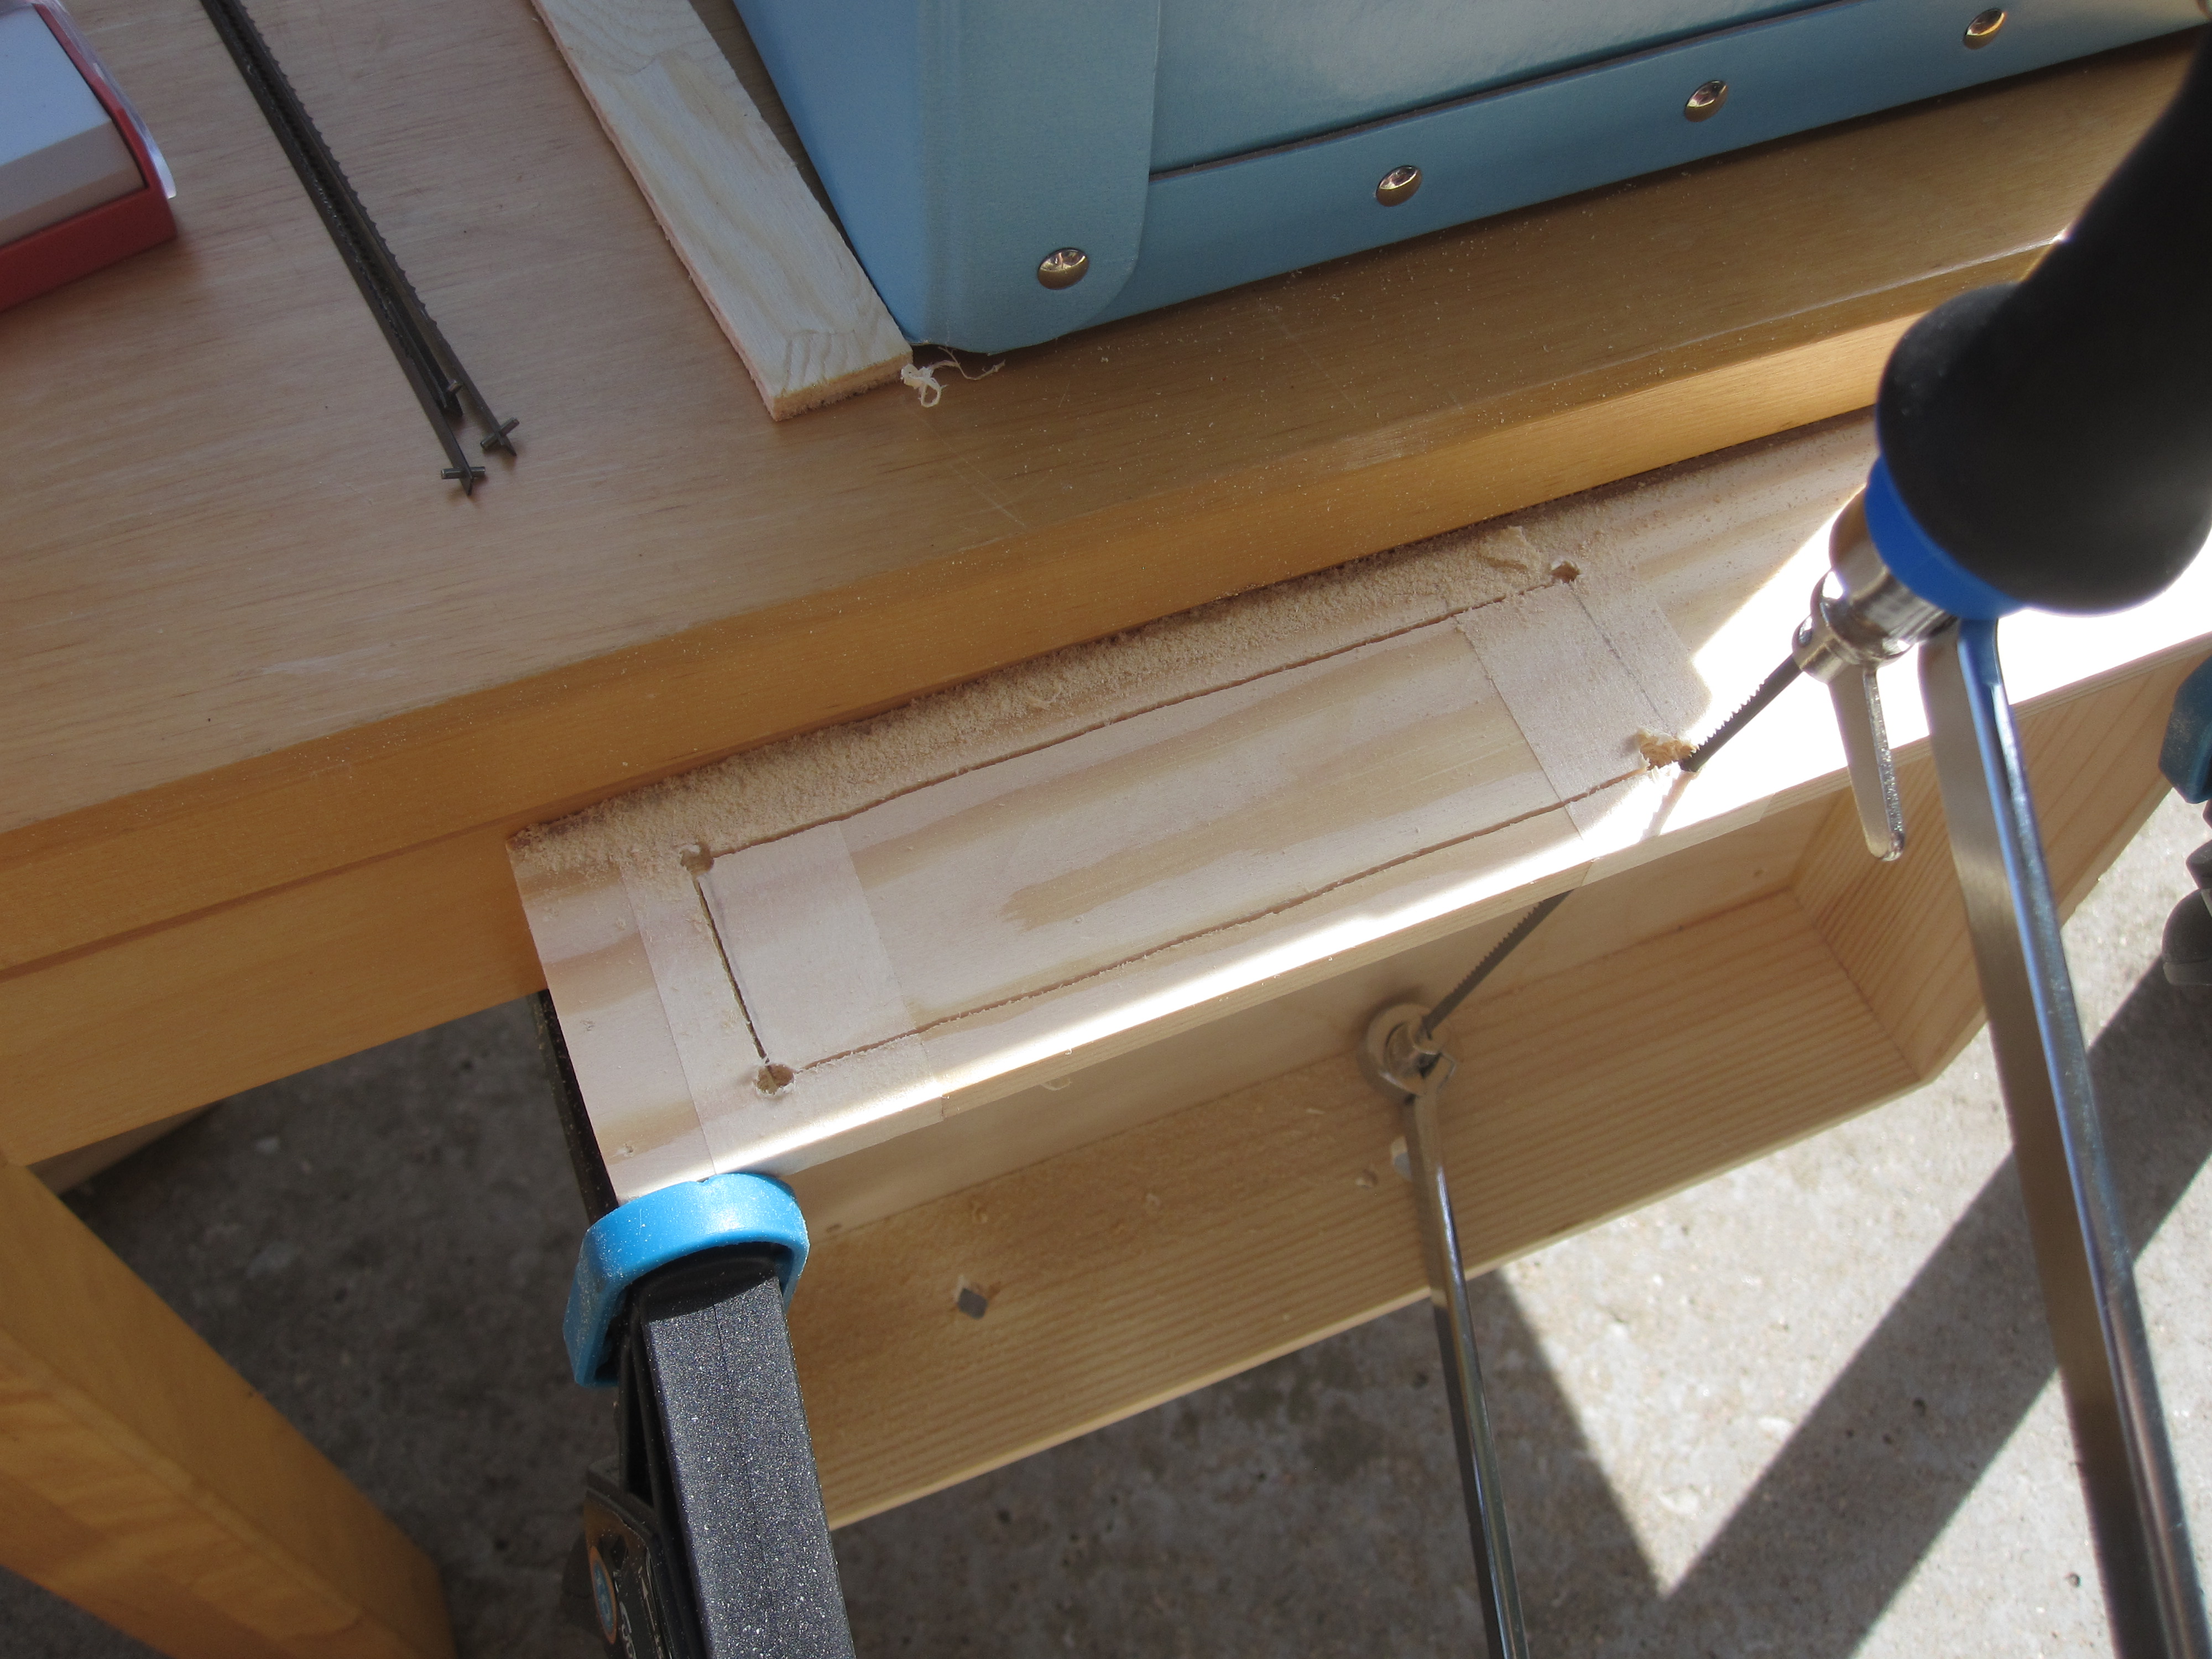
Next I drilled the larger holes on the front panel for the on/off switch and the volume potentiometer shaft. To prevent chip-out I clamped the box to a sacrificial plywood board.
 |
I opted to not put any blinkenlights in the front panel. As I wrote in the first impressions article the output relays switch on a few seconds after power on which produces a clicking sound. This will do for a power on & amplifier happiness indicator.
 |
The front panel holes were off by a millimeter or so, which I was able to carve and file out. I also had to make a smaller hole for the pin next to the potentiometer shaft that I believe is intended to secure the potentiometer against a panel.
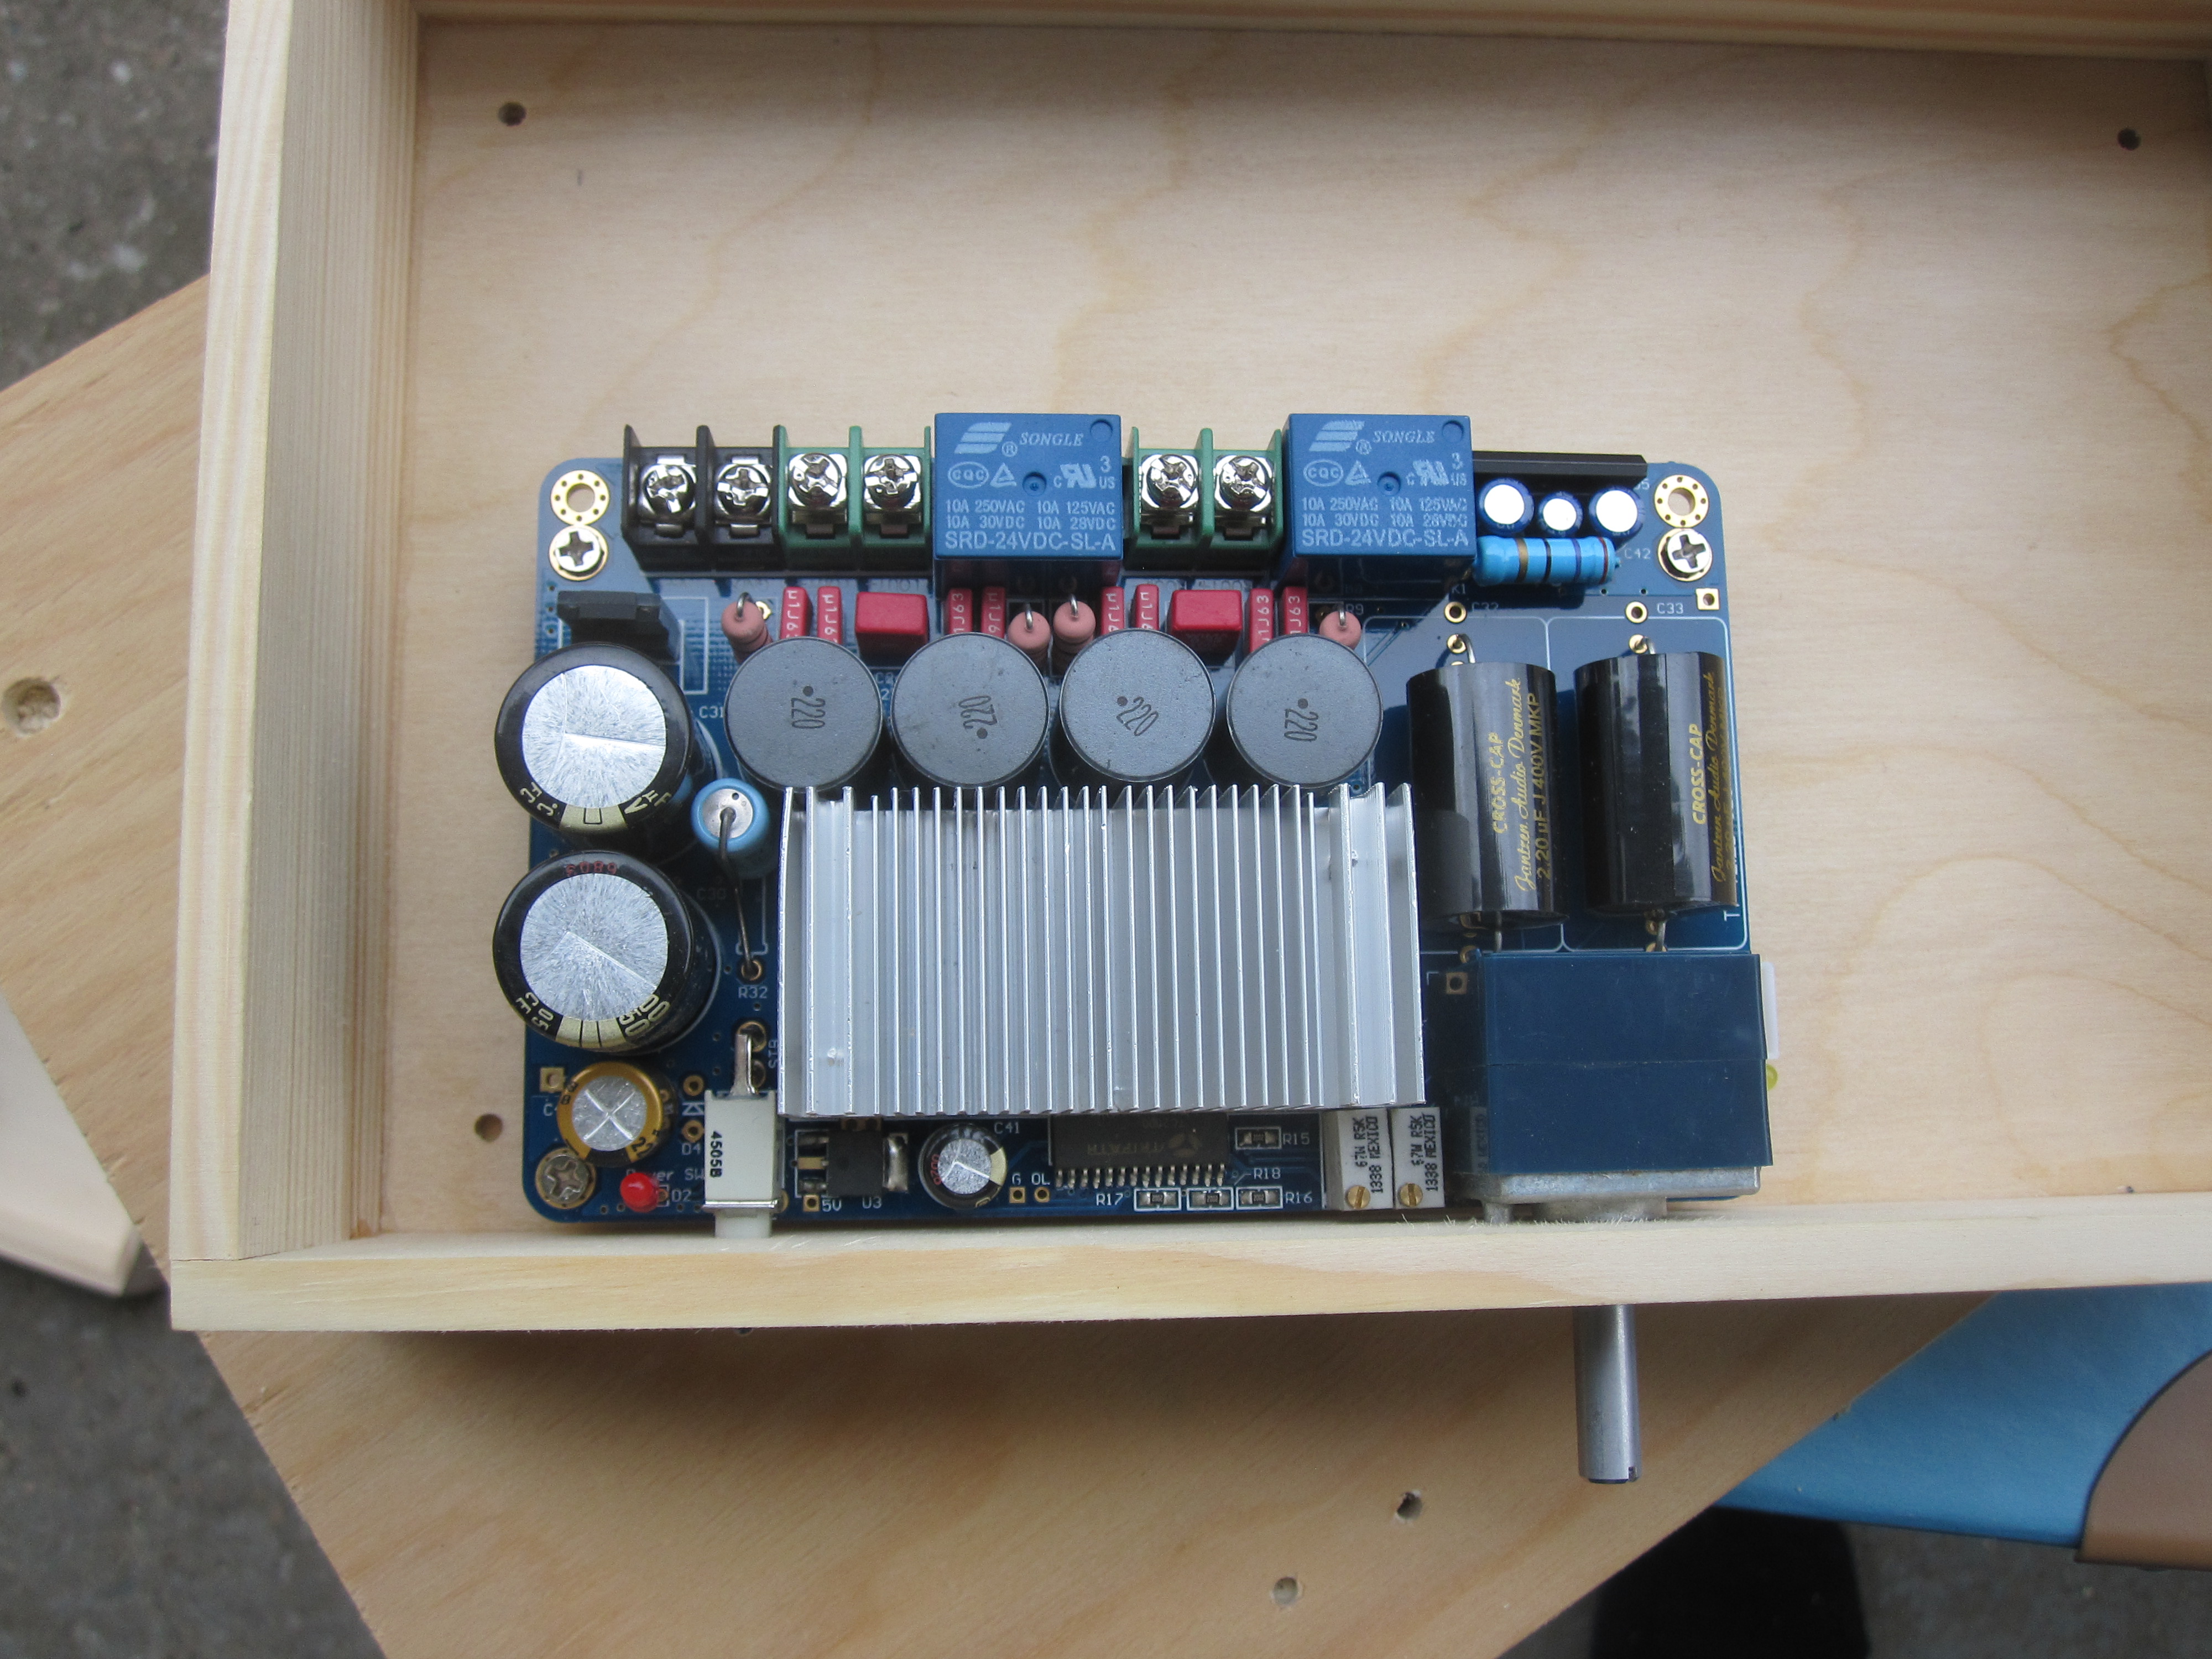 |
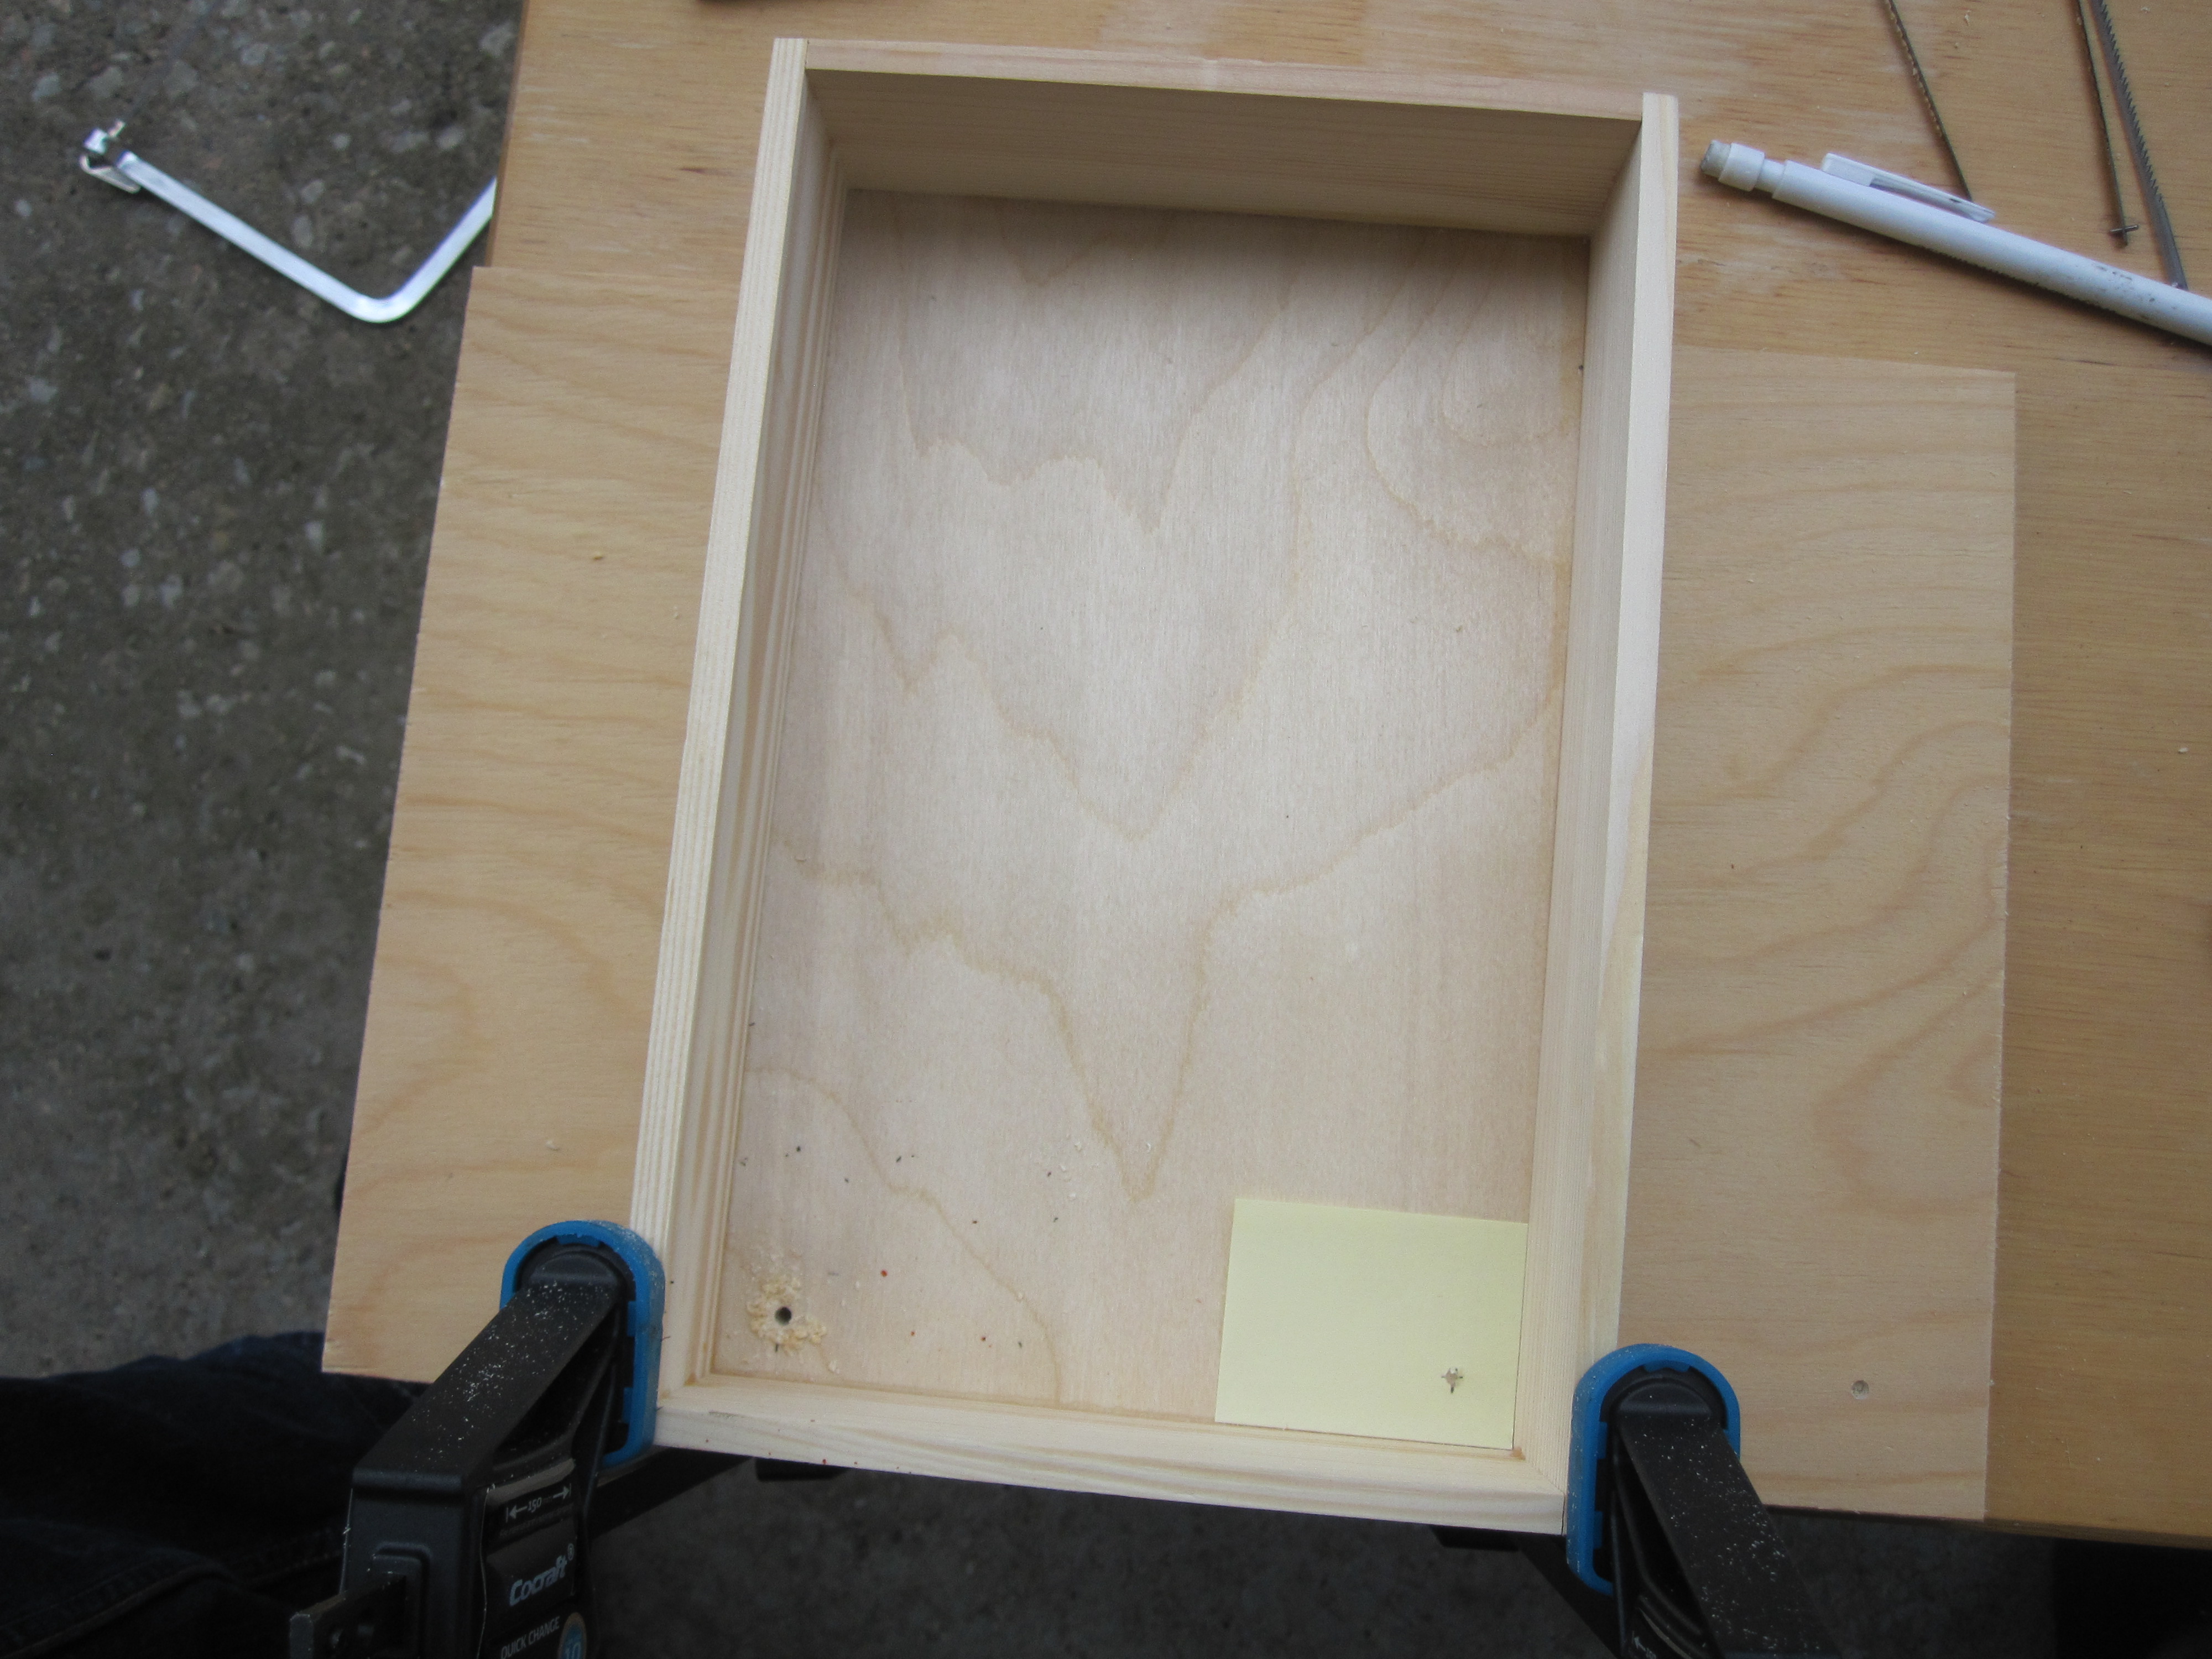
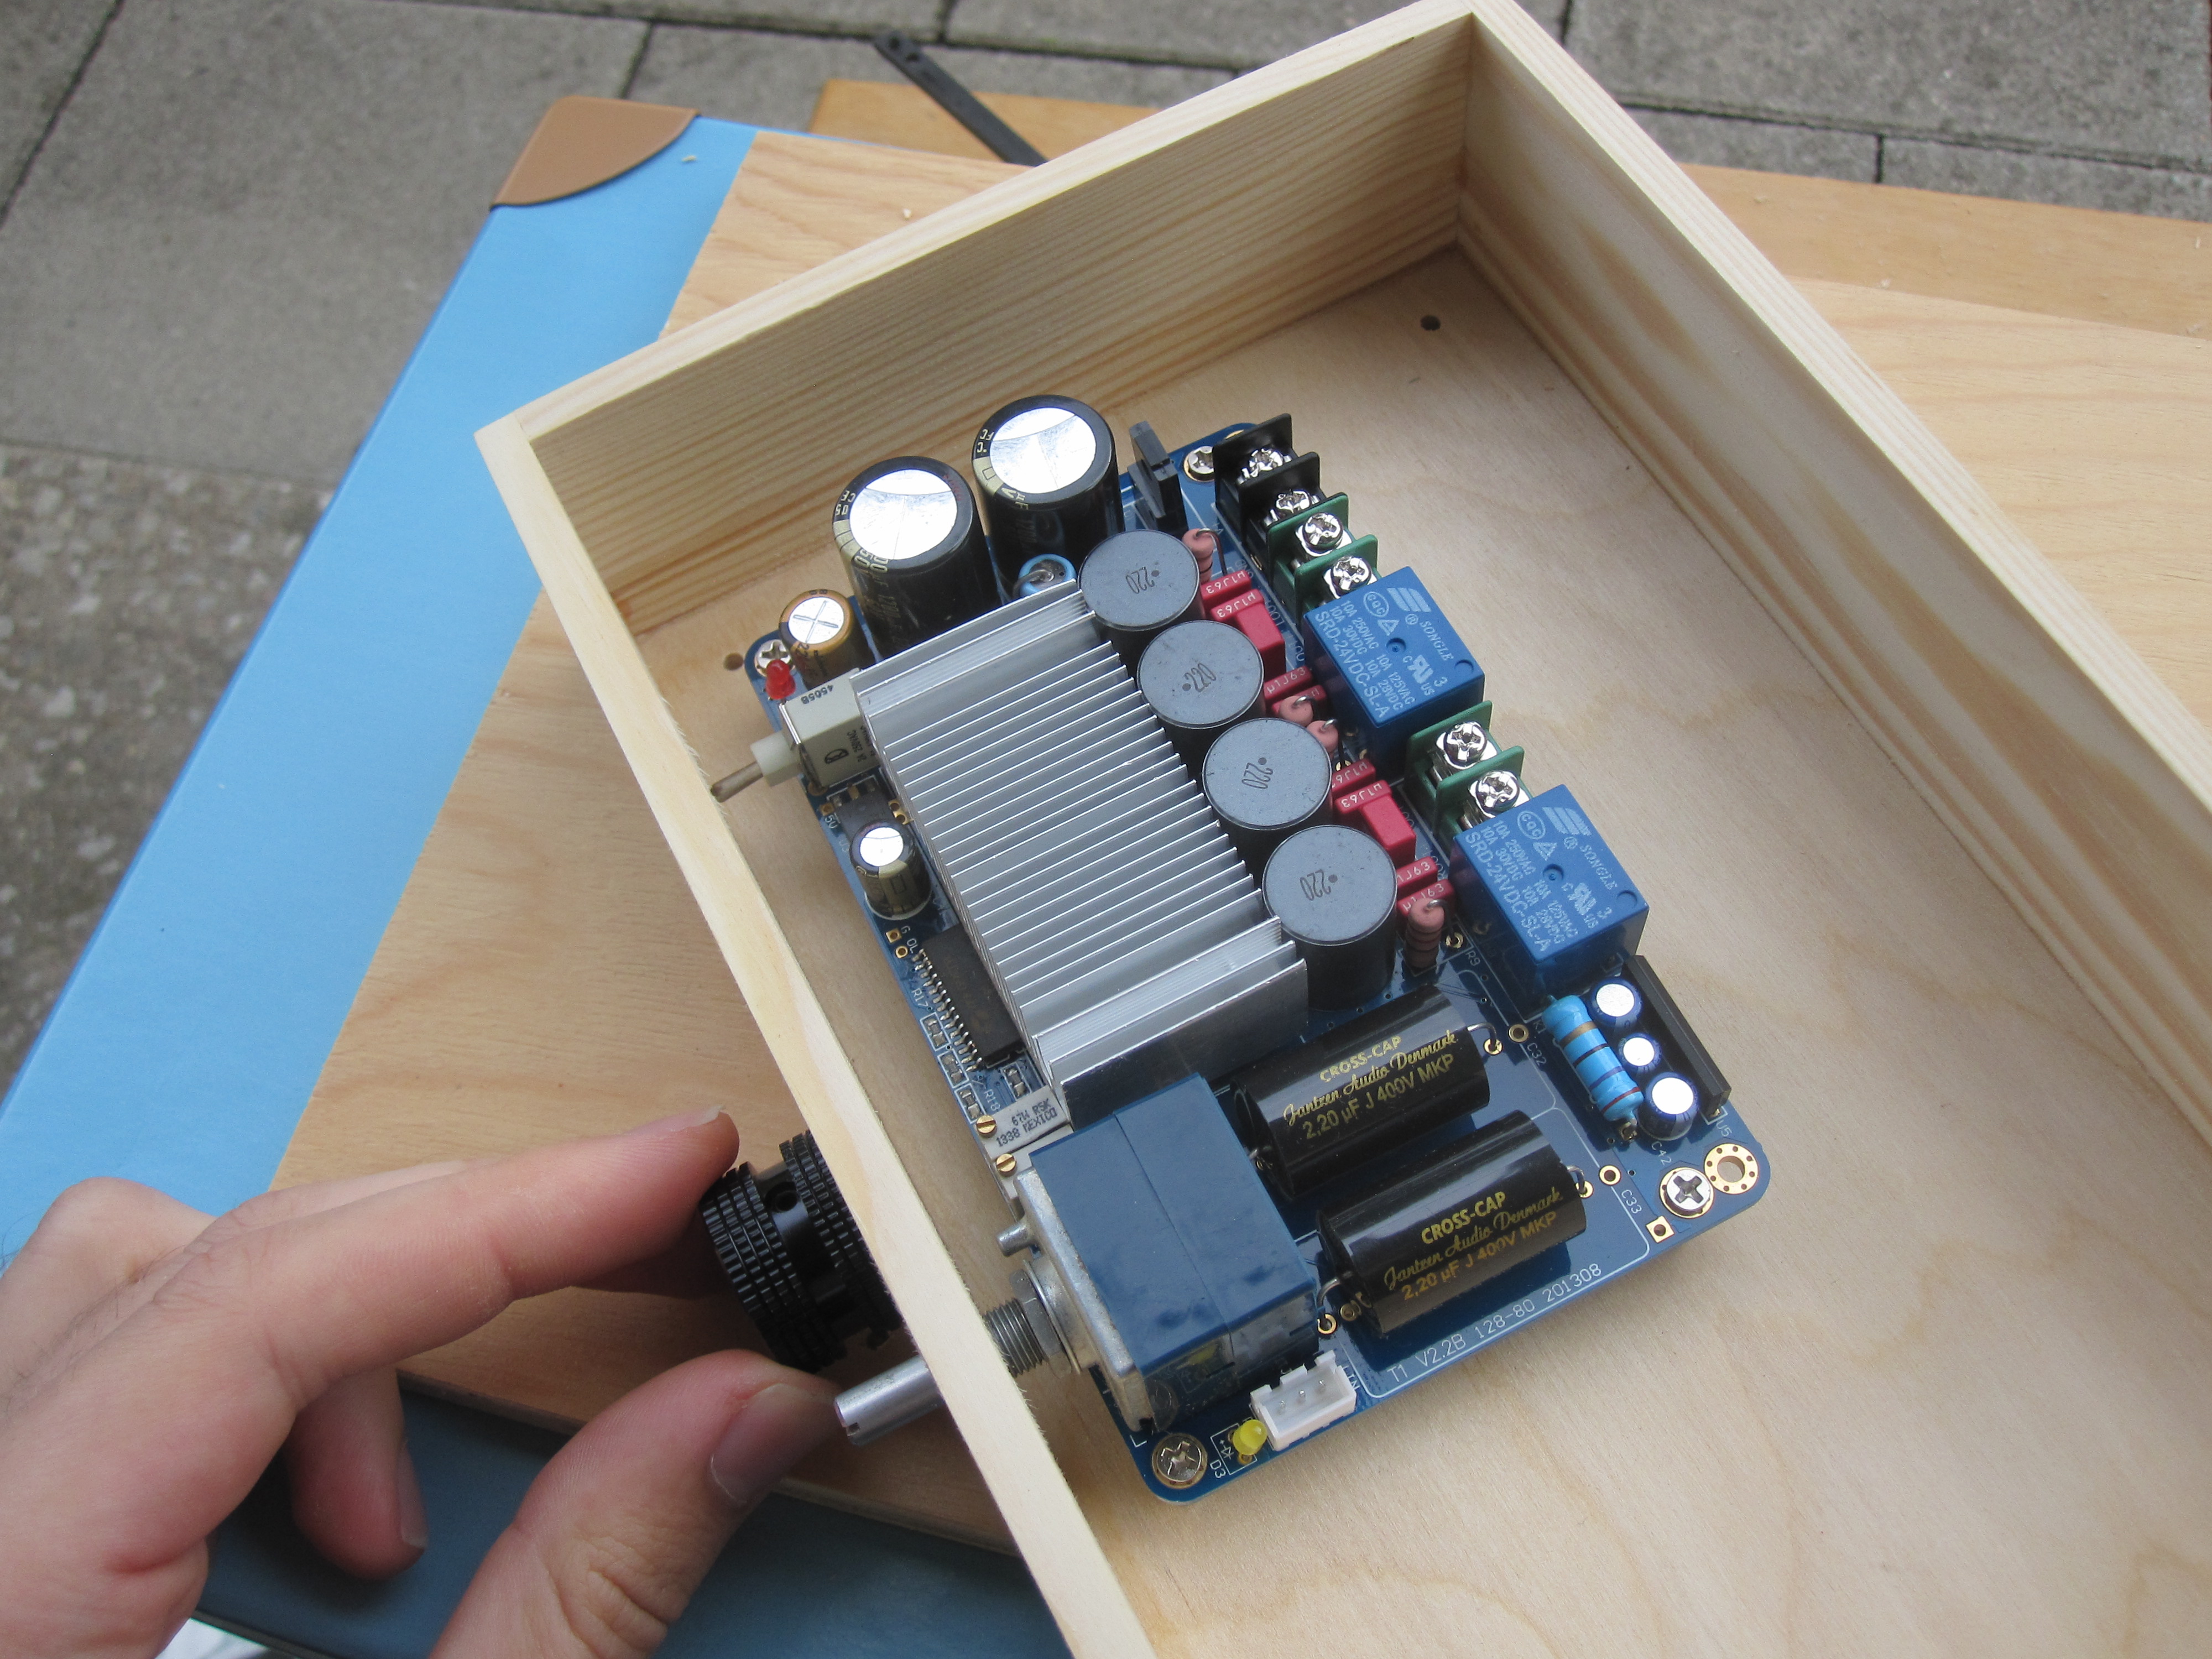
With the amplifier board in its intended position I marked the shape of its standoffs on the bottom board. I was then able to mark, tap and drill the four holes for the board.
 |
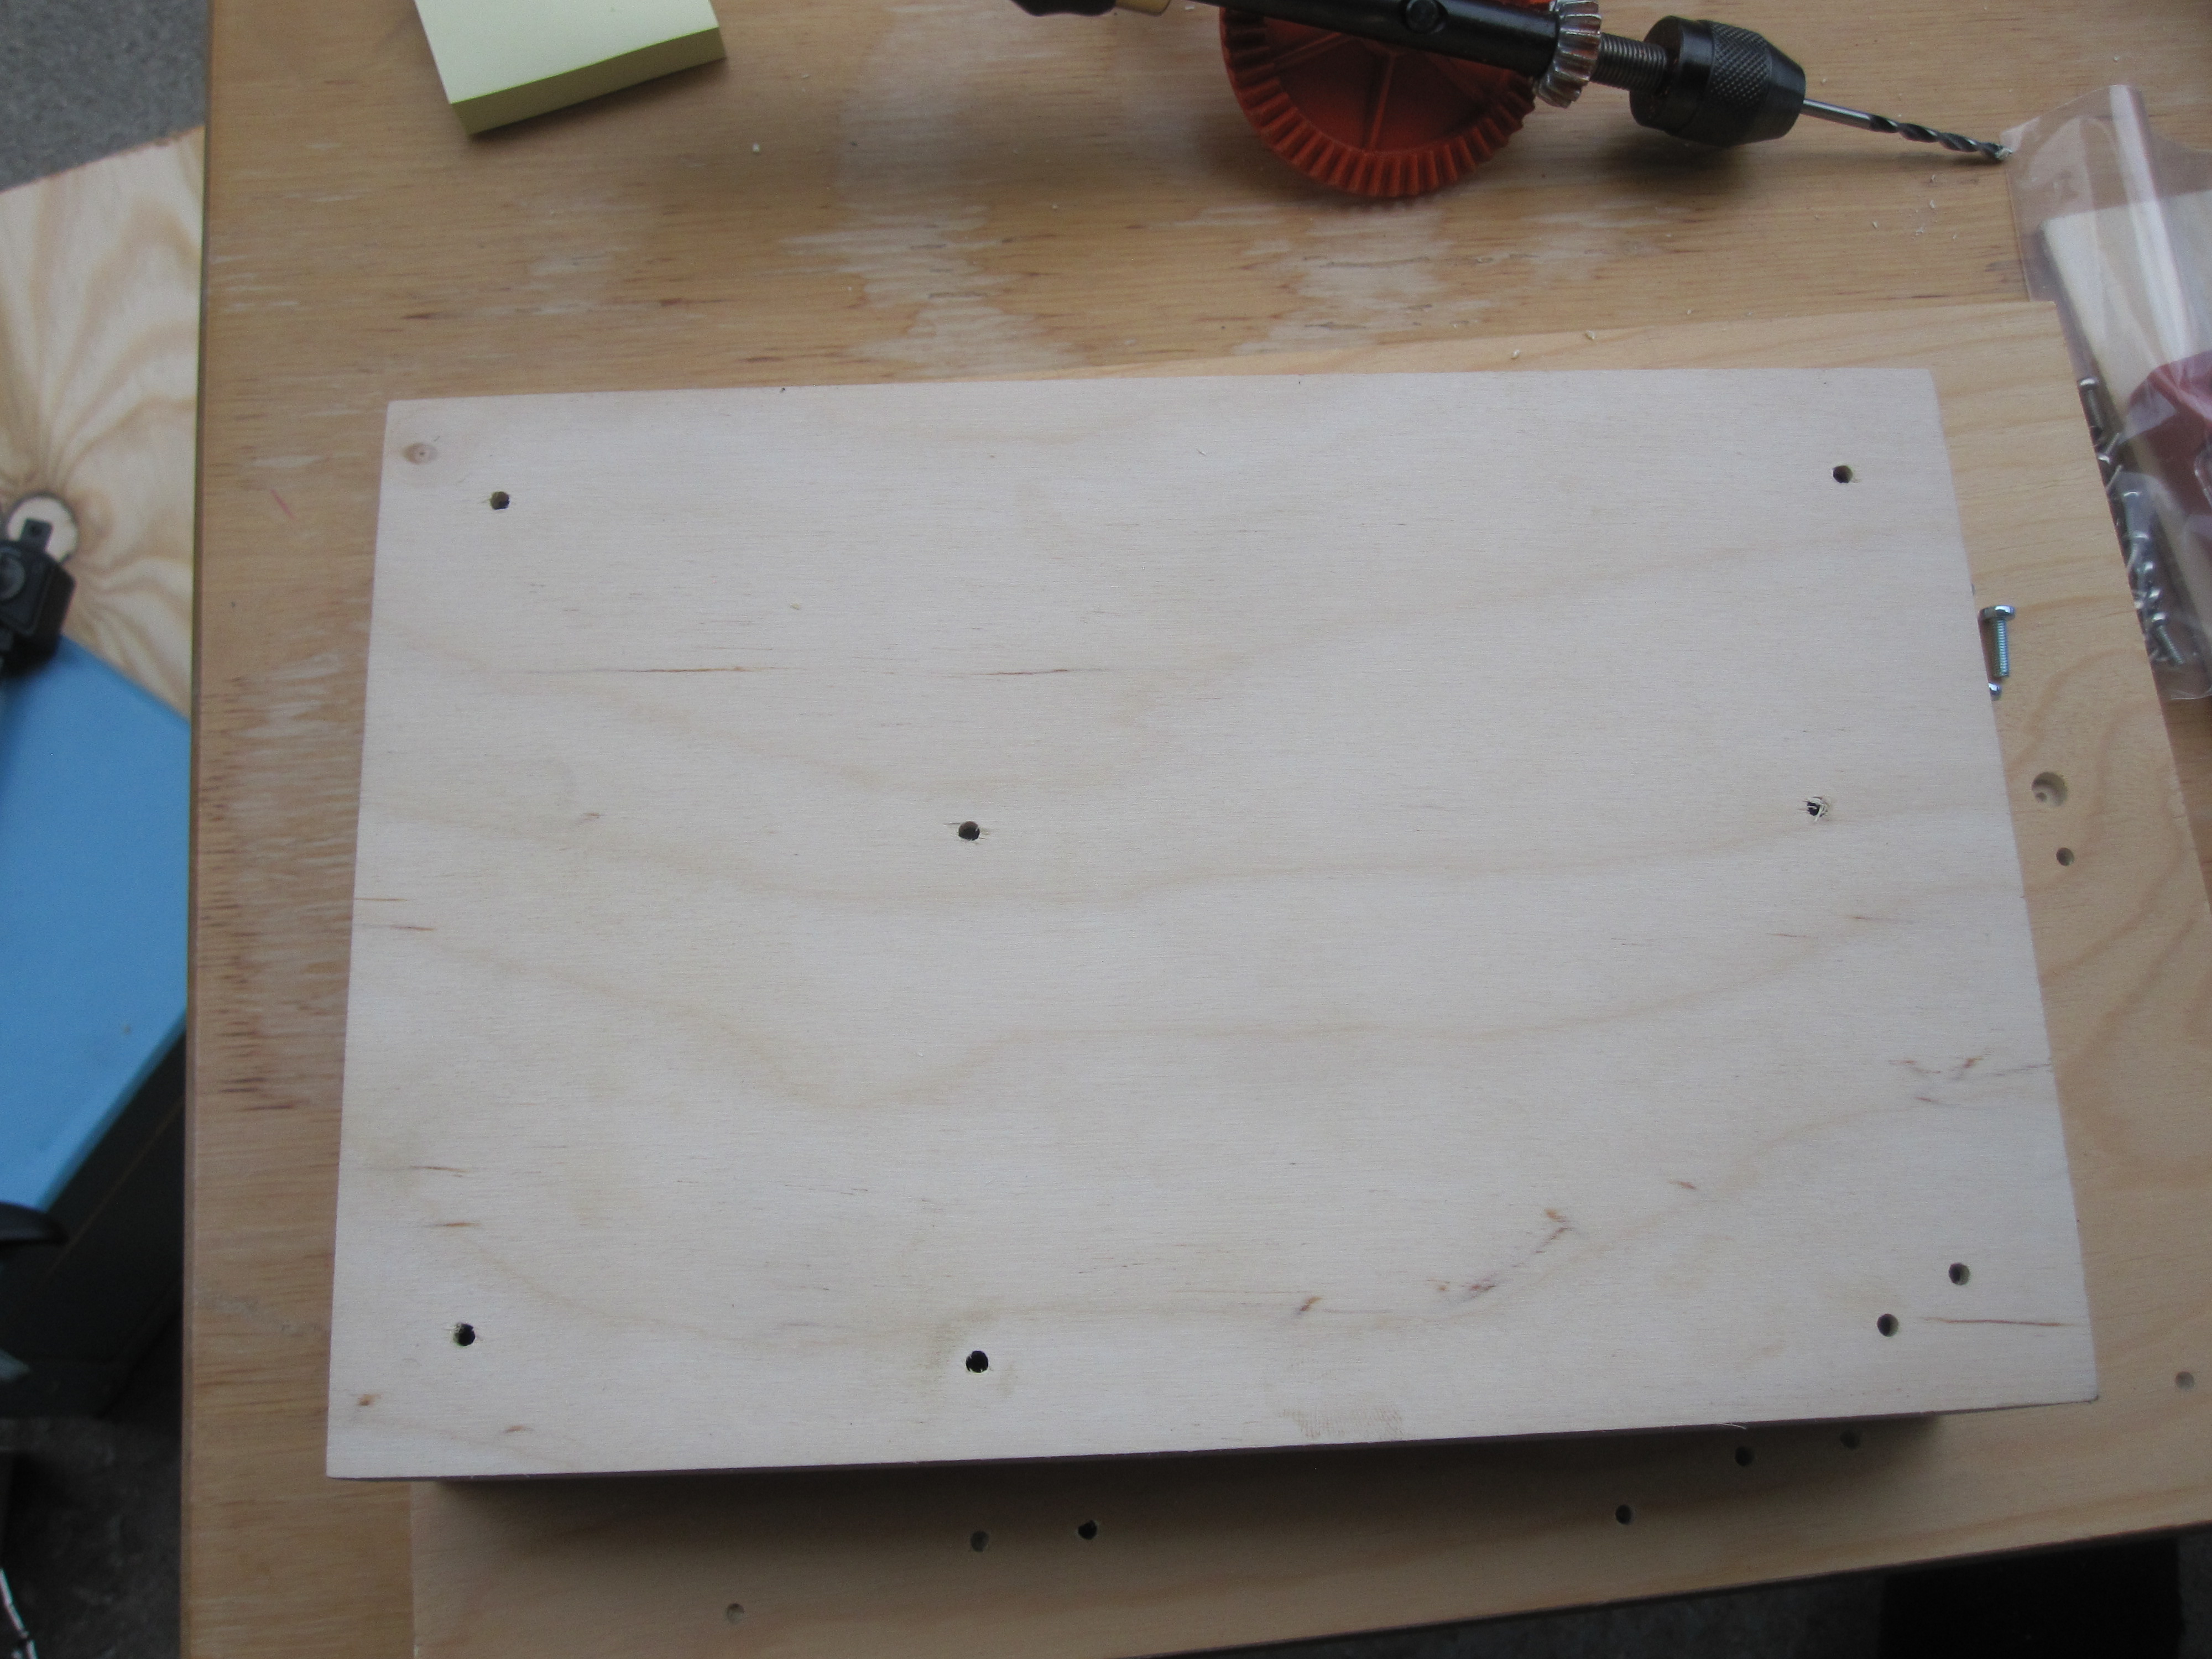 |
At this point I took a break for the day and will also do so in this article series. Next up is the back panel with the connectors.
In part 1 of this series I described the design of my HiFimeDIY T1 wooden case project and finished most of the fundamental parts of the chassis. In this segment I continue with the back panel where the connectors are mounted.
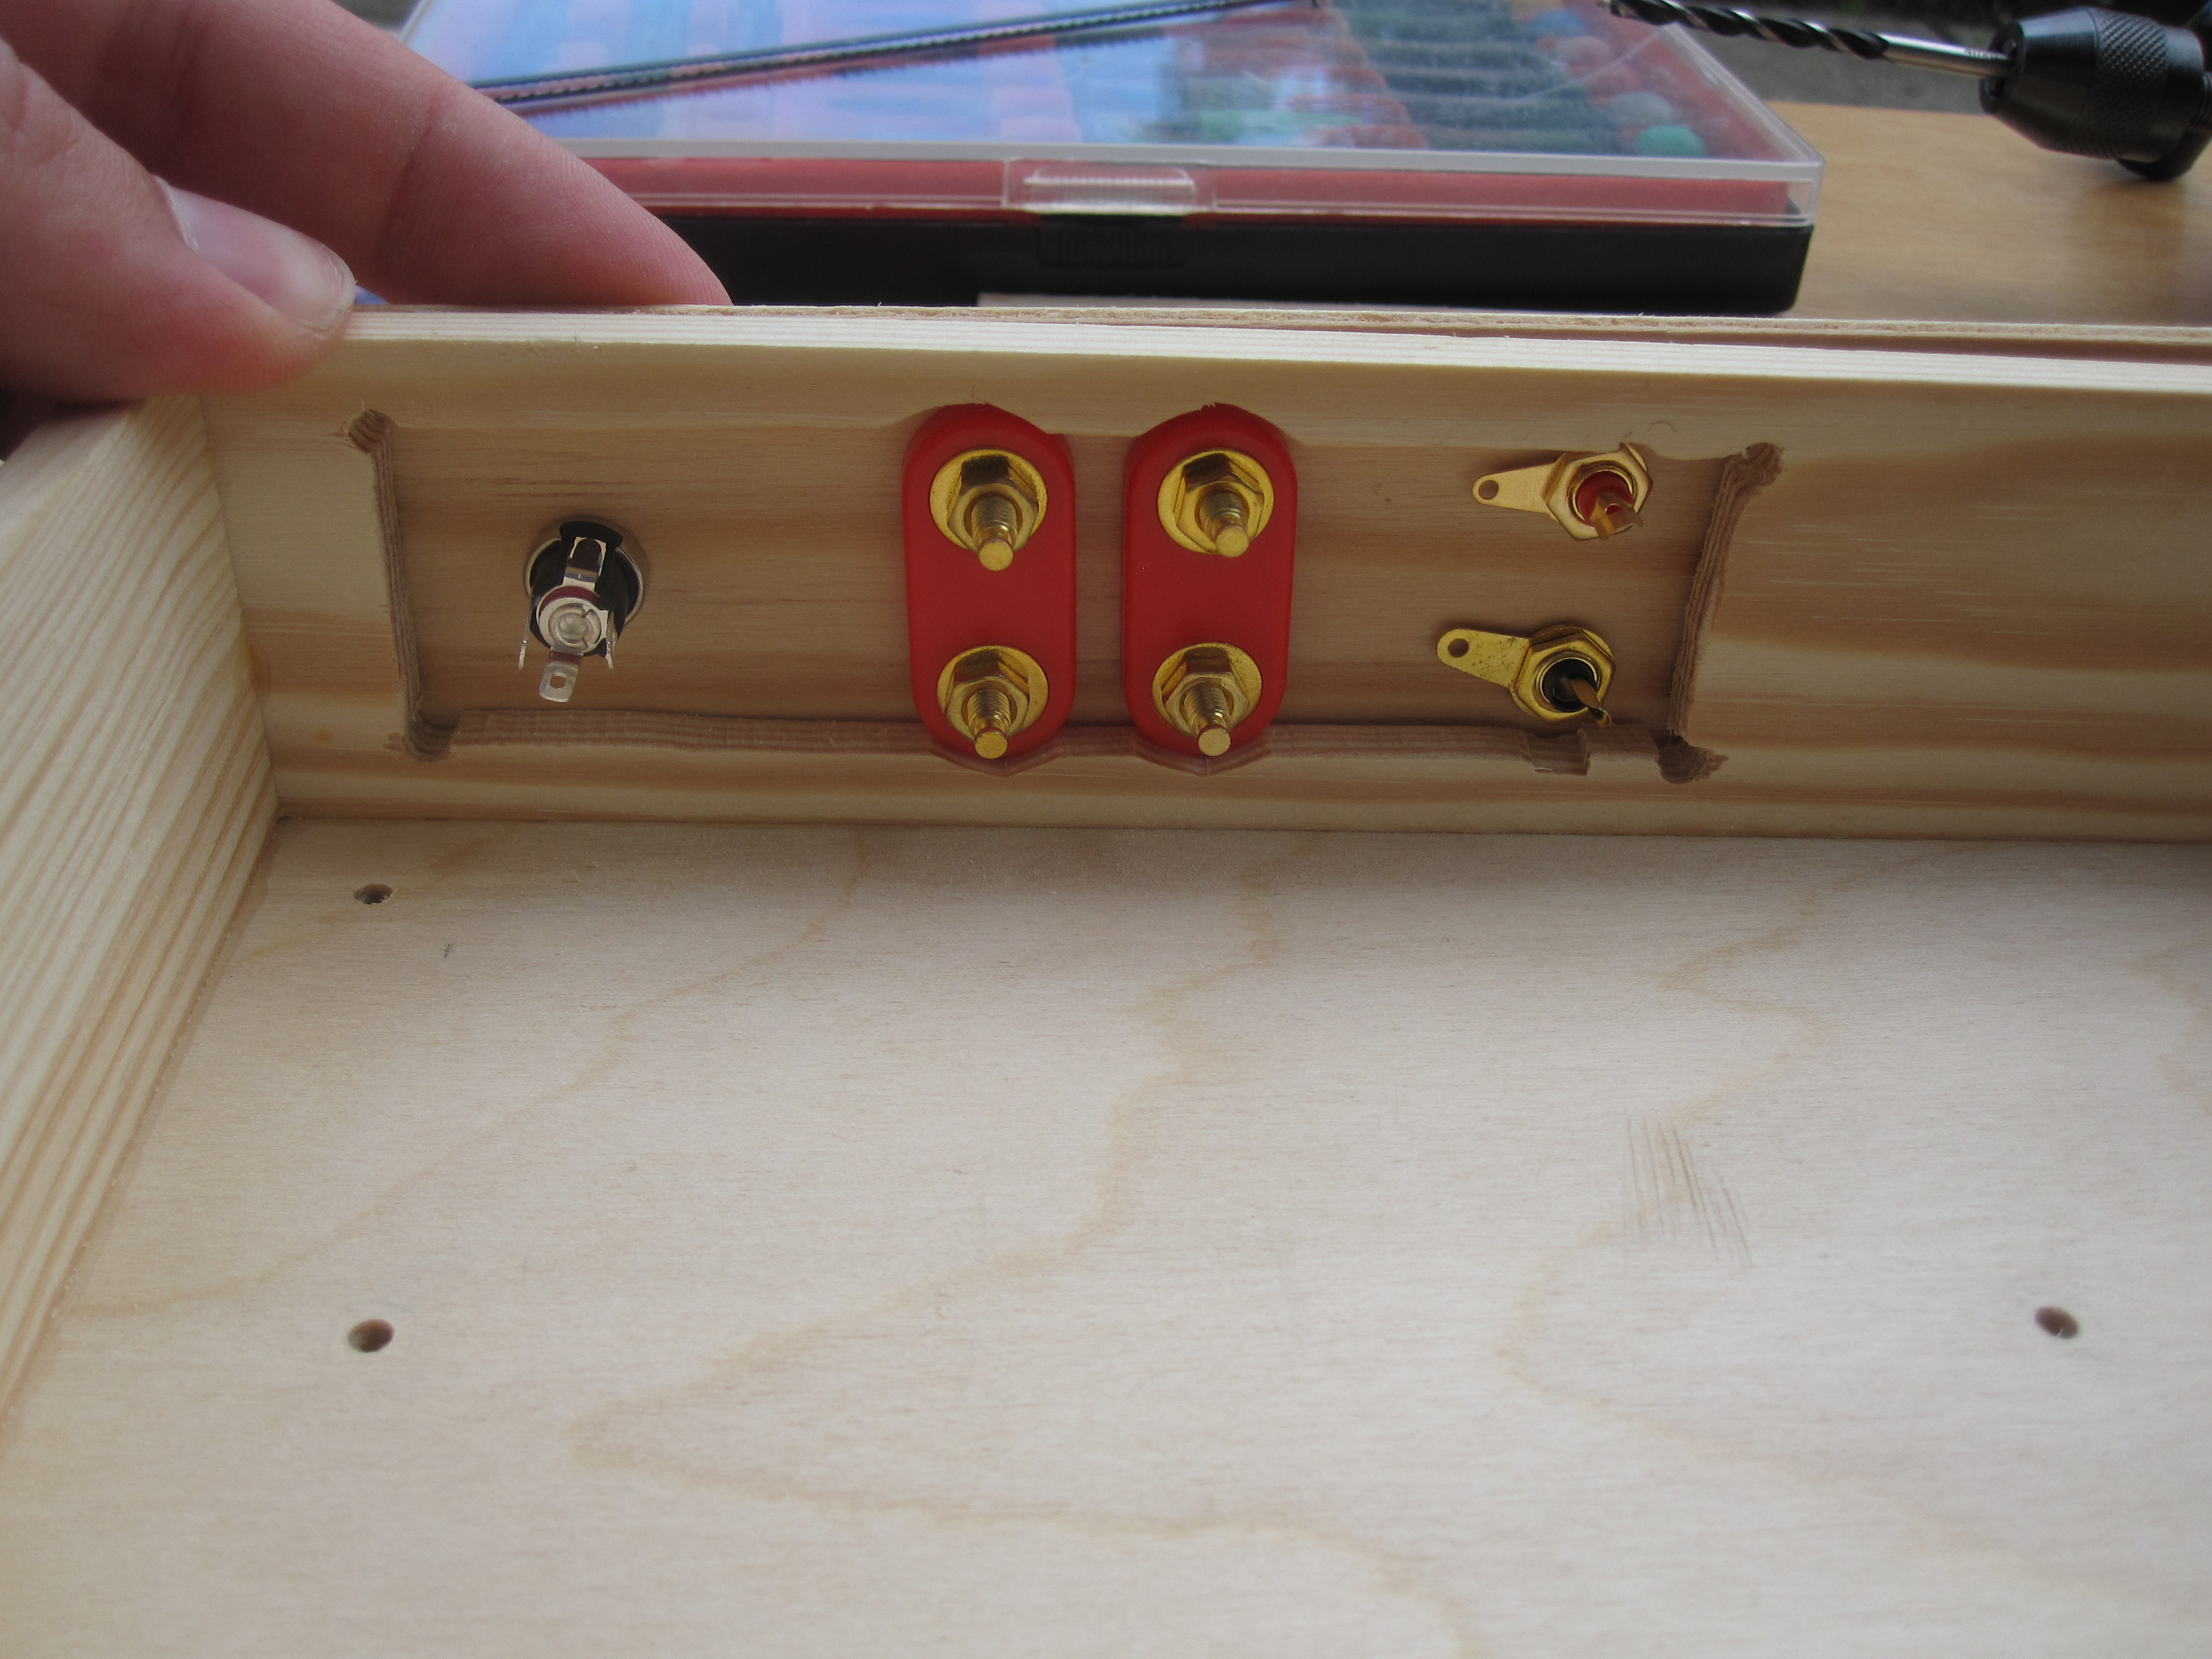
The connectors are, unsurprisingly, designed to be mounted in a thin metal chassis and therefore have quite short screw threads. The sides of the pre-made case I used are 6 mm solid wood, much too thick for the connectors. To mitigate this I opted to cut out a large part of the back and mount a thinner piece of plywood on top, which I could mount the connectors on.
I started by sawing a suitable piece of 3 mm plywood and marking the holes on masking tape. The masking tape was somewhat unnecessary but enabled me to make a bigger mess while marking without having to clean up the wood afterwards.
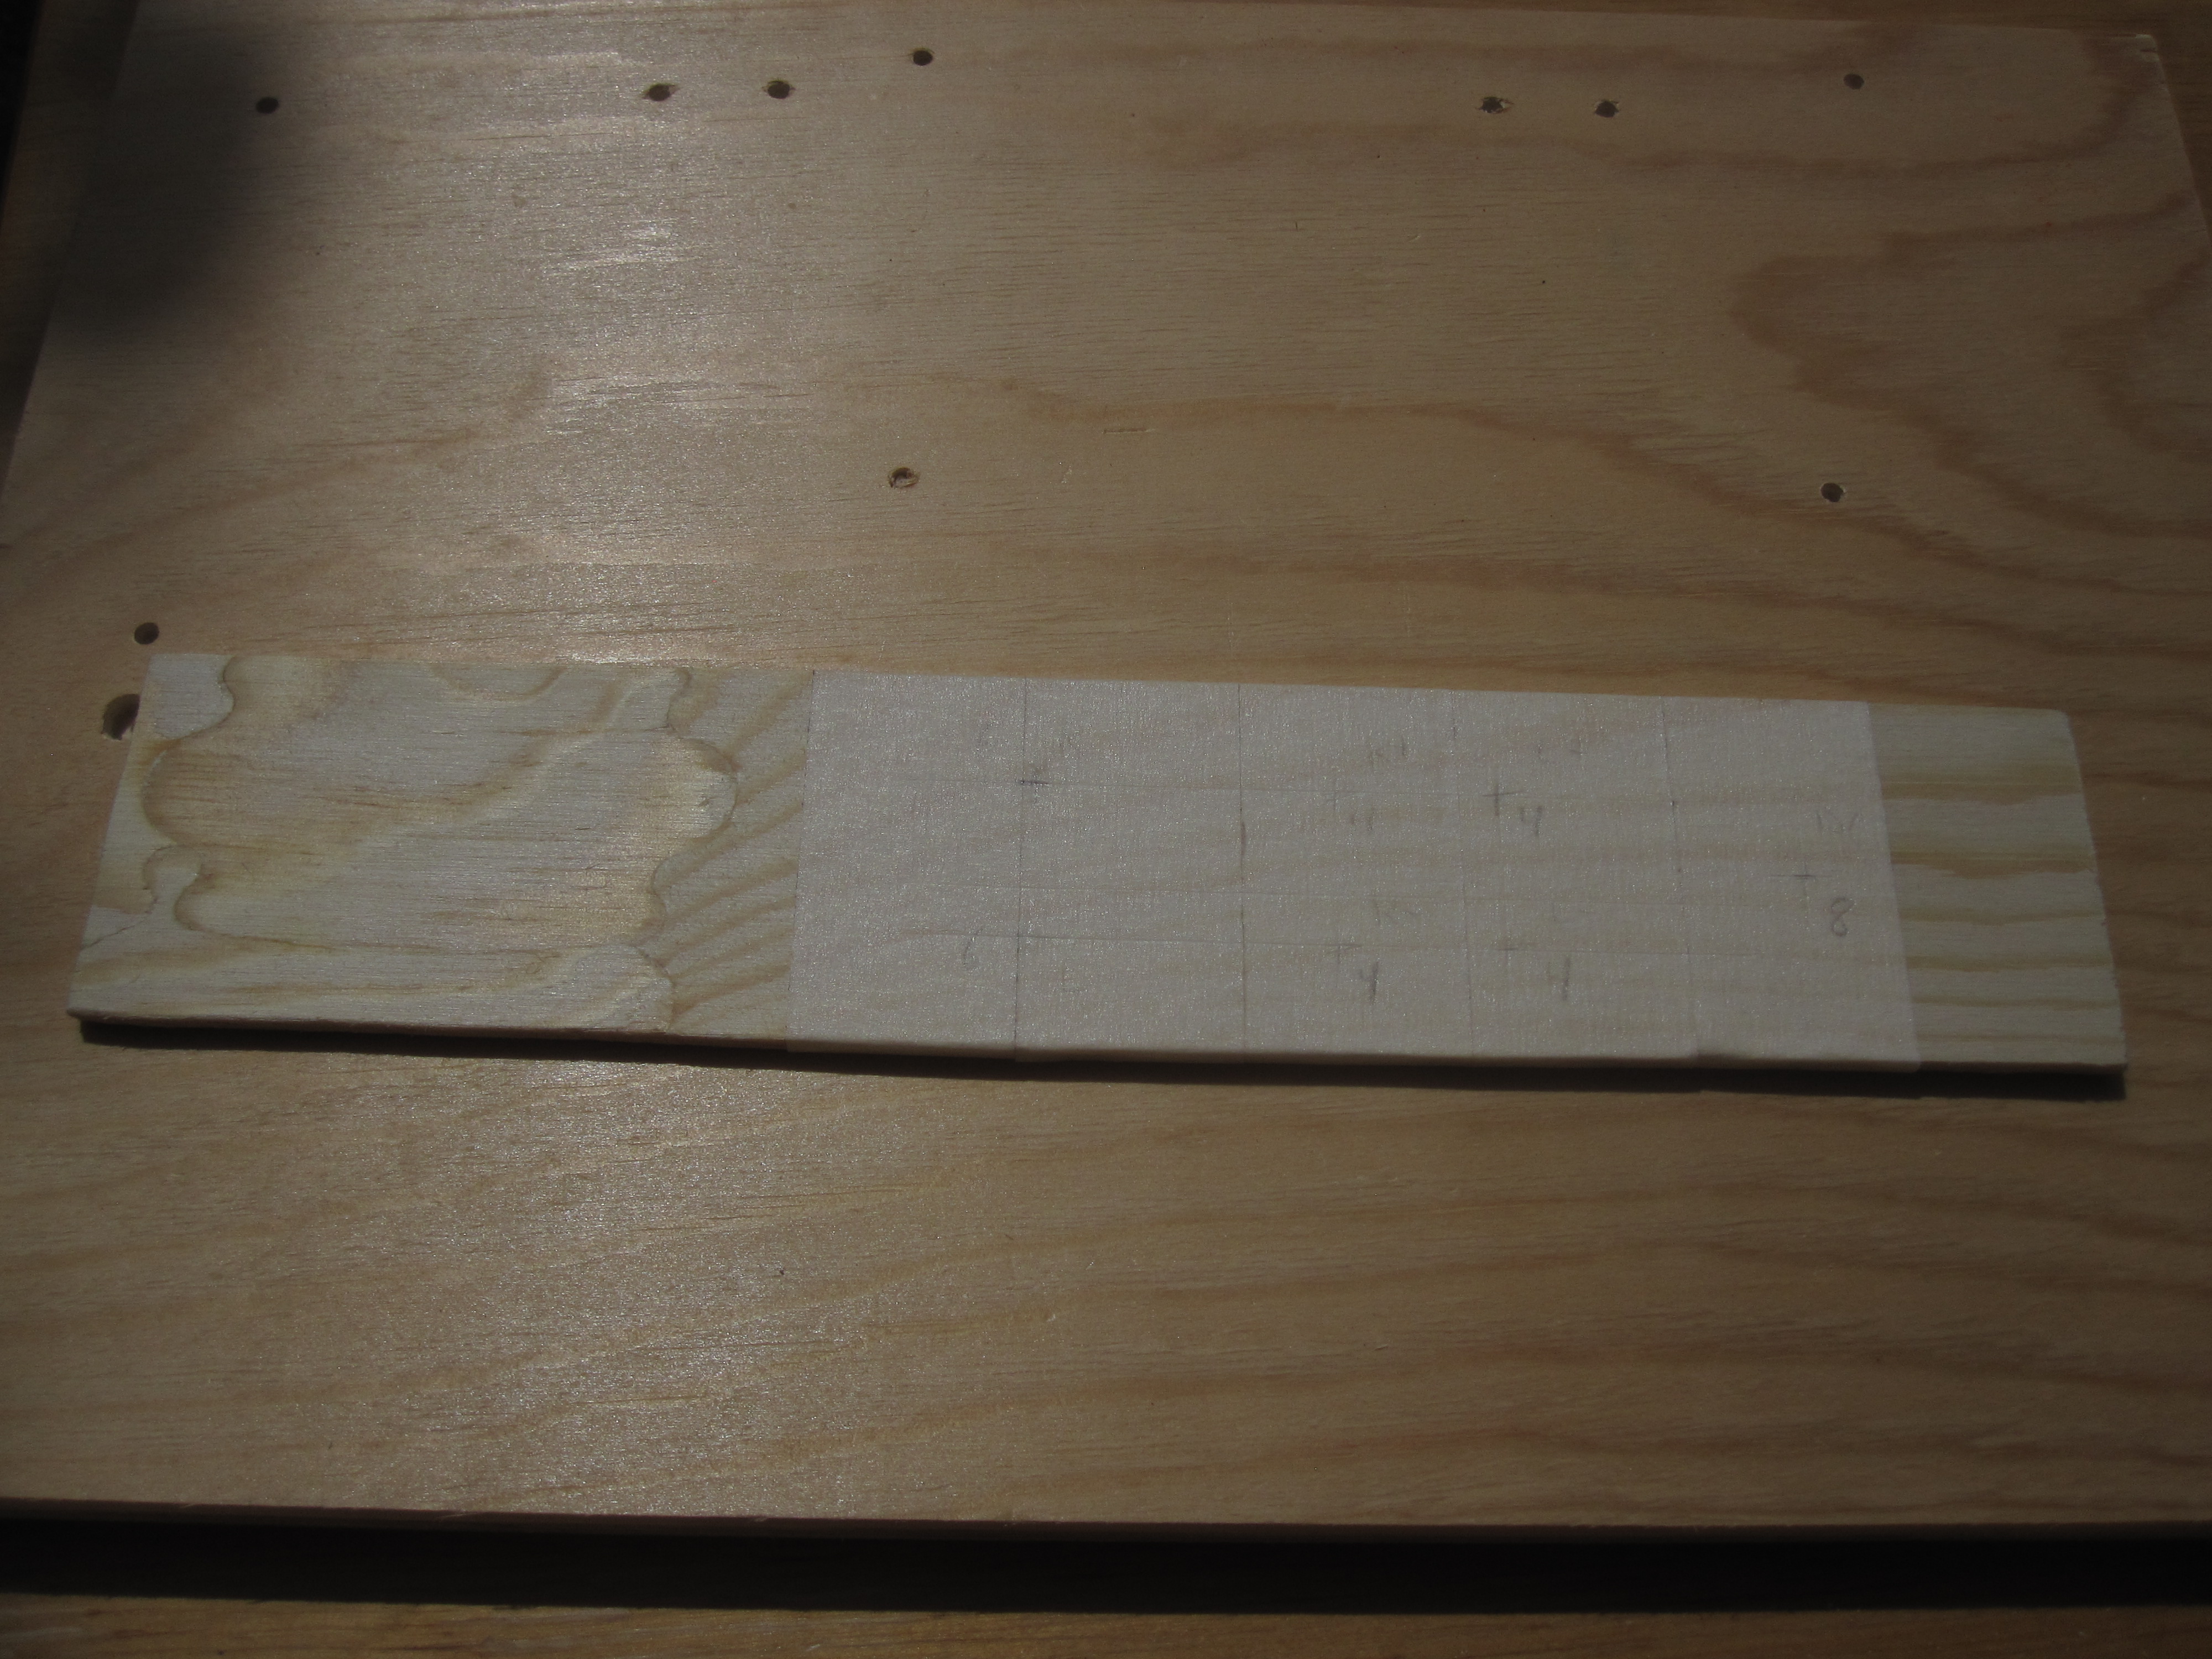 |
With the holes drilled and the connectors test-fitted it looked like this:
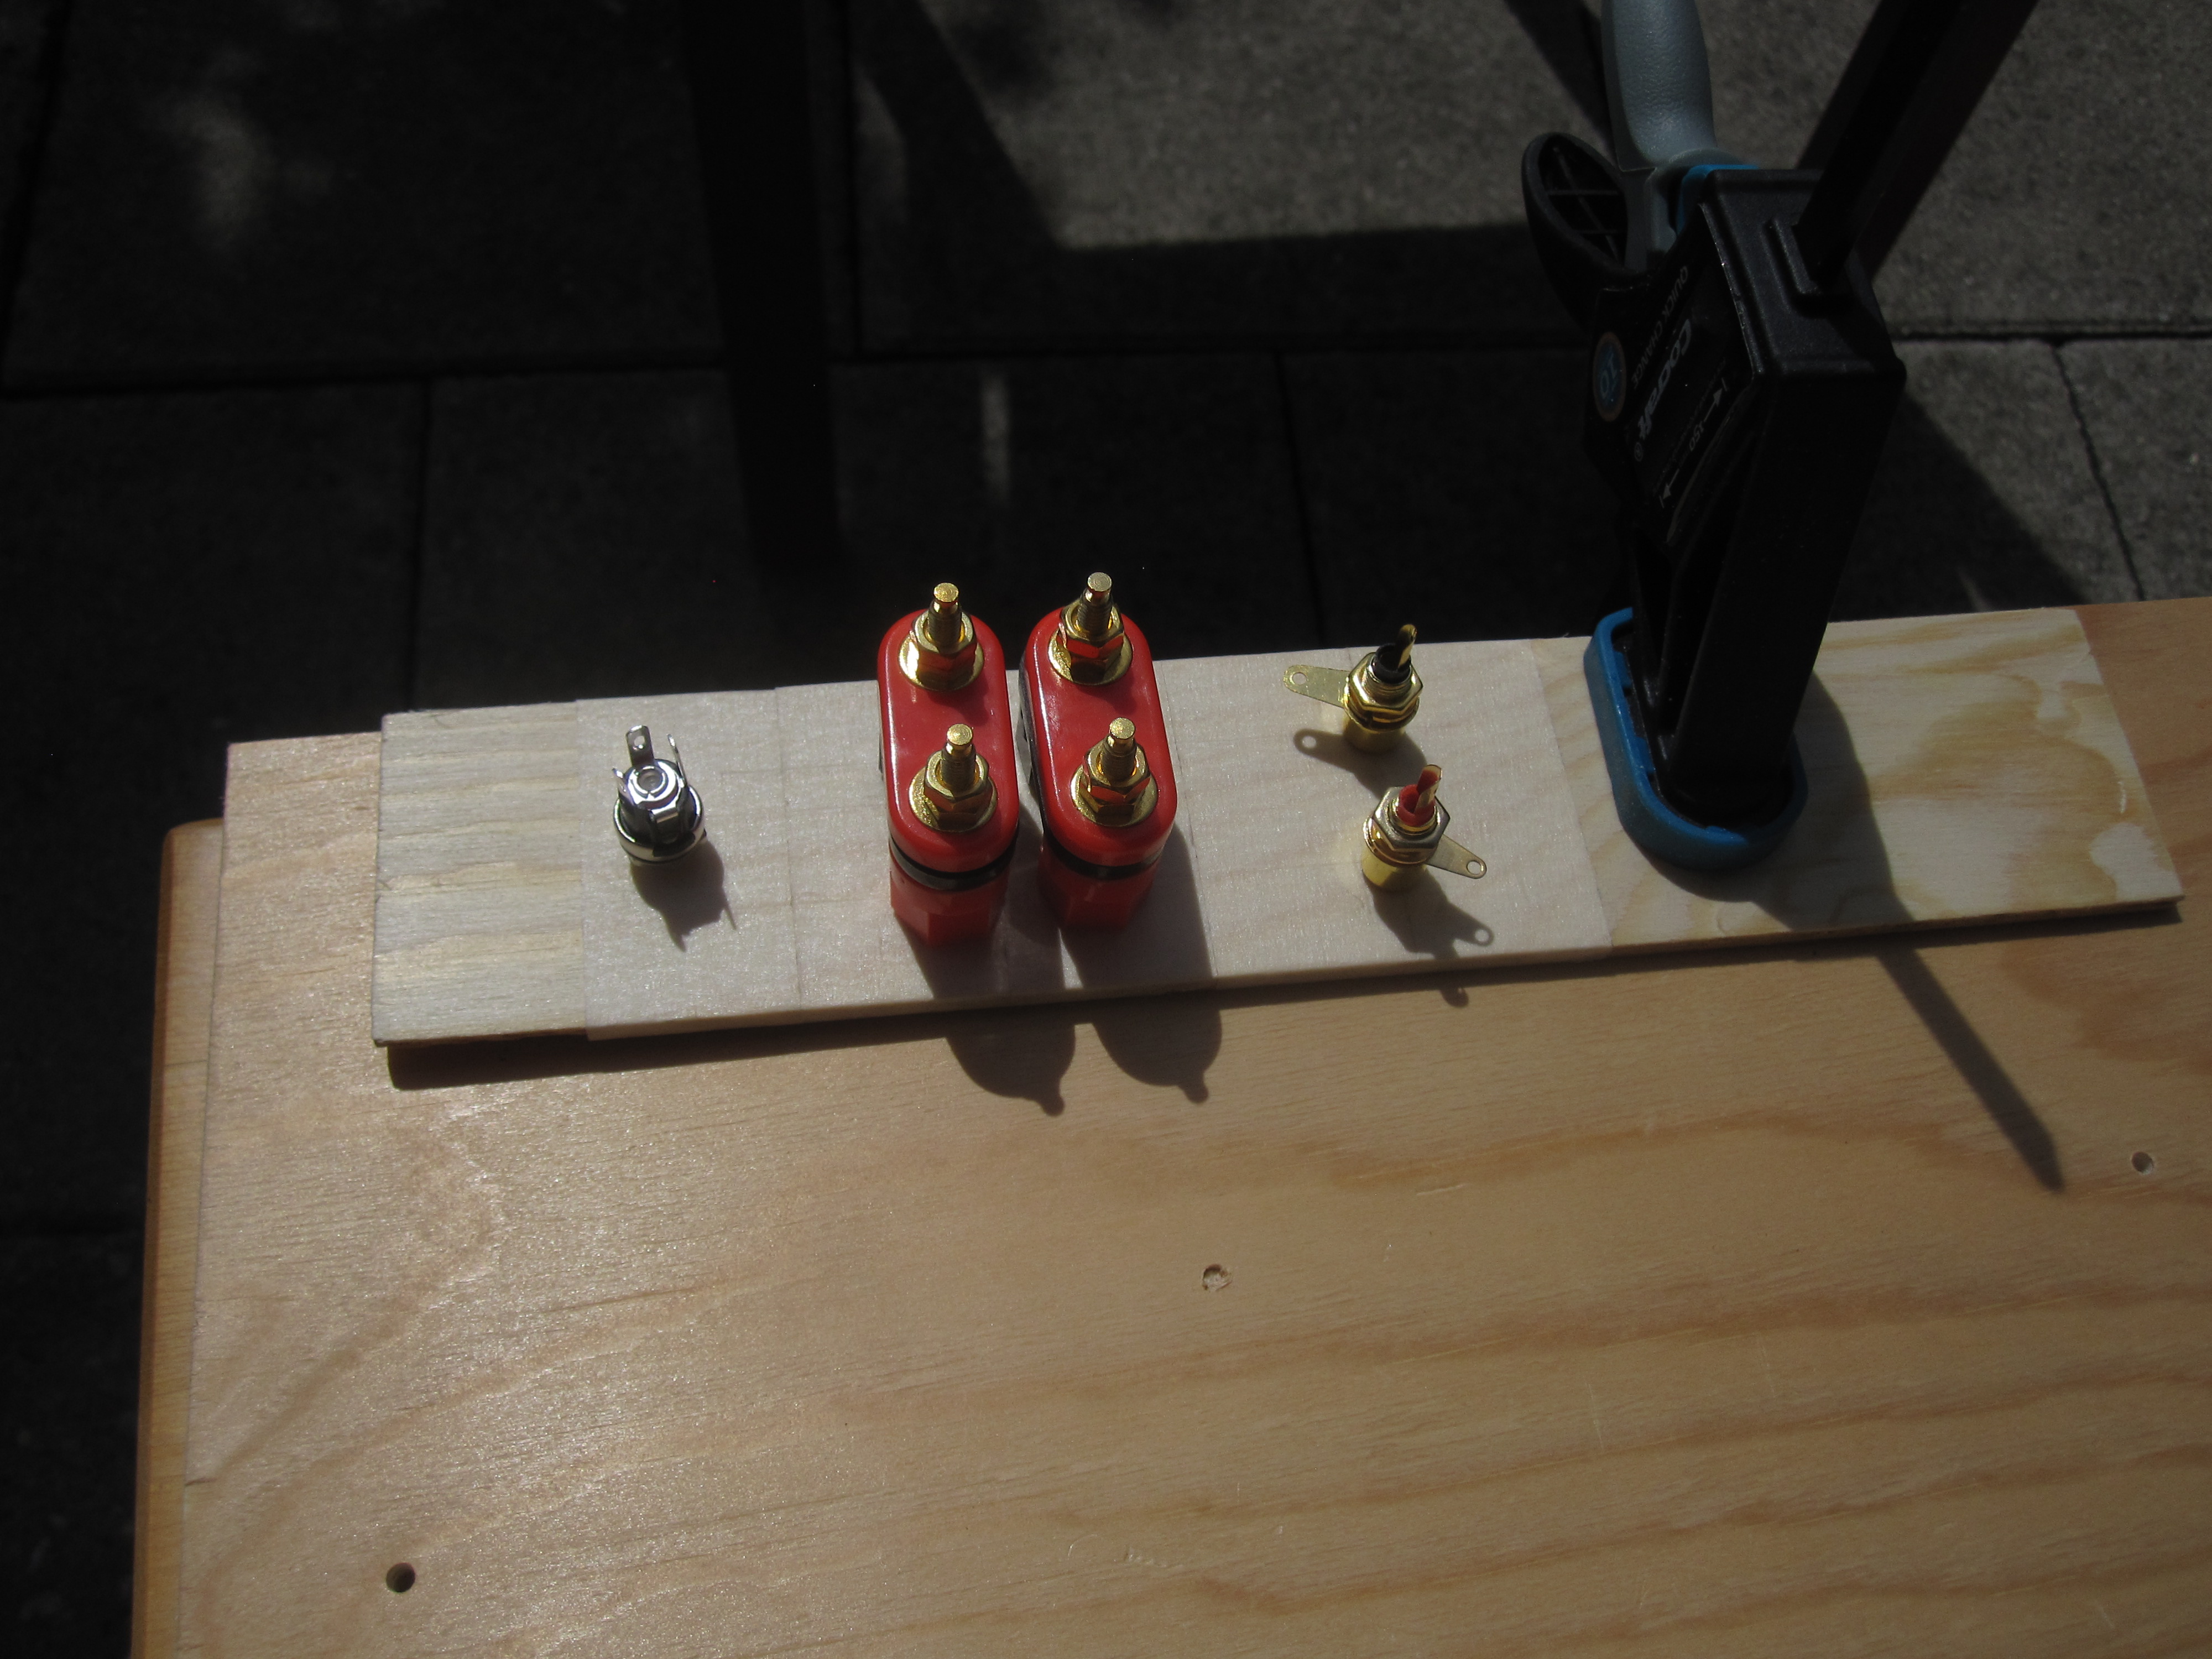 |
Then I had to make a rather large cut out in the box. I marked out a rectangle, drilled holes in the four corners and put the saw blade through one of the holes. The jigsaw worked great for this job.
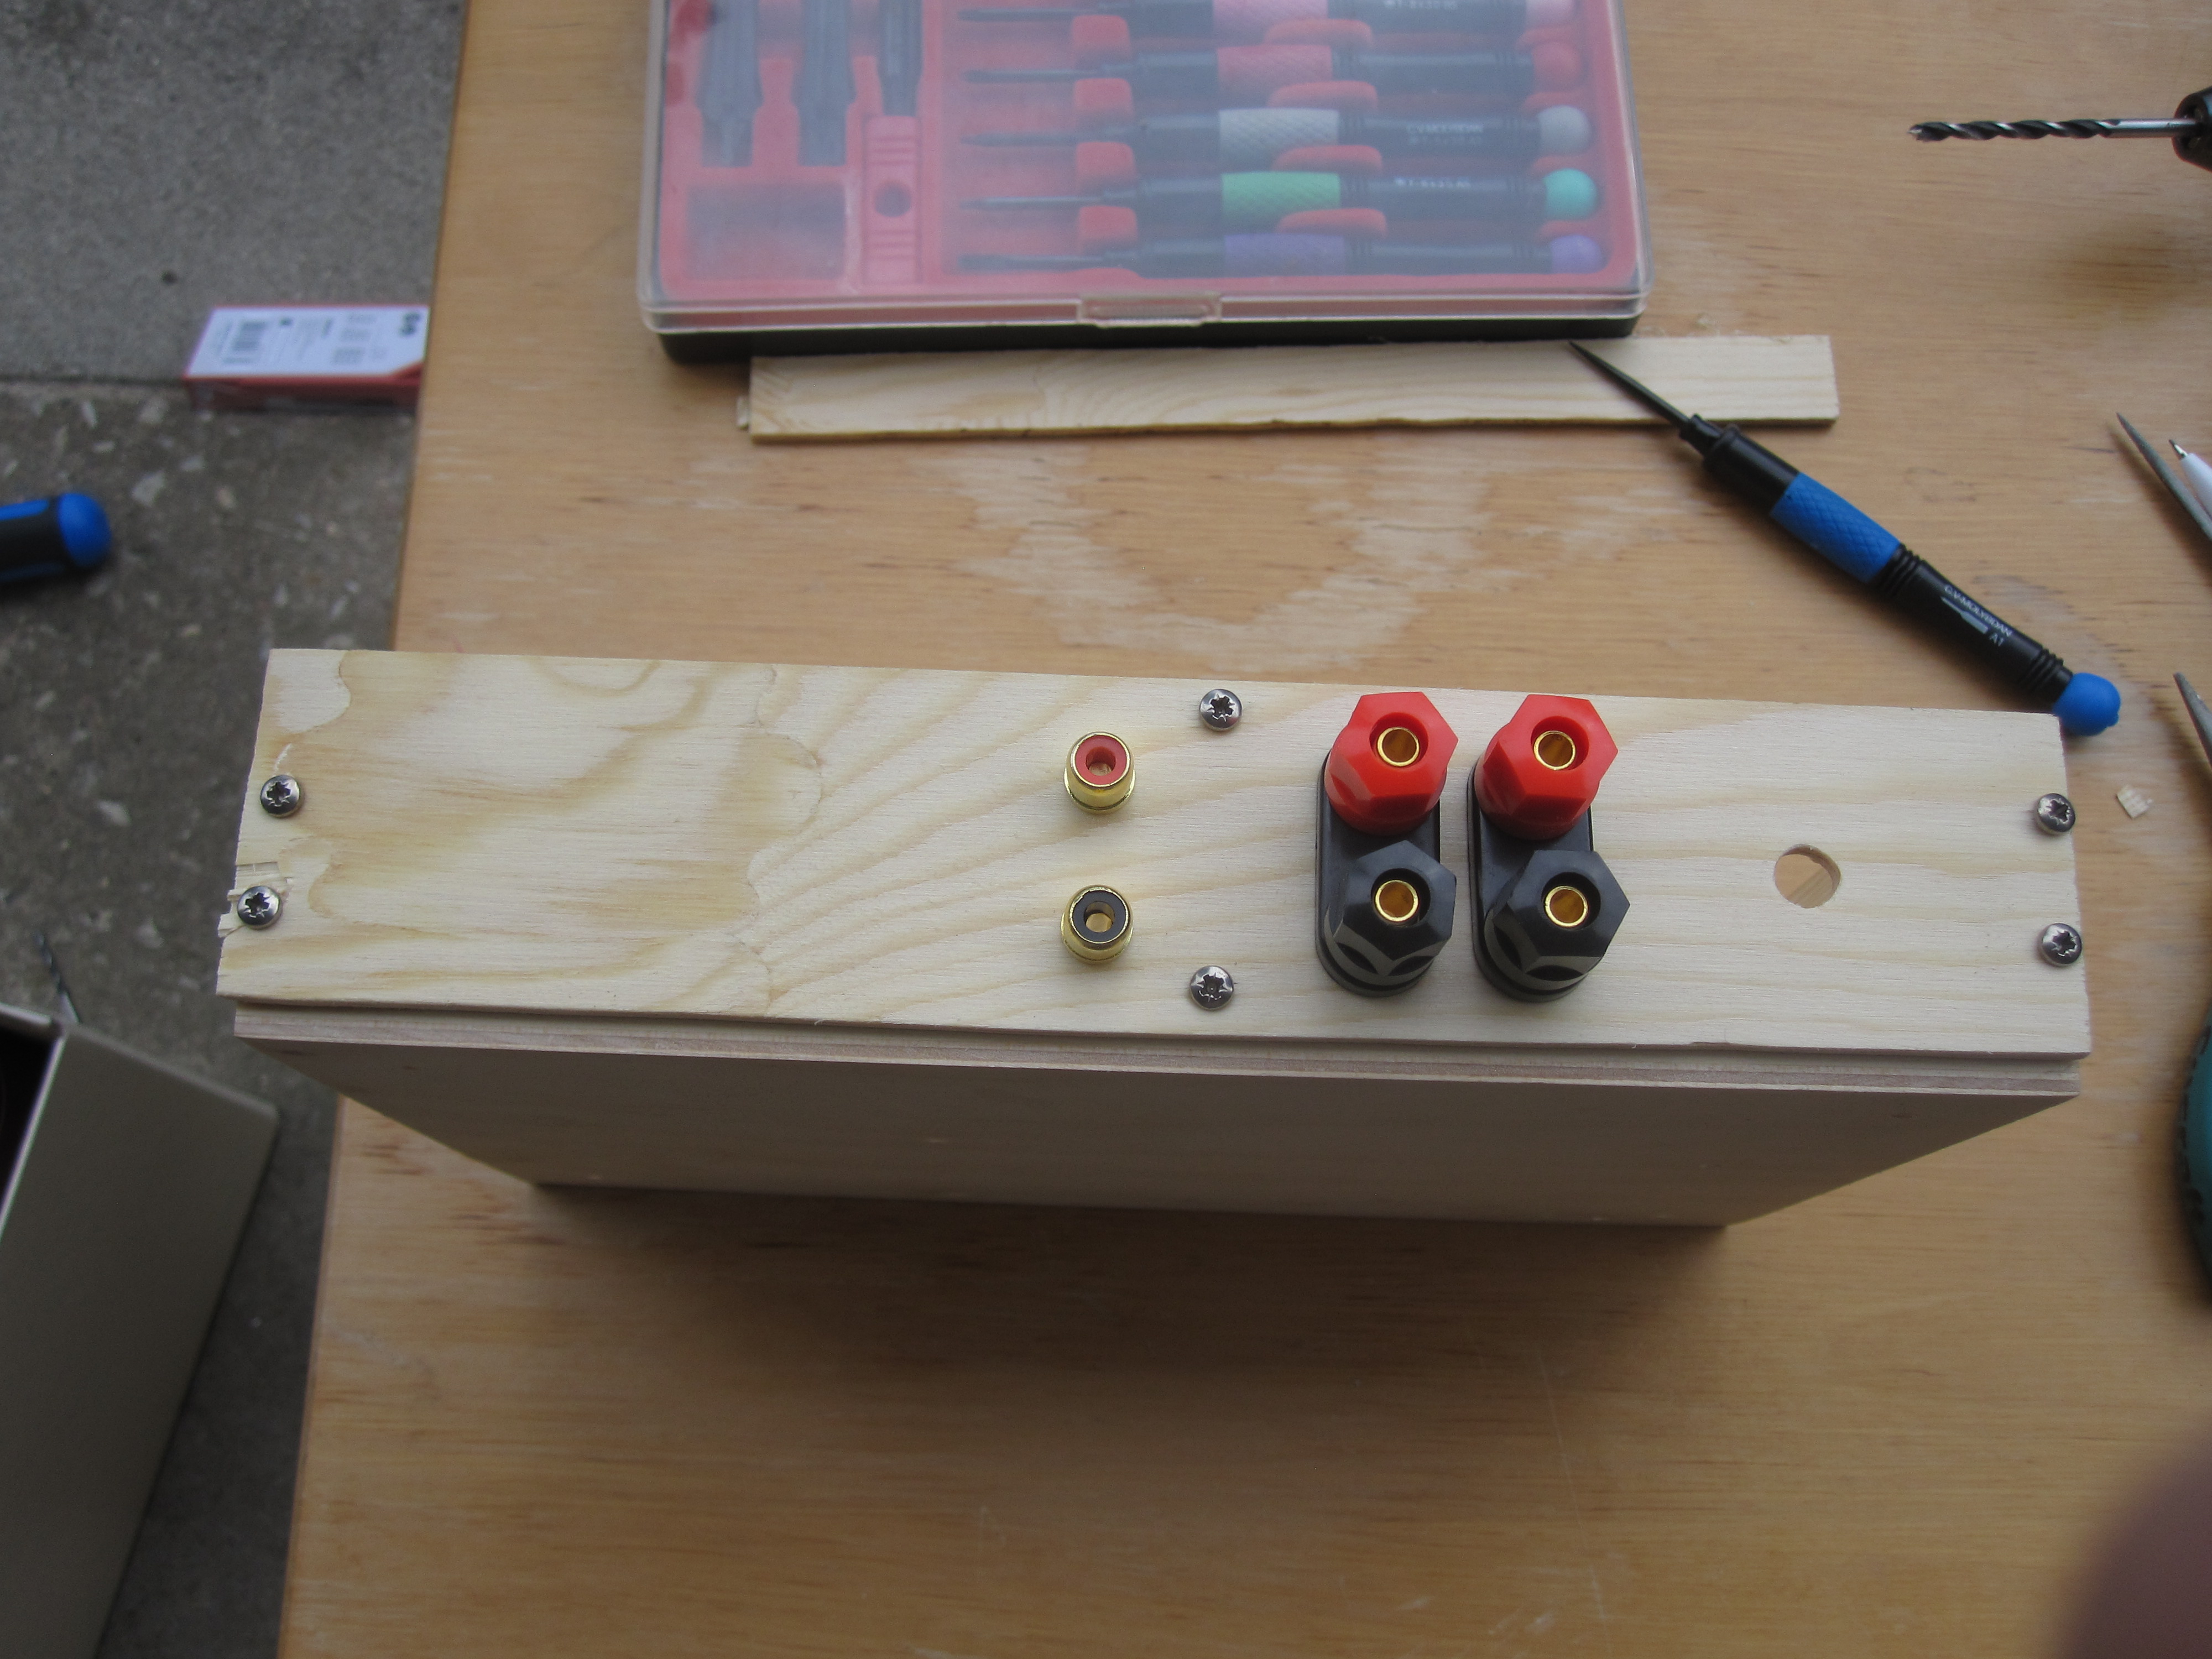
I had to carve out some additional space for the large speaker connectors and the RCA input jacks. This is how the back panel ended up:
I mounted it on the case using sheet metal screws, since they were the only ones the hardware store offered in a suitable size. To avoid hitting the nails that hold the case together I had to place the screws somewhat asymmetrically.
The screw mounted rubber feet I also got from Clas Ohlson. These are actually intended for furniture but I found them to be excellent appliance feet as well.
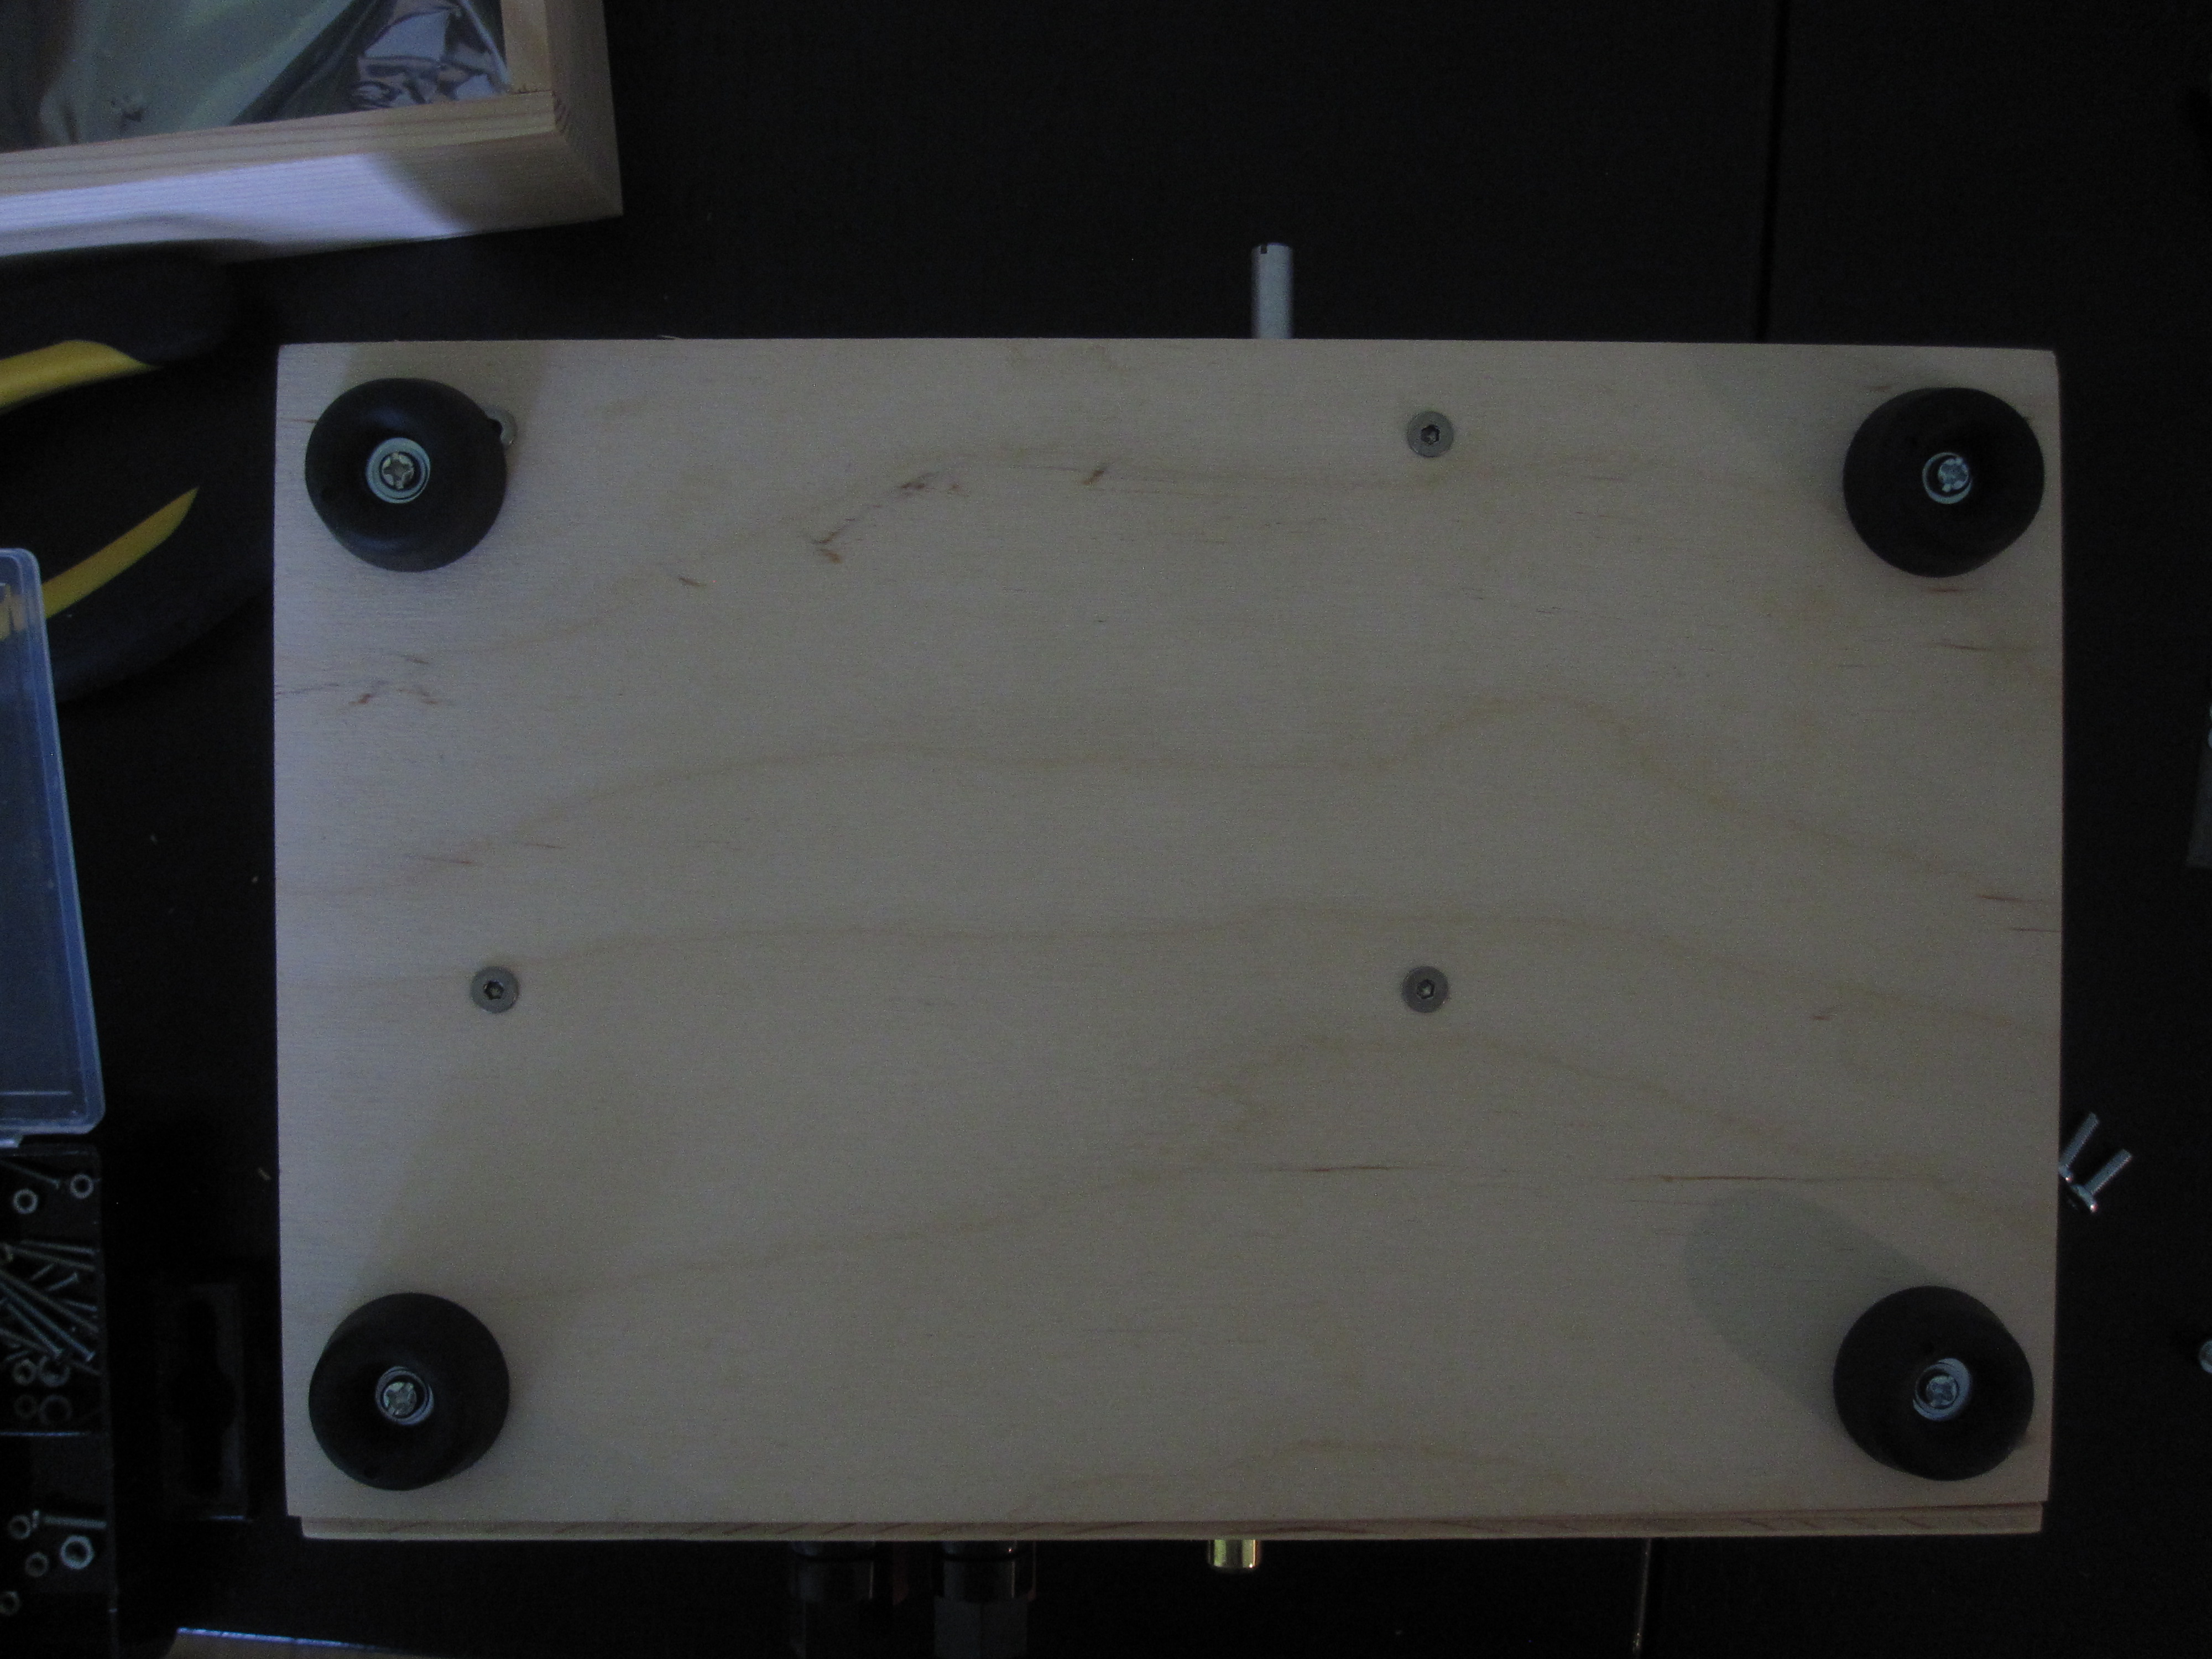
As you can see in the top left corner I made the rookie mistake of not accounting for the appliance feet when I laid out the screw holes on the bottom of the case. Fortunately, the screws holding the PCB are countersunk so the overlap didn't cause any issues.
Finally, here is the finished amplifier with the cover off:
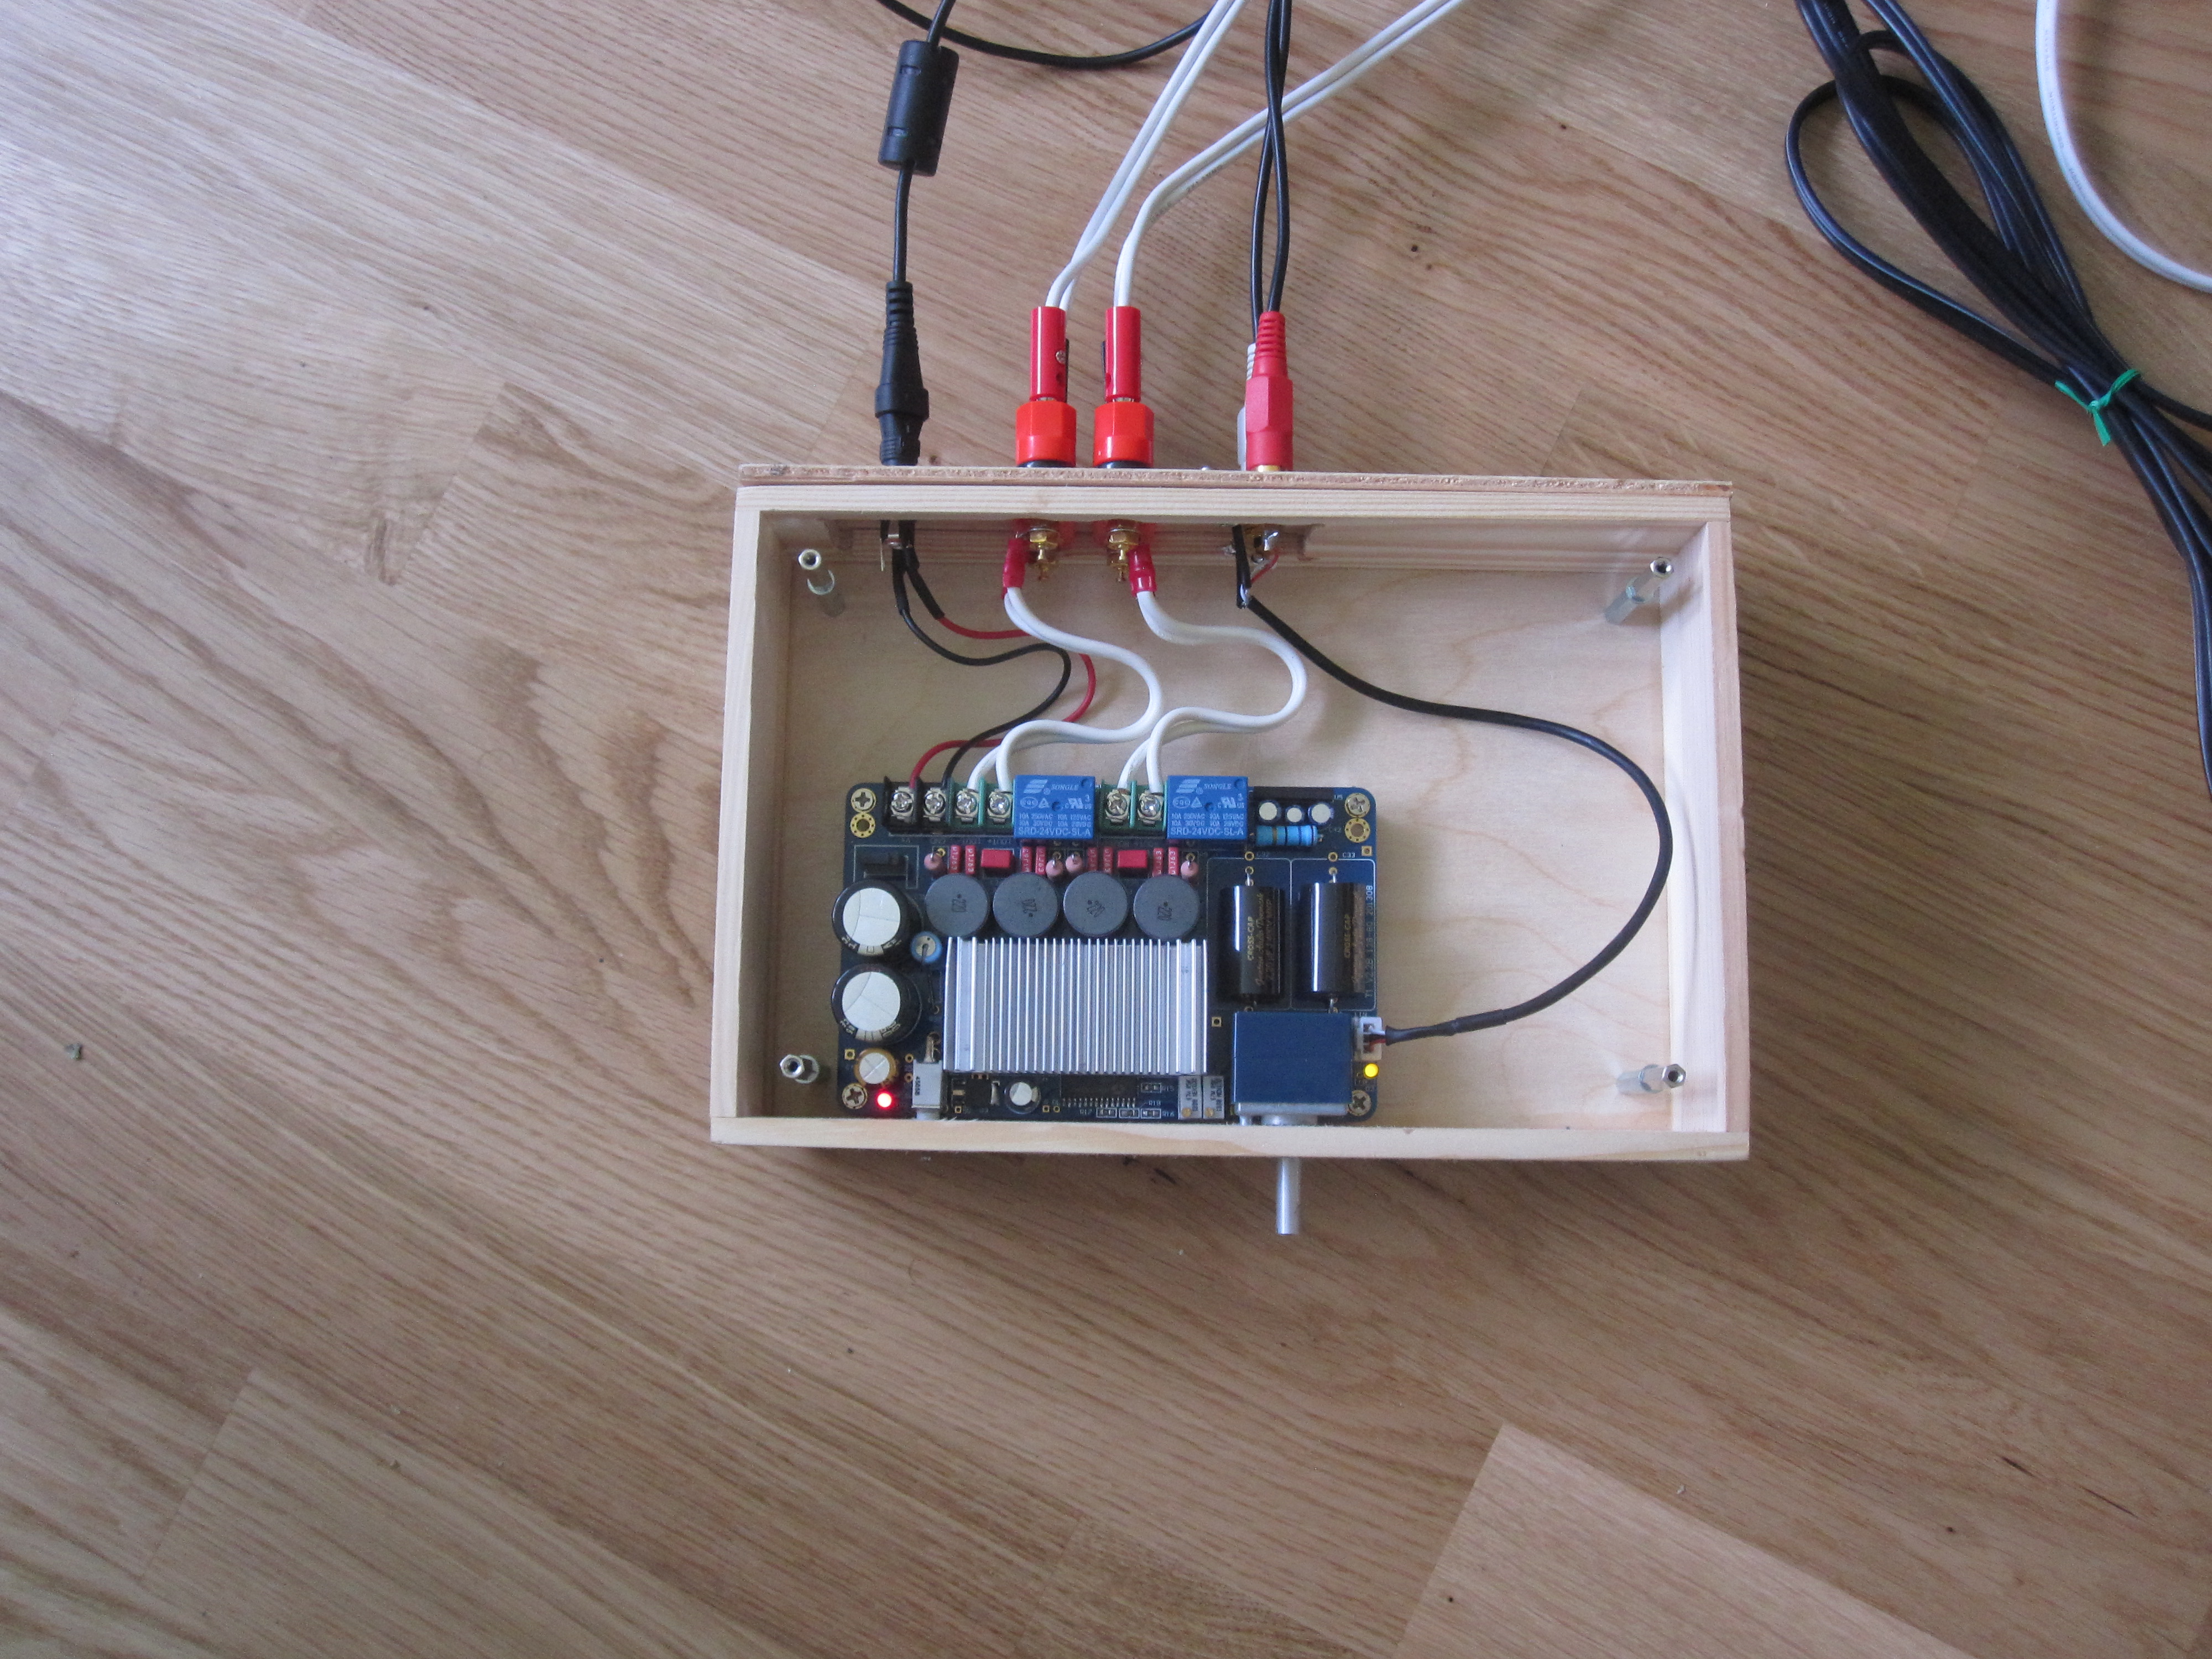
With the top cover on I used the amplifier for a few days to see if it worked and if I was satisfied with it. As the case would be completely shut I was a bit worried about heat dissipation. I borrowed an infrared thermometer from a friend to measure the amplifier temperature. After running it for an hour or so I found that the hottest parts on the board, the output inductors, reached about 50-55 °C. I think this is a bit on the hot side, considering that I might want the amplifier to remain functioning for tens of years if I like it. So I came up with a cooling solution, which I will describe in the next segment.
Update 2019: I never did write that followup segment. The cooling solution consisted of a grid of holes drilled in the top and bottom above the heatsink on the amplifier board. I'm not sure what difference it made in practice but in any case the amplifier has been working well for two and a half years now. I also oiled the outside of the wooden box to make it easier to keep clean. I've been quite happy with this project!
Update 2016-04-15: This guide is out of date. KF 2 server now requires Wine 1.9. I'll update this guide when I find the time.
Update 2016-05-19: See Containerized Killing Floor 2 Dedicated Server for an updated guide.
Introduction
Killing Floor 2 has a dedicated server program, but it is not yet available for Linux. However, the Windows version of the program runs perfectly well in a Wine environment. See its AppDB entry.
As this is a closed-source program which will run an Internet facing network server, it makes a lot of sense to try to contain it somewhat. Ideally, it should run on its own (containerized/virtualized/bare metal) machine. If you intend to run it on your regular PC, as will be covered here, it should at least run under its own user account.
This is mostly based on the guide Installing KF 2 Server on Linux with WINE at the Tripwire forums.
Preparation
Install a recent version of Wine. I used the official PPA for Ubuntu to install Wine 1.8.
Create a new local user account on the machine that will run the server, and su to it:
# useradd --system --create-home kf2server
# su - kf2server
--system makes it a system account which, among other things, will make it not show up at the login screen if you are using a full desktop environment. --create-home creates an empty home directory for the account. You may also want to use the --base-dir option to specify a different location for the home directory than the default /home.
Installation
Run winecfg once to create a Wine directory hierarchy:
$ winecfg
Use winetricks to install Microsoft Visual C Runtime 2010 in Wine:
$ winetricks vcrun2010
(Without it, the server would crash on startup with the error message "BugSplatRC resource DLL not found".)
Download SteamCMD for Windows. Extract the executable to .wine/drive_c/steamcmd/ in the kf2server user's home directory. Use the following command to install the server into C:/steamcmd/kf2server:
$ wine "C:/steamcmd/steamcmd.exe" +login anonymous +force_install_dir kf2server +app_update 232130 +quit
The same command is later used to update the existing installation when Tripwire releases a new version of the dedicated server.
Now run the server once to let it create its configuration files with default values:
$ wine "C:/steamcmd/kf2server/Binaries/Win64/KFServer.exe" kf-burningparis
Note that it is required to specify a map on the command line, otherwise Web Admin will not be accessible. To stop it, press Ctrl+C twice.
Configuration
Edit the configuration files to your liking (located in .wine/drive_c/steamcmd/kf2server/KFGame/Config/). See the Tripwire wiki page for details. I suggest only setting an administrator's password for the Web Admin interface, and doing the rest of the configuration there.
Automatic start/stop
On startup the server checks if it is connected to a controlling terminal. If not, it attempts to start an xterm, presumably so that the user can see the console output even if they started the server by double-clicking it in Windows Explorer. This somewhat obstructs unattended startup of the server, for instance by a init script. One workaround is to fake a controlling TTY using the program unbuffer from expect (see also expect Ubuntu packages.
The following is a sample systemd service unit for the Killing Floor 2 Dedicated Server.
[Unit]
Description=Killing Floor 2 Dedicated Server

[Service]
ExecStart=/usr/bin/unbuffer /usr/bin/wine "C:/steamcmd/kf2server/Binaries/Win64/KFServer.exe" kf-burningparis

# The user account that will run the server
User=kf2server
Group=kf2server

# The server is stopped by sending it a SIGINT (Ctrl-C)
KillSignal=SIGINT
# This hides most of the fixme errors in Wine, which are harmless in this case and just clutter up the output
Environment="WINEDEBUG=fixme-all"

[Install]
WantedBy=multi-user.target
Place it in /etc/systemd/system/kf2server.service. Now you can easily start and stop the server using the systemctl command, as in the following example:
# systemctl start kf2server.service
# systemctl status kf2server.service
● kf2server.service - Killing Floor 2 Dedicated Server
   Loaded: loaded (/etc/systemd/system/kf2server.service; disabled; vendor preset: enabled)
   Active: active (running) since mån 2016-01-25 16:52:16 CET; 35s ago
 Main PID: 25624 (tclsh8.6)
   CGroup: /system.slice/kf2server.service
[...]
To enable automatic start on system startup, run systemctl enable kf2server.service. Happy fragging!
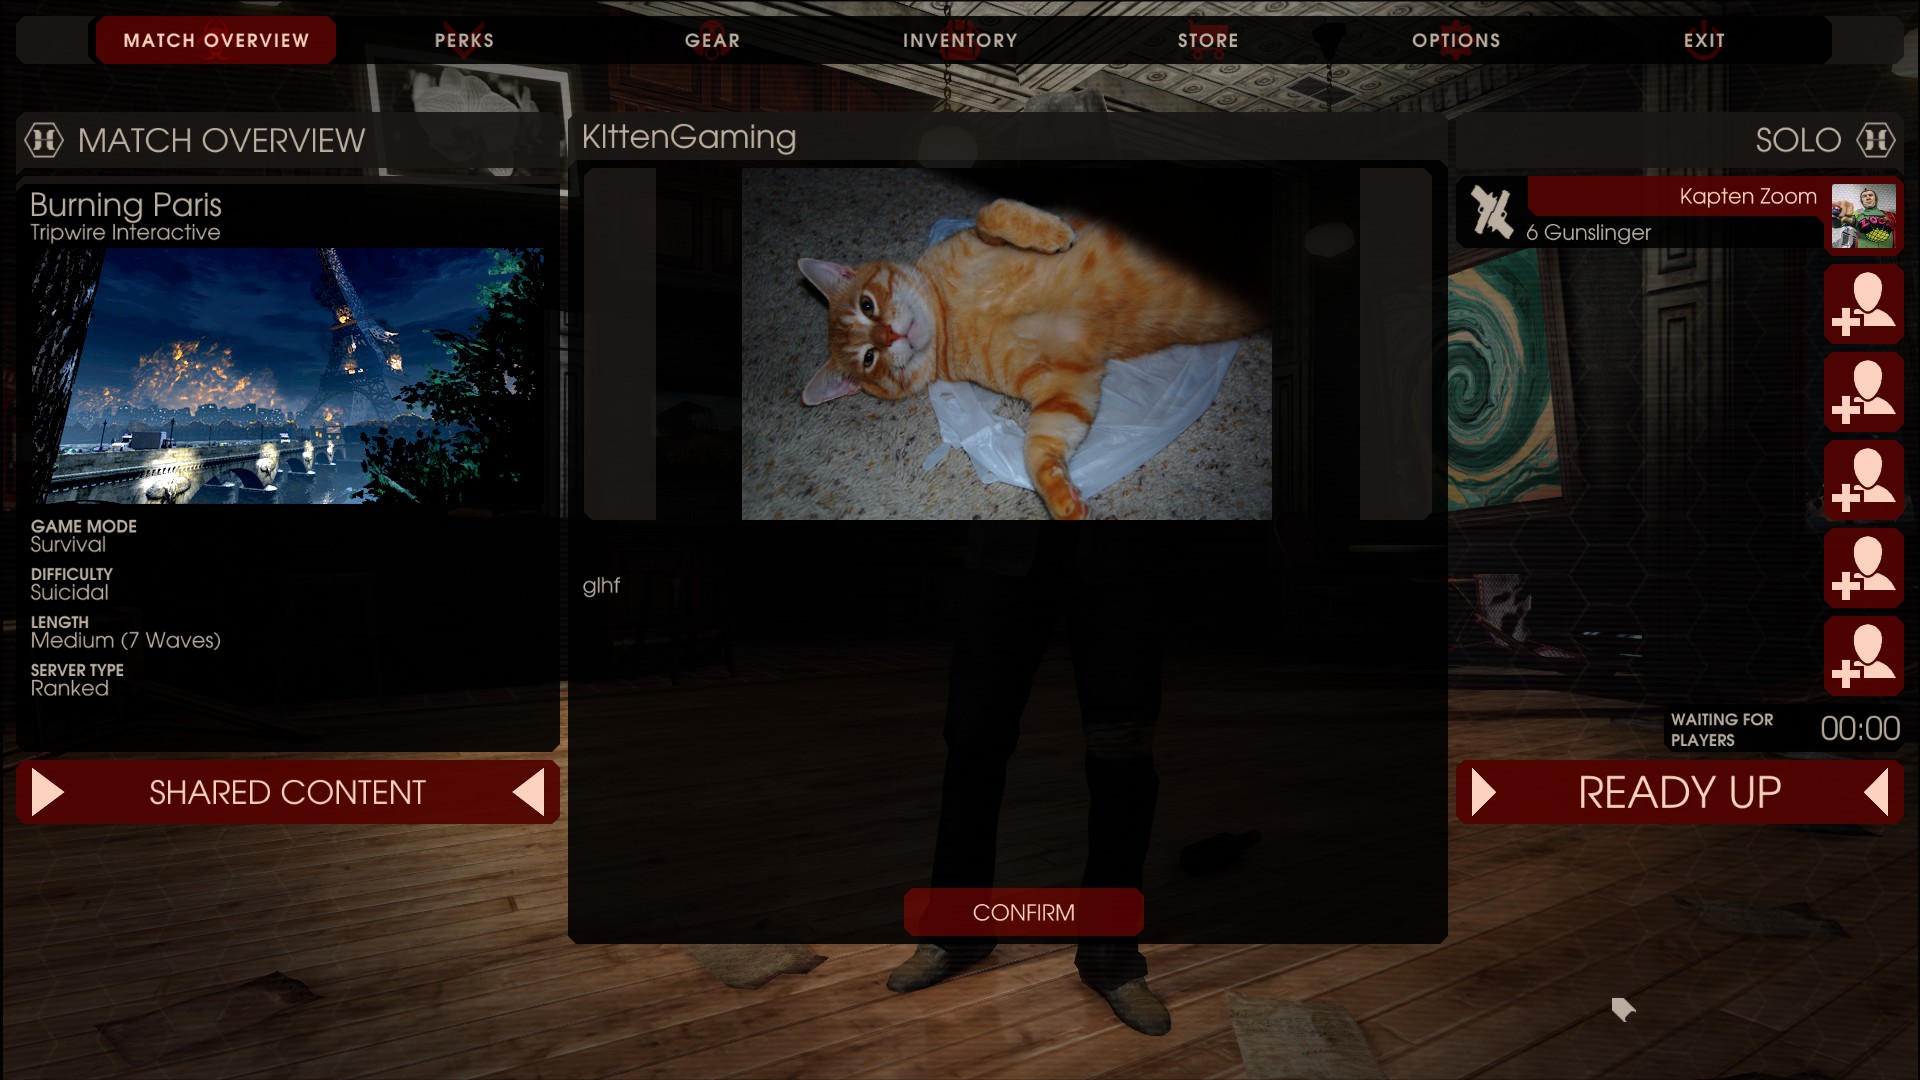
For my Killing Floor 2 server I made a stupid little PHP script that provides cute cat images for the welcome screen banner. It obtains cat images from The Cat API. Each image is cached for ten minutes before it is replaced with a new one, so that all players (who connect at roughly the same time) see the same image. The source code is available on Github and an in-game screenshot is shown below for demonstration.
In this article I cover my existing home audio equipment, what parts I want to replace in the near future and how I eventually settled for the HiFimeDIY T1, a DIY class-D power amplifier kit.
Background
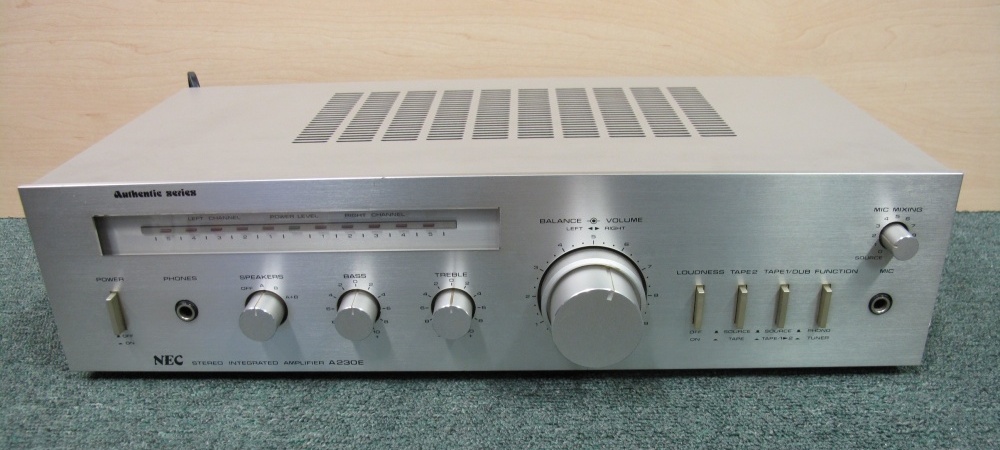
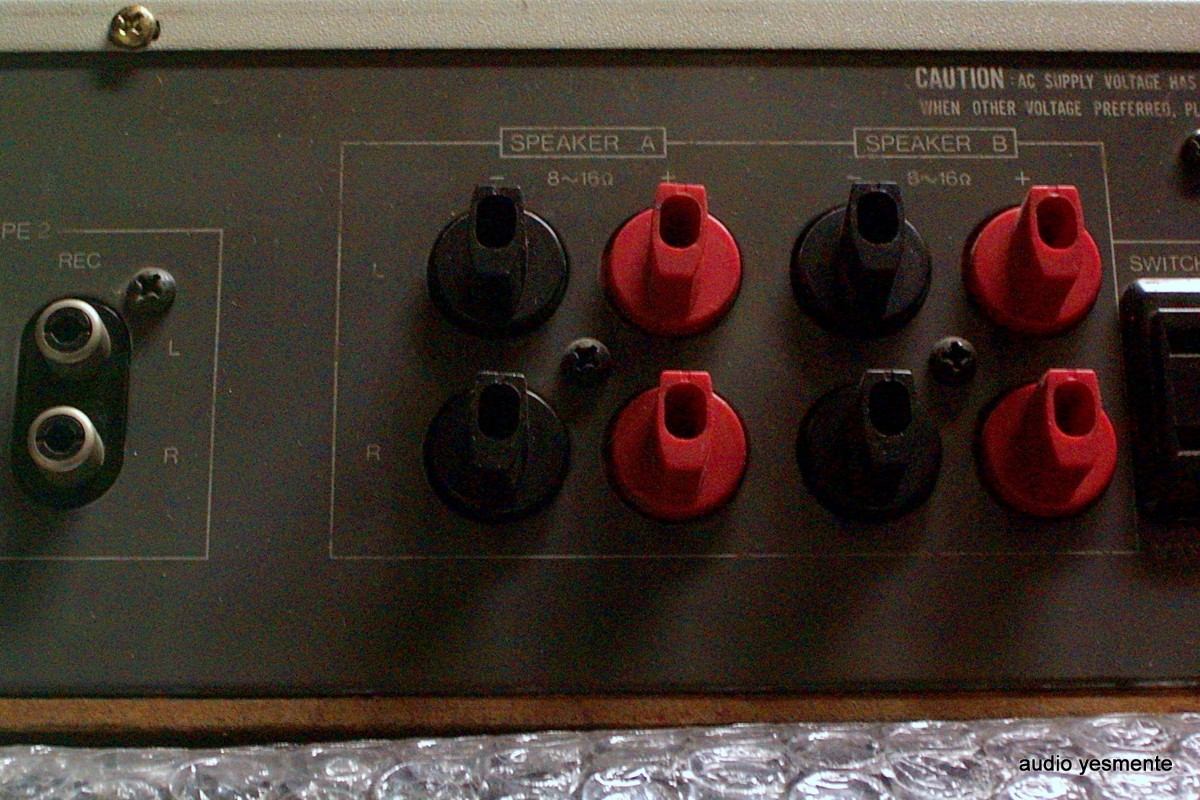
Recently I was in pursuit of a power amplifier for my home audio system. I already had an ancient NEC A230E from the 1970-something. The thing is huge, smells of old dust when it runs and doesn't have any connectors for the speakers. Instead the bare speaker cables are inserted into funny looking connectors that are twisted to clamp the wire in place. See the picture below. To make it easier to clean behind my TV desk I want all connectors to be detachable if possible.
I also wanted something smaller and simpler. I am a fan of buying technology in parts and assembling them into the system I want, as opposed to buying an integrated solution. That way I can get the best parts, for my current definition of best, and when I want to change some part I don't have to throw away the rest of the system. The flipside is of course that I have to research and understand every part, but I usually don't see that as a drawback.
I don't consider myself to have "gold plated ears" and I don't have grandiose thoughts about myself to use fancy words like soundstage or high-frequency roll-off. I am more sensitive to awful sounding audio than most people I know in person though. The things I've seen in PA systems during the years as a social dance course and event organiser would give an audiophile nightmares. Pre-amp gain turned up to 11, line level devices connected to phono inputs and VU meters blinking red on every beat of the music... next to an oblivious audio technician.
In short: If it sounds well I am happy. If it sounds poorly I get grumpy quickly.
Amplifier candidates
In the past five years or so a couple of class-D amplifier designs (see wikipedia) have become very popular. The most well known is probably the Lepai LP-2020 (A) which is based on integrated circuits by Tripath. This is a very cheap amplifier that has received mixed reviews. It is rated at 20 W / channel RMS, but that's with 4 Ω speakers and at 10 % THD. At 10 % THD a sine wave input looks basically like a square wave on the output and does not sound very harmonic at all. With 8 Ω speakers the amplifier can output about 5 W / channel at a more reasonable maximum 0.1 % THD (see references in the end of the article). 5 W per channel is probably enough for a living room setup, but I wanted some margin if I ever want to use the speakers somewhere else. People on the internet[citation needed] have also noted inconsistent build quality and amplifiers failing prematurely. So no Lepai for me.
HiFimeDIY T1-T4
I don't remember where I first read about HiFimeDIY and their Tripath based amps, but from what I've read they are very good and have excellent value for their price. ValueHifi.net has some information on their amplifiers and also build instructions and videos. If you want to buy a HiFimeDIY amp you might want to consider using his affiliate links. I intended to but then I, ah, forgot (sorry).
Their bare-bones amplifier boards can be found in the DIY section. T1 is their basic model that can drive a maximum of 100 W / channel into 8 Ω. T2, T3 and T4 are variations on the same design but with higher output capabilities. Some are optimised for 4 Ω (requiring higher current) and some for 8 Ω speakers (requiring higher voltage). There is also a lower power rated T1-M model which is half the price of the T1. However, it also sacrifices some of the nice features that the T1 has, like a fancy (ridiculously expensive) ALPS volume potentiometer as well as output relays protecting the speakers from pops during power on/off.
As DIY kits you get to complete them with a case, power supply and various connectors. I've never designed a case for an electronics project this big before so I figure this will make a nice exercise project.
A major selling point for me was that HiFimeDIY give away the schematics for all their amplifiers for free. As an open-source geek, this very much appeals to me. They also maintain stock in Europe (among other places) which makes shipping very convenient and quick.
In the end, I went for the T1. In the next article I'll cover initial testing of the amplifier and later I'll describe how I made a case for it.